Improving 3D Printer Quality by Adjusting the Temperature
/
For a while now I've been trying to improve the quality of prints from Una the Ultimaker. I've replaced quite a few bits and bobs here and there and she is now pretty reliable. But I've been having problems with "lumpy layers". Objects with flat sides end up having lots of ridges in them, as if the printer was laying down layers of different thicknesses.
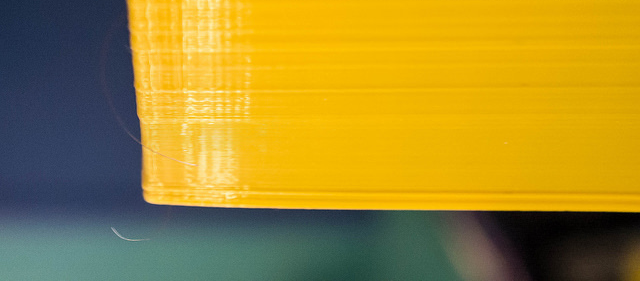
You can see the effect above. The layers at the bottom of the print are nice and smooth, and then they suddenly become thicker and more uneven. This is not a huge problem but, me being me, I've been trying to figure out what causes it, particularly as earlier prints didn't seem to have the same problem.
Turns out that it is all down to temperature. I used a plugin which is part of the Cura slicer which converts designs into printer instructions. The plugin lets you tweak printer settings at different heights during printing. The layers at the bottom of the print were printed at 210 degrees centigrade, then it switched to 215 and so on upwards in steps of 5 degrees. The effect of the changes is much more significant than I thought it would be. I've noticed that different makes and colours of printing material have quite different temperature profiles. I think I'll have to do a test print like this for each one and then set decide on an optimal temperature.
Oh, and I also managed to include a human hair in the picture so that you can get some idea of scale. It really is astonishing how precisely this technology can be made to work.
Update: One thought occurred to me after writing this post. The temperatures I'm quoting are as reported by Una, and are probably unique to her (it) as different machines will have different arrangements of print head and temperature sensor. If the temperatures that I mention don't work for you the try different ones, the important point here is that it is worth calibrating your machine for each different material.
