Red Nose Day Presentation Video Now Live
/This is the Red Nose Day presentation in super-duper widescreen and high resolution and also starring a bucket of money. Which has all the best lines. Watch out for the bit where the cameraman falls asleep.
This is the Red Nose Day presentation in super-duper widescreen and high resolution and also starring a bucket of money. Which has all the best lines. Watch out for the bit where the cameraman falls asleep.
The video shows my Air Quality Hat in action. (still time to donate at https://www.justgiving.com/fundraising/lecture-in-rhyme )
This how I made my Air Quality Top Hat. It’s actually more of an Air Quality belt really, in that the sensors and the lights are attached to a strip of webbing which can then be fitted around the hat. I’ve made it slightly too long, so that it can also be turned into an Air Quality belt if you prefer.
Click on the image for a large version on Flickr
I’m using a Wemos D1 Mini and a Winsen ZPH01 particle sensor. The sensor will detect 2.5 micron particles but it’s not super stable (mind you - it is very cheap). For the light display I’ve added a strip of NeoPixels.
The wiring is just point to point, with some wires twisted together, soldered and then covered with heat shrink cable. The ground line is connected to the grounds on the pixel strip, the Wenos, the ZPH01 ground and the ZPH01 control line to pull that line low and request that the sensor sends serial data out of the TX line. The 5V line from the WEMOS is connected to V+ on the ZPH01 and the V+ of the NeoPixels.
The data line of the NeoPixels is connected to D4 on the WEMOS which is actually GPIO2. I’m using a lovely pixel library from Makuna which uses the onboard UART on the ESP8266 to drive the pixels. This forces them to be connected to GPIO2.
I’m using a specially hand tampered SoftwareSeral driver to get the sensor data, which is read on GPIO12 which is exposed as D6 on the WEMOS device.
The device is powered by a short usb cable that I’ve plugged into the WEMOS and then taped in place. I can use a USB extension lead to program the Wemos and plug it directly into a usb power bank to power the whole thing.
Rather than find a plug and wire up a cable, I’ve actually soldered the wires directly to the back of the sensor. I’m not proud of this, but it does seem to work. The Air Quality sensor and the Wemos are secured to the belt by double sided adhesive foam.
The software I’m using is an early release of my Monitair software for Air Quality sensors. You can find the “Top Hat” version on GitHub here.
If you want to really impress someone just tell them this:
“If you want to use MQTT with PubSubClient and talk to an Azure IoT Hub over secure sockets you should use Version 2.4.2 of the LOLIN Wemos framework or your program will crash when it runs out of memory during socket open.”
Then again, it might just be me that would be impressed by this.
There comes a point in a project where things start to look real. I think we’ve hit that in our Air Quality monitoring project. At the Connected Humber hardware group this evening Brian gave out some populated versions of the sensor circuit board he’s designed and had made. Rather than making all the individual connections by hand we now have a beautiful little board that takes our processor, some power supply and switching circuitry and sensor connections.
It’s very pretty. The next step is to marry it up with our housing designs and start putting sensors into the hands of our waiting test users.
Exciting times.
If I ever join you climbing a mountain, I’ll probably be the one wearing roller skates and carrying a piano.
Sometimes it seems to me that I have a stubborn determination to do things the hard way. For example, today’s task was to create some designs for an outdoor air quality sensor. I wanted a circular fitting to go in the base of a pipe and a support that would attach to the fitting and hold the processor and air quality sensor.
Some people (I think I call these people the “sensible ones”) would reach for their CAD tool and begin designing. Not me though. I reached for my Python interpeter and the ezdxf library that lets you write Autocad files from your code.
I wanted to use the “nut holder” approach to fitting where the laser cut plastic (which is what I want to make the stand out of) holds nuts that a bolt engages with to grip it. I’ve used these on the Hull Pixelbot quite successfully. I was quite proud of the “nut holder generator” that I’d written for the Pixelbot, it even makes each change of direction into a tiny curve, which apparently reduces the chances of the plastic cracking after it has been cut. However, my original code only drew the holders in one direction, whereas for the holder I wanted to put them all around the edges of a circle, as shown above.
Cue lots of bits of paper covered in drawings of triangles, sines and cosines and cursing over code. Eventually I managed it though, and the next step will be to get the plans cut into plastic so that we can make some sensors.
I’ve got the web based configuration for the Monitair working quite well now, but it is a bit of a faff to use. You have to connect to the WiFi access point served by the Monitair device and then navigate to the web page it is hosting.
If you have got the device connected to your PC, perhaps to download the software, it would be nice if you could configure the settings via the serial interface. Well, you can now. I’m using the same data source as is used to generate the web page, and I’ve added some useful commands as well. Now you can set any of the values in a device straight after programming it, which is rather nice.
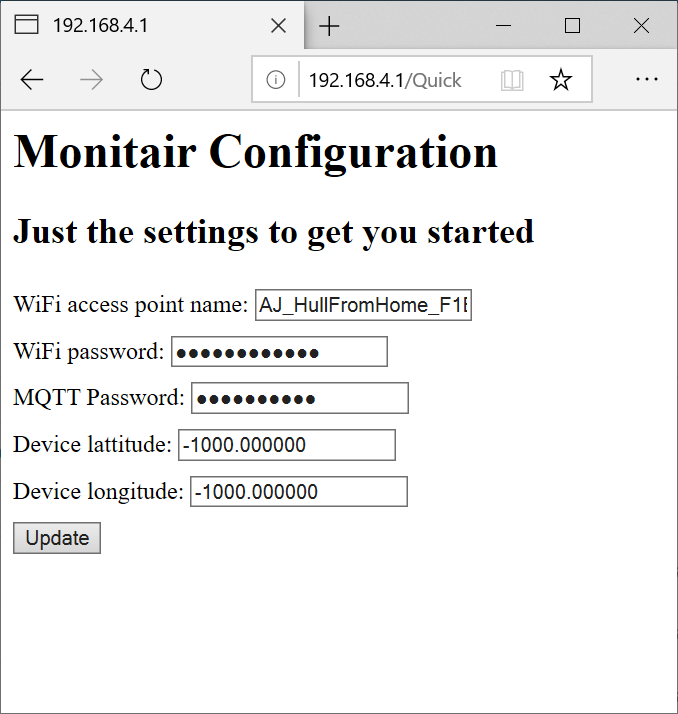
The new configuration web page for the Monitair sensor is taking shape. Above you can see the “home page” that the sensor displays during setup. Rather than having one enormous page of settings we now have links to sub-pages which contain different setting categories. The page is generated from a data structure so that it is very easy to add new settings.
These are the simple settings for the device. You can leave everything else at the default values and the sensor will just work on the Connected Humber MQTT broker. The only things you really need are WiFi connection details and the MQTT password. If you happen to know your location details you can put them into the form so that the sensor readings can be displayed on the map. When you click Update the settings are written into EEPROM on the device. You can use the advanced configuration pages to select things like the hardware pins that various peripheral devices are connected to. I’m rather enjoying writing this…
After an awesome hardware meetup at c4di tonight Robin and I went on to a meeting of Cottingham Parish Council. We were there to talk about Air Quality, something we are quite passionate about - what with us having done quite a lot of breathing over the years.
As it happened they were discussing an air quality issue just before we were introduced, which gave us a lovely context in which to describe the work of the Connected Humber Group on designing, making and deploying sensors around the area.
Everyone was very interested and I it looks like we’ll be working together in the future on this, which is lovely.
The coloured fountains in Hull city centre look lovely.
Every now and then I get to do the newspaper review for the Radio Humberside breakfast show. It means getting up at stupid o’clock in the morning but it is rather fun. We talked about a bunch of things, including Air Quality, which was actually in the news today. Apparently the air in London Underground tunnels contains dangerously high levels of particulates (just the things we are measuring with the sensors that we are building at Connected Humber). According to the standards that we’ve been using, things get unhealthy when an indicator value we are measuring goes above 60 or so. The values they are seeing in the deepest stations are around 450….
The bit that took my breath away (really) was that someone actually said something like “Although the levels are high, it doesn’t matter because people don’t spend a lot of time on the tube”. Unless, of course you happen to drive a train or work in the station…..
I spent a big chunk of yesterday trying to create a Heltec Lora 32 part for the Fritzing design program. In the process I learned quite a bit about SVG files, Inkscape and pcb design. So I don’t think it was a complete waste of time….
Tomorrow I’m going to try and figure out how to add my newly created part to the Fritzing parts library. Then I’m going to make Fritzing parts for the sensors that I’m using and then I can draw some lovely circuit diagrams.
One of the problems with any WiFi enabled device is the initial configuration. How do you tell your device the settings for your WiFi when you can’t talk to it via WiFi? It’s a “chicken and egg” situation, even though it doesn’t involve any chickens or eggs.
One answer is to make your device set up as a WiFi access point of its own, and then connect to this from a WiFi enabled phone or computer to configure all the settings. There are quite a few libraries of routines out there that will help you do this, but none of them did exactly what I wanted, so I’ve built my own.
You can see the configuration screen it generates in the screenshot above. You connect to it via your browser and then fill in the various options. It has support for five different access points and also lets you configure all the MQTT settings for a sensor as well.
I’ve got it working with my MQTT Mini Air Quality sensor. To configure the WiFi you simply turn the sensor upside down, plug it in and it starts up in “configure” mode. You then connect to the access point and perform the configuration. Then flip the sensor the right way up, restart it and away you go.
I’m very pleased with how well it works. I’ll have the code for the new, super configurable MQTT Mini device on GitHub before the end of the week. Then I’ll port the configuration mechanism over to larger, ESP32 based sensor.
Great fun.
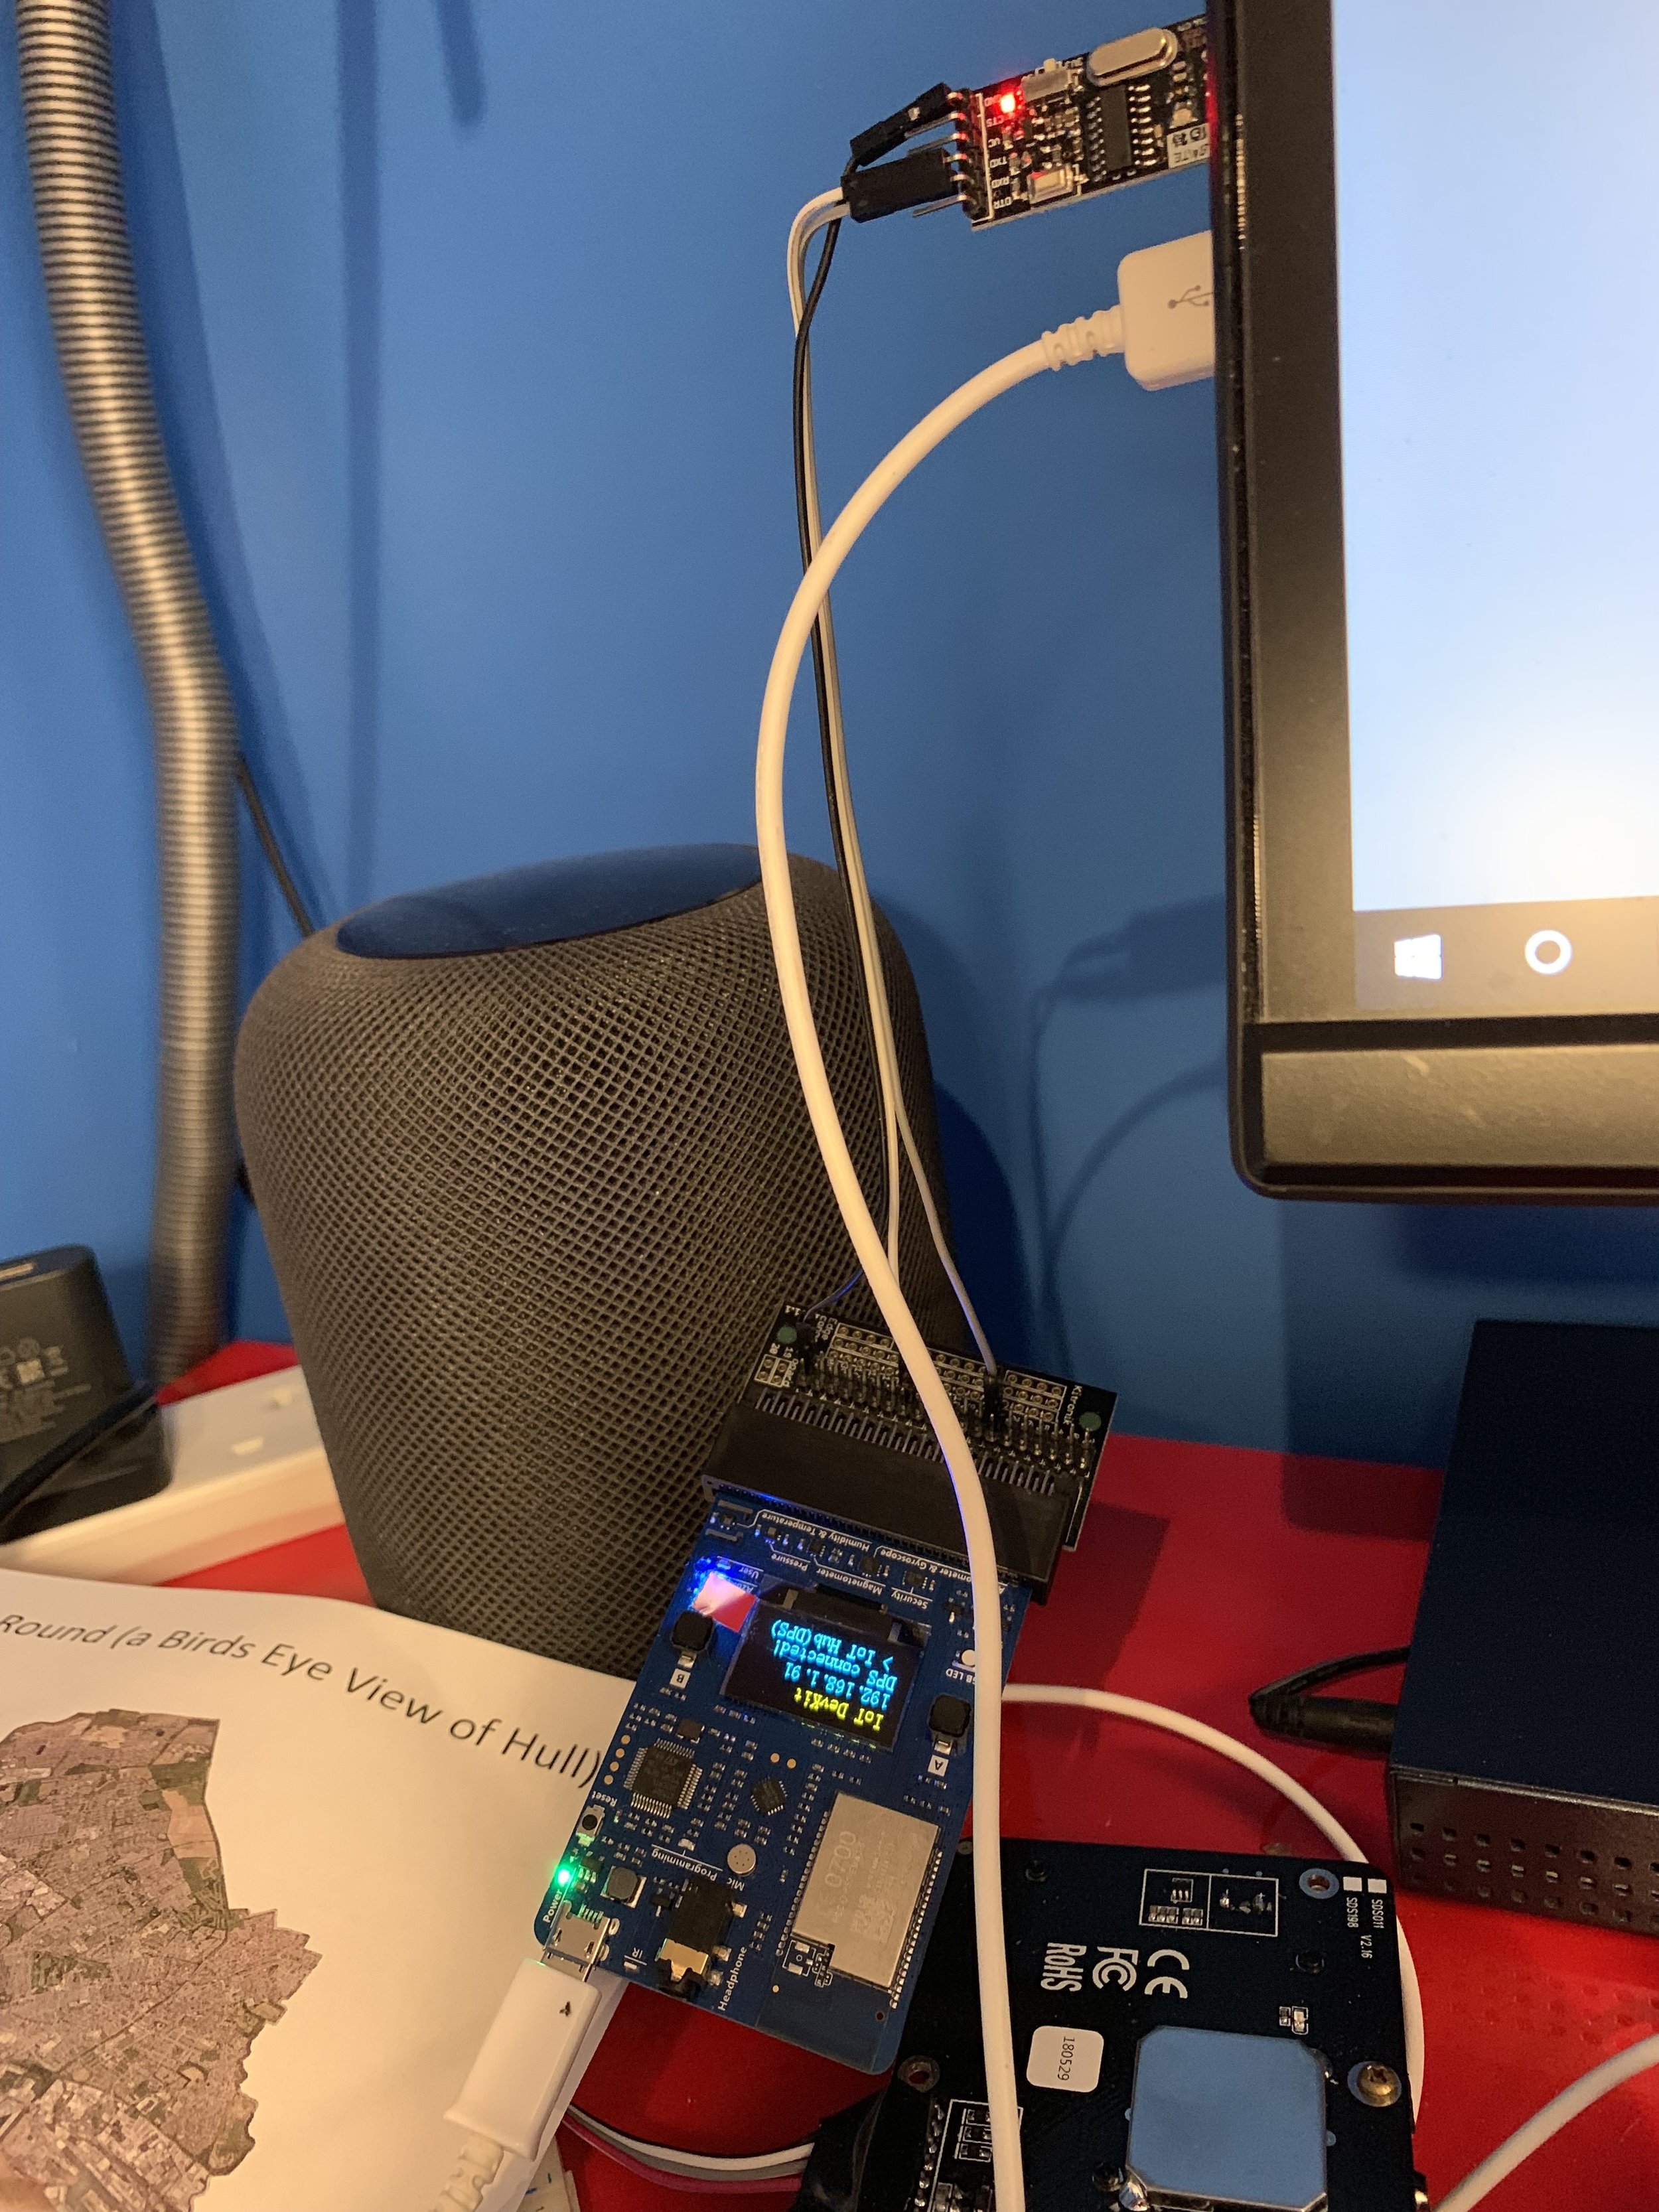
For some time I’ve been trying to create an Air Quality Sensor using the Azure IoT Developer Kit. It’s a nice little device that has a bunch of environmental sensors, a nice OLED screen and a couple of buttons. It is also properly secure, in that it contains secure storage and you can validate access using X500 certificates.
I like it a lot, but I’ve not been able to use it for air quality work as I couldn’t get the second serial port to work on it. This is important because the air quality sensors that we are using deliver their readings over a serial connection. I’ve tried doing what the documentation says to do but it just didn’t work.
I posted a question about this on the GitHub repository for the kit and got a response indicating that what I was doing should just work.
But it didn’t.
So I had a proper look in the code in the device SDK. After a bit of digging I discovered that two of the source files are missing statements that make the second serial port available to Arduino programs. The file Variant.cpp needs the statement:
UARTClass Serial1(UART_1);
..and the file Variant.h needs the statement:
extern UARTClass Serial1;
Then it does work. I’ve tested it and everything. The picture above shows my cunning test rig, using a USB to serial adaptor that I wired to the devkit. If you’re connecting the device using a MicroBit connector you will find that pin 1 is TXD and pin 2 is RXD.
I’ve put the changes into a fork of the devkit sdk that you can find here. I’ve also told the developer team about my fix, so that it should appear in the “proper” version soon. I’m very pleased to be able to contribute a tiny bit to the development of the device. I feel like a grown up programmer…..
The only problem I have left to solve is that my Air Quality sensor needs a 5 volt power supply. While the USB connector on the Developer Kit board receives this from the host device the power connection is not surfaced anywhere on the board. I can see why this is: you wouldn’t want people inadvertently sending 5 volt signals into the input pins, but it means that my wiring is going to have to be a bit more complicated than it might be.
Anyhoo, I can now start porting my Air Quality Sensor code into the Devkit, which is nice. I’m also going to make a little box for it too.
If you woke up with an urge to create an Air Quality sensor out of either a Heltec or a Wemo device then I’ve got good news for you. You can download all my software and hardware designs from here. You can make sensors that use LoRa in OTAA or APB (these will make sense if you know LoRa or go to my talk later this month). You can also use MQTT to talk to Azure IOT Hub or another MQTT broker including Mosquitto.
All configuration is performed using JSON messages that can be sent via the serial port or over the air. It is very easy to configure a device, no need to re-burn the software each time you want to deploy another sensor with a different name and network configuration.
I call this a “shirk in progress” release, in that I’ve been too lazy to release any new versions for a while. However, I'm now using this as my main development repository and so you can expect updates, including more detailed documentation, over time.
The video shows me pressing a button on my Air Quality sensor to trigger the sensor to send a new reading via MQTT. The action then switches to the output of an Azure Function running on my PC which is responding to this. I’m very pleased with this.
MQTT (Message Queuing Telemetry Transport) is a neat way to connect embedded devices together. I’ve used it to talk to the Hull Pixelbot devices over the internet using Azure IOT Hub. Using MQTT in this way has meant that my server applications can send commands to the robots to tell them what to do, and also receive messages back.
Creating a server application is all very well, but it is a bit too much like hard work for me when I’m writing code for the Air Quality sensors. In that situation I don’t really want to have a server application sitting in the cloud twiddling its digital thumbs while it is waiting for incoming messages.
What I really want is a way of connecting a lump of code (ideally a C# method) to the event “Hey out there. I’ve got a new Air Quality Reading”. It turns out that Azure Functions just do this. You deploy the function into the cloud and bind it to the Azure IOT Hub and the endpoint that you want it to listen to. And then, whenever your remote node (which could be anywhere in the world) wants to send a message it posts an MQTT update and your function runs.
This is my function at the moment:
[FunctionName("SensorMQTTReceiver")]
public static void Run([IoTHubTrigger("devices/#",
Connection = "IoTHubConnectionString")]EventData message, ILogger log)
{
log.LogInformation(
$"C# IoT Hub message: {Encoding.UTF8.GetString(message.Body.Array)}"
}
I stole most of how to do this from a very useful howto here. The next thing to do is add some code to the function that puts the data values from the post into a data store and perhaps add handling of alerts if we see air quality values which are out of range.
The next thing to do is build a similar mechanism to process LoRa updates sent via the things network.
Thanks to Robin for the picture
We had another great session at the Connected Humber Hardware Group tonight. Paul was telling us how to design our own printed circuit boards and get them made up. This is now so cheap that every electronics hobbyist should be getting their own custom boards made up. It turns out that it is all a matter of workflow, in that the sequence in which you put the design together is the important part. Unfortunately I was helping out with a recalcitrant LCD panel during this bit, so I’ll have to ask the other members to help me along when I start making my own circuits.
I want to make at least four, one for the fully featured Air Quality sensor, one for the “Mini MQTT” sensor, another for the Hull Pixelbot dual brain version and a final one as a badge which I think will look cool.
We’ll be continuing our exploration of PCB design at later meetups. They are free to attend, great fun, and take place on the first and third Thursday of each month at c4di in Hull. You can just turn up on the day (as a bunch of people did tonight) but you can also sign up for notification of upcoming events here.
Air Quality sensors inside and outside the box
I’m presenting a session at Hull University about low powered radio networks and air quality sensors in a couple of weeks. I’ve just written the description:
"LoRa is a low powered, long range radio networking technology with the potential to open up new embedded applications. It makes it easy and cheap to create connected devices. Rob Miles will explain how LoRa works, what makes it particularly interesting and why you should start working with it. He will show how the Connected Humber group are using LoRa to move Air Quality data from sensor to server, and how you can create your own LoRa devices very easily."
It sounds rather interesting. I’m definitely going to go along.
I spent quite a bit of today getting my tiny air quality sensor working. I’ve ported the code for the full fat sensor over, so that it has full MQTT setting control and all the other trimmings. It seems to work OK. I’ve mounted the pixel ring up against the 3D printed case and the result is rather impressive, and really hard to photograph.
The biggest problem that I have is that my “artistic” back, which contains programatically generated vent holes, doesn’t seem to let in enough air (or the air inside just circulates). I’m going to have to re-design that part. I’m toying with adding a little fan to get some forced ventilation. I’ll put all the code and the hardware design files on Github when they’re finished.
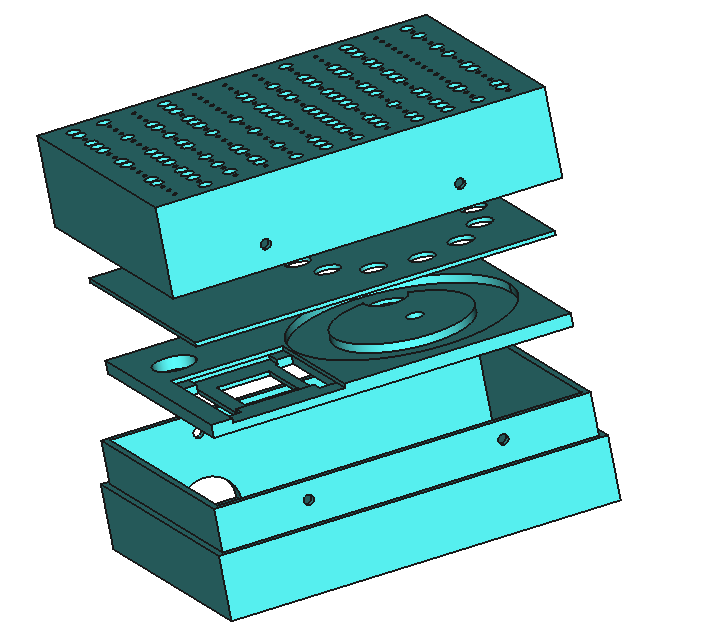
I’ve got the large, “full fat” Air Quality sensor just about working. But the hardware cost of the device is a bit on the high side. So today I’ve spent the day grappling with FreeCAD to try a design a much smaller, WiFi only, device. This uses a cheap Wemos D1 Mini and a five pound air quality sensor and a pixel ring. The cost of this hardware is only around ten pounds, which makes it much cheaper to build.
I’m using a new construction technique where the components are mounted on a tray which is then fitted into the box. This removes the need to connect things together inside the box, which helps. To make this work I’ve created a design for a Wemos D1 mini “blank” which can be cut out of the tray. This seems to work quite well. I’ve made another blank for the pixel ring.
I’ve used random numbers to design the vent holes in the back panel. I love using software to create physical objects. Tomorrow I’ll print the components and start building up the circuit.
Prototype and “floral” version
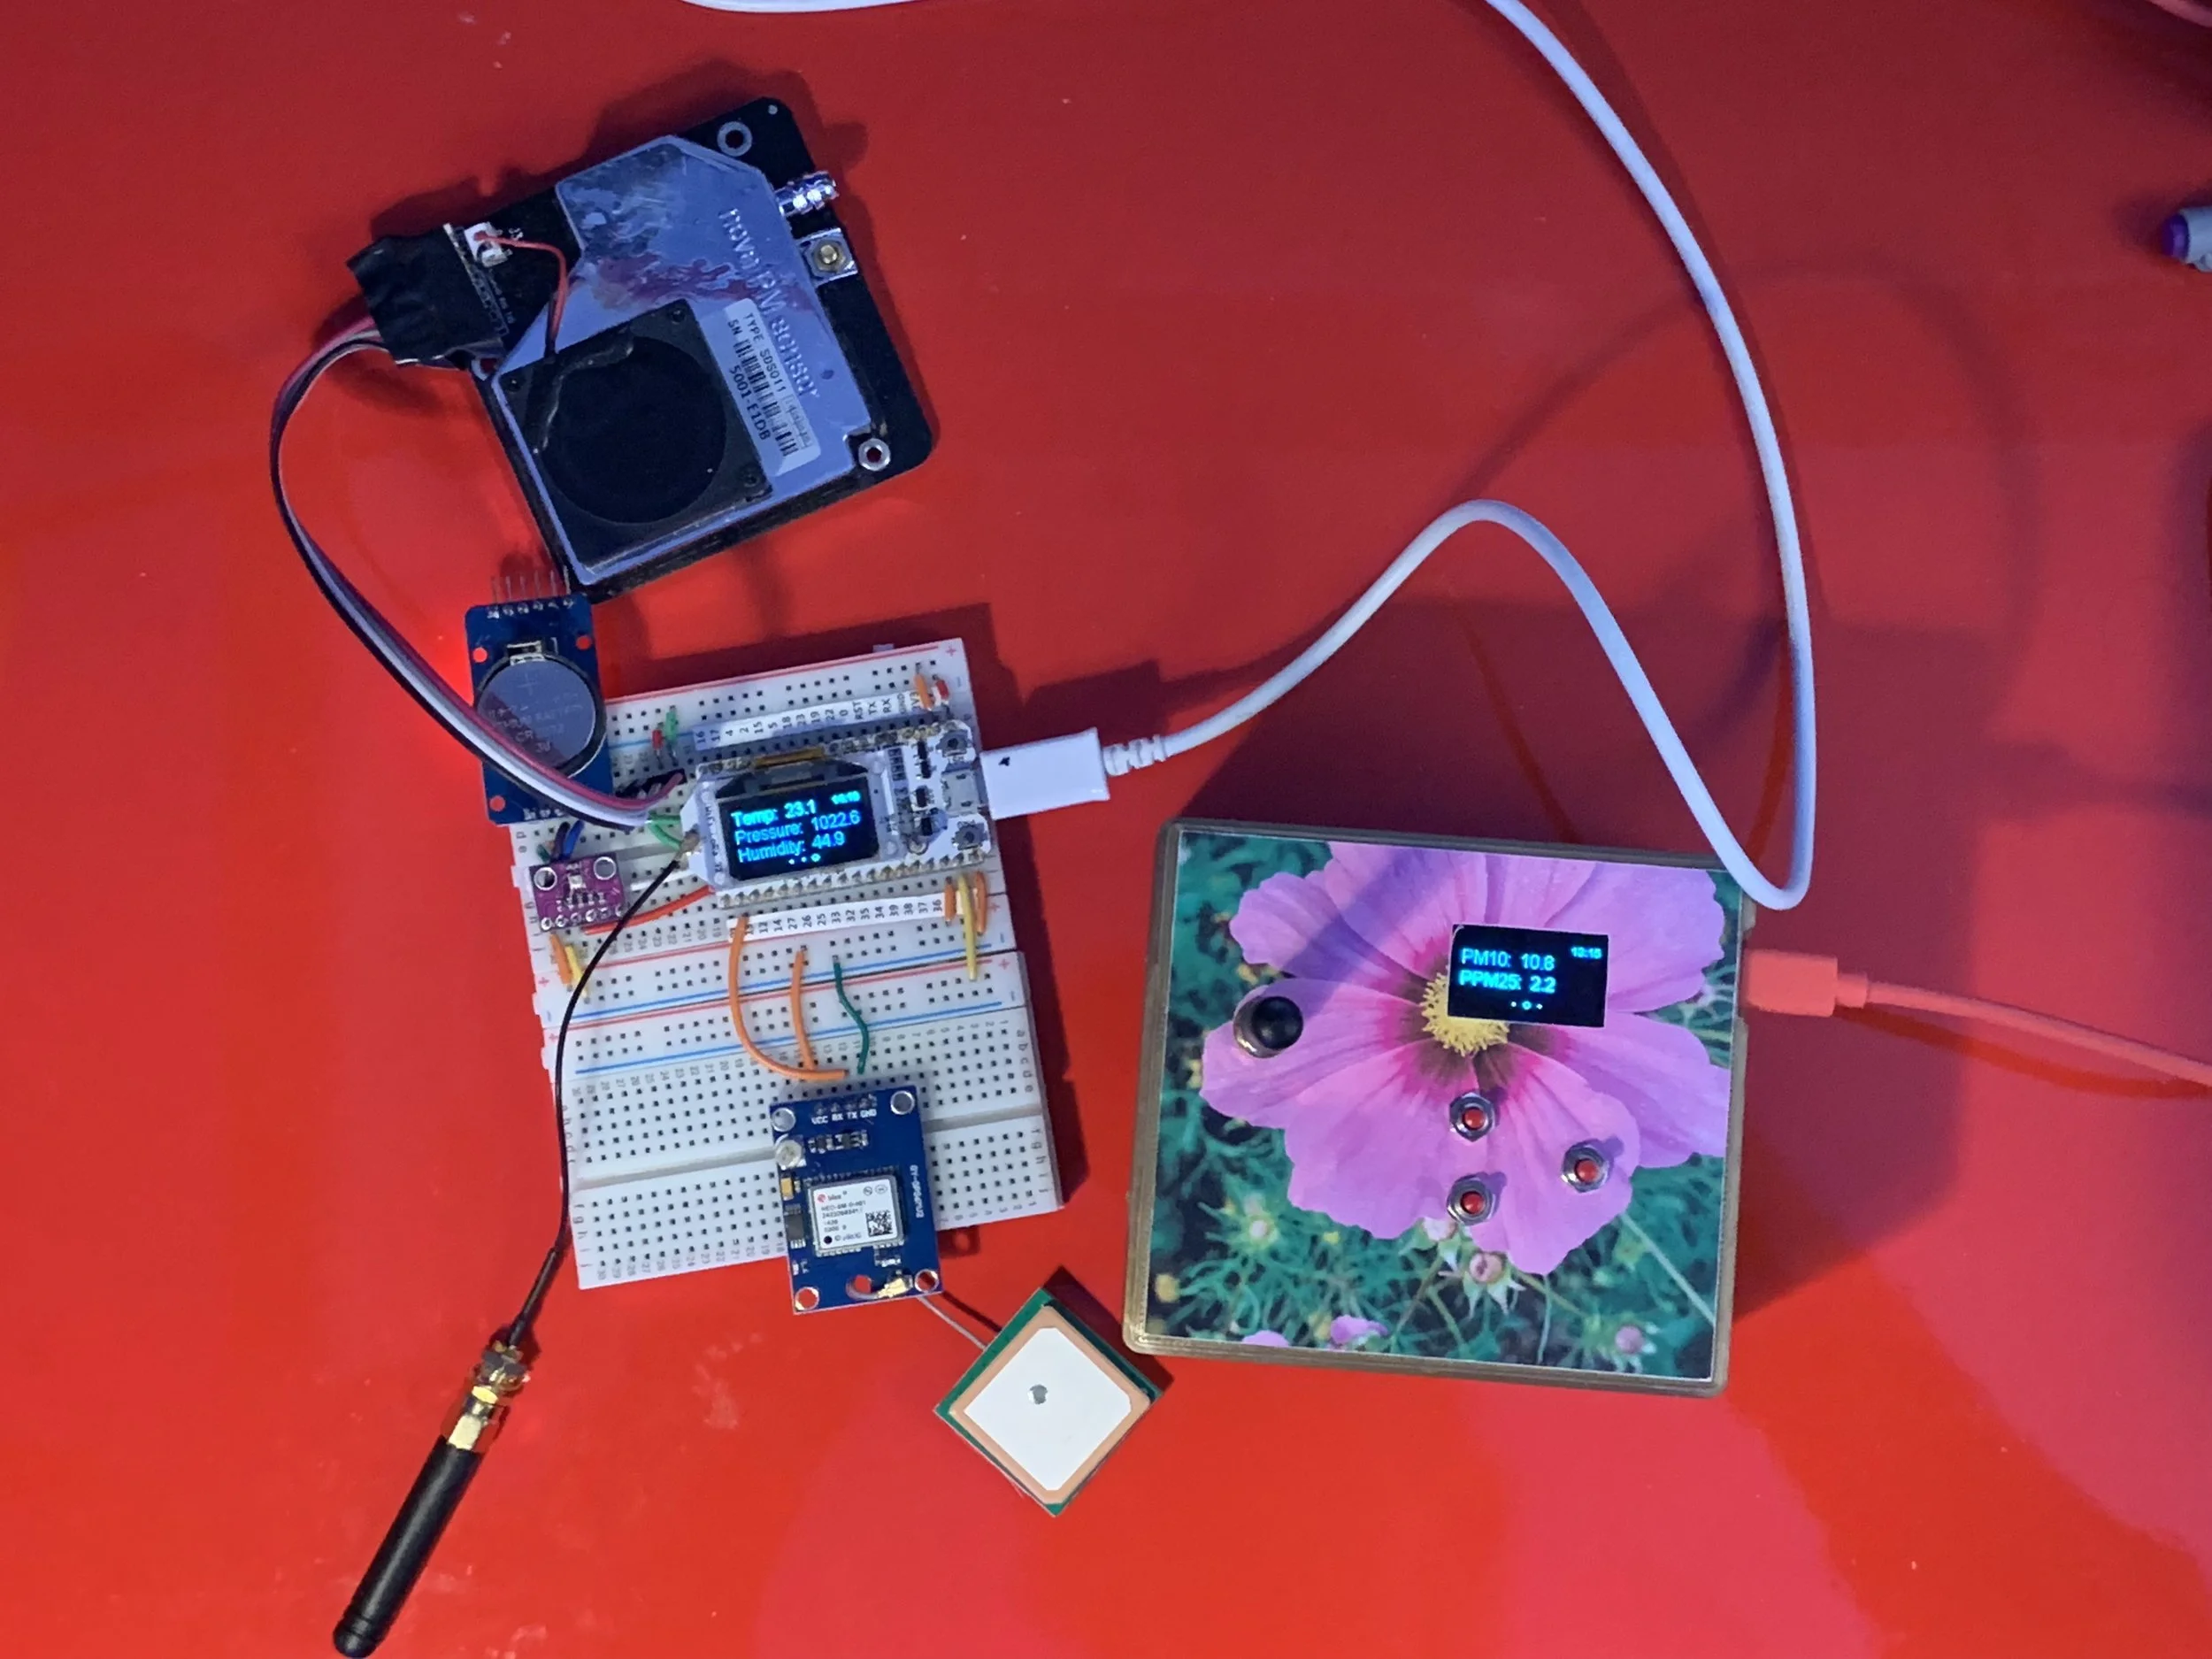
I’m making pretty good progress with the Air Quality sensor. I’ve now got a command protocol running between the devices and MQTT or LoRa. As you can see above, I now have the ability to customise the splash screen. Which is very useful if you like cheese.
Anyhoo, I’ve decided that the sensor really needs GPS so that each air quality reading can be tagged with location. I can configure fixed latitude and longitude values into the device, but for real portable usefulness we need it to be location aware.
Getting a GPS device wasn’t a problem, I had one lying around. But connecting it to the Heltec processor that I’m using was more tricky. I’ve got one serial port I want to use as a connection to the host computer and another that I’m using to connect to dust particle sensor. But now I need a third connection for the GPS receiver.
After some rather unsuccessful fiddling with different kinds of software serial connections I decided that it was best to go back to first principles and see if the hardware had anything to offer.
It turns out that it does. The ESP32 chip that the Heletc uses actually contains three serial ports. The problem is that they are not always connected to pins that you can access easily. But the good news is that the ESP32 chip is capable of mapping functions to pretty much any pin and the Heltec libraries take advantage of this. You can map the transmit and receive functions of a serial port when you open it:
HardwareSerial GPS_Serial(2);
GPS_Serial.begin(9600, SERIAL_8N1, 13, -1);
The first statement creates a hardware serial port. The second sets it to receive from pin 13. I don’t really want to transmit anything to my GPS device at the moment (I’m a bit short of spare pins to be honest) and so I’ve set the TX pin to number -1 which means “Don’t use this port for transmit”.
It works a treat. And thanks to this fantastic library I’m now tagging sensor readings with location. The next thing to do is re-design the case to take the GPS sensor and print another flower for the top.
Rob Miles is technology author and educator who spent many years as a lecturer in Computer Science at the University of Hull. He is also a Microsoft Developer Technologies MVP. He is into technology, teaching and photography. He is the author of the World Famous C# Yellow Book and almost as handsome as he thinks he is.
Begin to Code with JavaScript is now available for purchase and download. You can find it here