Now available in white
/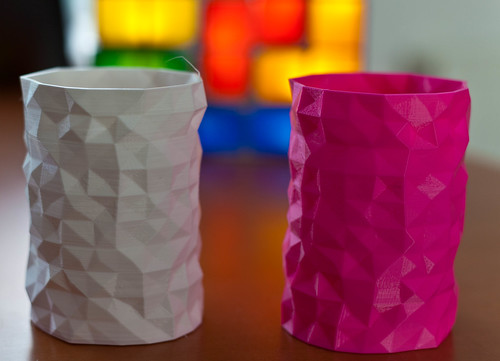
I found this Roundom Vase design on Thinginverse. It is a fairly good workout of the Ultimaker printer. Up until now I’ve been printing in pink, as it is the only colour plastic I had in stock. However, today when we got back from our trip away there was a parcel from Faberdashery with some different colours in it, including a reel of “Artic White”.
Changing printing colours is quite easy. You heat up the print head, pull the old coloured plastic out of the printer and then push in the new one that you want to use. Then just extrude plastic until all the old colour has gone. push the old plastic out until the colour changes, and then print something in the new colour. Actually, the base of the white vase above has some pink streaks in it where a last blob of the old colour made its way out of the system, but for now I’m printing white, which is nice.
I’m pleased with the results, but the surface is not quite perfect, as you can see if you examine the above pictures carefully. For me the interesting thing is that the imperfections, which you would think would be down to things like random noise and vibration, are pretty much always in the same place on both vases. Very strange.
I’ve almost, but not quite, reached the point where I can fire up the machine with the expectation of getting a useable print out of it each time I use it. The most important thing is to make sure that the first layer sticks to the printing surface. To do this I use the “Rob Miles Patent Pending A4 paper trick”. This goes like this:
- Turn the printer on and heat up the print head. This is so that you don’t get bits of solidified plastic upsetting the position.
- Put a piece of A4 printer paper on the print surface.
- Send the printer to its home position where the Z value (up and down) is set to zero.
- Turn the printer off so that it doesn’t spend too much time with the print head heated up.
- The print head should now be really close to the print surface. Adjust the surface height until the paper will just slide between the head and the print surface. Move the print head to the four corners of the print surface and adjust the height at each of those.
- Remove the paper, turn the printer on, heat up the head again and start printing.
If you have the urge to tinker then a printer like this is a great outlet. I wouldn’t say it is totally reliable, but it is fun.


