Talking Hull Pixelbots at the new Hull Makerspace

I stole this picture from Hull Makerspace. Thanks for that. 

Today I got my first look at the new Hull Makerspace. 

It's splendid. It's a huge room full of potential; connected to a bunch of other rooms also full of potential. The stuff they are installing is fantastic, including pottery kilns, a CNC machine shop, a paint booth, wood working, sewing and of course frickin' lasers (not mounted on sharks, that would be silly, but for cutting things with). 

I'd been invited to give a presentation at a Code Club meetup. Code Club is an an organisation that does just what it says on the tin. It sets up code clubs, usually as an after school activity, where kids learn the basics of coding. They're getting going in Hull, but they could always use more help - contact them here for more

We also had a talk from Matthew about his efforts putting a Raspberry Pi in the sky, Becky on why we should all be taking part in Code Club and Jon, giving details of the next Raspberry Pi Jam in Hull. 

When it was my turn I showed off the new Hull Pixelbot in perspex,talked a bit about HullOS and we had some fun making robots move via Azure IoT Hub and MQTT. Such fun.

Thanks for the invite folks, I look forward to seeing a lot more of the makerspace in Hull. 

Talking about robots for the children's university

Showing of "Transparent Terry", one of the robot crew

We had a bunch of folks from HEY Children's University come and see us at c4di today. It was great fun. I was showing off how we can put programs into robots to tell them what to do, and that a program is just something that takes in something (a distance from a distance sensor)  does something with it (run away if the distance is less than 100 mm). 

They were a great audience and I hope that a fair few of them get into software, robots and other stuff that can change the world. 

I said I'd put some links on here to resources. You can find out about the Hull Pixelbot (the robot I was showing off) here. You can find resources to build your own Pixelbot here. If you really do want to build a robot, come along to our hardware group meetings (there's one next Thursday). Sign up here

Super Duper Hardware Meetup

We had a really good hardware meetup today at c4di. A whole bunch of new members turned up. along with a bunch of "regulars".

I did a talk about the latest developments on the Hull Pixelbot front. The system that controls the Hull Pixelbot has been renamed "HullOS" for marketing reasons, and is now available on GitHub. There's also a manual for the new scripting language supported by HullOS and an editor program you can use to create HullOS scripts and load them into the robot. 

Finally, I've added the DXF files for laser cutting Hull Pixelbot chassis components, along with STL files for the 3D printed parts that you need as well.

I'll be adding more Hull Pixelbot stuff in blog posts over the next few weeks. 

There were lots of really interesting conversations going on all round the room, which was great. We've still got room for more though, the next meetup is on the 15th of February. You can sign up here

Hull Pixelbots at Global Gamejam

The them of the Global Gamejam was "transmission". Over in the university we had a bunch of teams exploring different aspects of this in lots of creative ways. 

I had a bunch of Hull Pixelbots and a newly minted web editor that mostly worked. 

Above you can see a nearly working display of Hull Pixelbots propagating a transmission from one to the other. Each robot is programmed via a web site using a scripting language that runs inside the robot. 

The idea is that each robot "wakes up" the next one by moving close to it. The first attempt fails because the Mr White doesn't wake up Crystal Maisie,, and the second attempt shows my bad planning, in that it leaves Crystal Maisie in the way of the final move from The See Through Kid. Oh well. 

Hopefully players of the completed game will be better at it than I was.  I think it would be interesting for a large team, with each team member controlling a robot and a prize for the fastest transition from one end to the other, using all the robots at their assigned starting positions. I took some pictures during the judging, you can find all of the shots here

Thanks to Simon and David from the university for organising such a great event. 

Hull Raspberry Pi Jam and Hull Pixelbots

Sorry the image above is a bit blurry. My lovely Fuji camera takes fantastic pictures, but only if you're patient enough to let it finish focusing before you take the shot.

Anyhoo, We had great fun at the Raspberry Pi Jam in the Central Library in Hull today. I've written before about how any carefully designed user interface never survives contact with the user. Same happened to day when I turned some kids lose writing little programs to control robots. 

The good news is that making robots do what you tell them was sufficiently intriguing for folks to ride over issues with the interface, and everyone had great fun in the end. I left the event determined to get enough robots together to allow people to do some proper co-operative (or competitive) action.  And set up something rather interesting. 

Then it was on to the Global Gamejam event at the university. The theme of the competition is "Transmission". I've got a plan for that. Involving robots. 

Feeling better - but going backwards

I think I must be feeling a bit better, because I've started making stupid mistakes again. Starting with telling off the database for refusing to find something that I knew was there. After all, I'd put the record there, hadn't I? Turns out that I had. Twice. So my request to find a single item with a particular name was failing because there were two of them.

After a bit of tidying up I've got something mostly presentable. I want to use it tomorrow at the Raspberry Pi Jam in Hull, and also as the basis of a Global GameJam entry. 

Coding while ill

Not well today. Let's just say that there's a particular room in the house that I can't be too far away from just at the moment. And I've got a horrible sore throat. What better time to write code? After all, the day can't get any worse, can it?

For some time I've been meaning to write a web programming interface for the Hull Pixelbots. I want to use MVC Active Server Pages and host the project on Azure. And today I got started on the project. I've not done this kind of thing for a while, and it was a journey of discovery in many ways. There's a very good tutorial on how to do it here

By the end of the day I've got the basics working, and I'm feeling a lot better. I think coding while ill works well for me.

"In-band" error signalling is dangerous

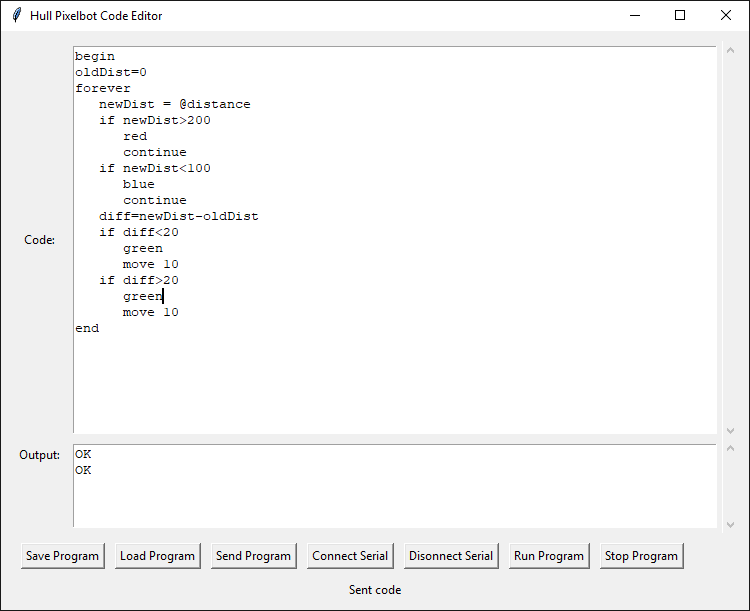
I've been working on the Hull Pixelbot for what seems like ages (You probably think I've been blogging about it for roughly as long. Don't care. My blog.)

Anyhoo, today I learned the perils of "in band error signalling". The phrase "In-band" is a radio term. It means that control information is sent in the came channel as the data. My "in-band" errors worked like this:

int findVariablePos (char * name)
{
    int result;
     /* Stuff happens in here to find the variable  */
    return result; // return the offset of the variable */
}

The function findVariablePos returns the offset into the variable name table of the variable with the given name. In a program a variable is a named location that you can use to store data that is used as the program runs. If my program does this:

i = 99

- this is an attempt to store 99 in a variable called 'i' for no readily apparent reason. The thing running the program needs to have a way of finding out where in the computer the variable i is actually stored. That's the job of findVariablePos. Deep inside the program that actually runs the Hull Pixelbot script there is a statement like this:

int iPos = findVariablePos ("i")

The statement above (we're writing C by the way) would get me the position in the variable table of the variable with the name 'i'. "Aha", you say. "What if the program doesn't contain a variable called 'i'. ". Well, in that case the findVariablePos function returns the value -1 to indicate that the name was not found. This is kind of sensible, because you can't have anything at the position -1 in a table, negative numbers are meaningless in this context. All good. To make things clearer I even did this:

#define VARIABLE_NOT_FOUND -1

This gives meaning to the value, so that I can write tests that make sense:

if (iPOS==VARIABLE_NOT_FOUND)
{
    Serial.println("Variable not found");
}

All good. Works fine. Then I re-factor the code and add a bunch of new error codes. I then decide it would be nice to have a set of numbers that the user (and other programs) can use to make sense of error messages. And I make the following change:

#define VARIABLE_NOT_FOUND 2

This makes sense in the context of fiddling with my error numbers, but it means that if the program ever puts a variable in location 2 in the variable table, the program will completely fail to find it because every time it gets the offset value this will be regarded as meaning that no variable was found. 

Which is of course what happened. The problem in caused by a bad design decision (using the data value as a means of signalling errors) and then doing something without considering the consequences. The latest version of findVariablePos looks like this:

int findVariablePos (char * name, int * position)
{
    int result;
     /* Stuff happens in here to find the variable  */
    
    *position = result;
    return FOUND_OK;
}

The result of the call is returned via one channel (the result of function) and the position value is returned by the method setting the value of the second parameter, which is a pointer to the variable. The call is a bit more complicated:

int iPos;
if (findVariablePos ("i",  &iPos) == FOUND_OK)
{
    Serial.println("Found the variable");
}

However, it now doesn't matter what the error numbers are, and whether or not they clash with any valid variable positions. 

"In-band" error handling is great if your'e in a hurry and you're trying to keep the code simple and quick. But they also leave you open to problems further down the tracks. 

It's not always a software problem

I've been doing some work to try and improve the reliability of the distance sensor on the Hull Pixelbot. Not that it isn't particularly reliable, but I got to worrying about all the interrupts and timers that are going off as it takes its readings. 

I did some tests today and discovered, to my alarm, that the distance reading was being horribly affected when I turned the motors on to move the robot. This was a problem. I spent a lot of time turning on and off different parts of the software, and getting more and more confused. I'd got to the point where just turning on one port seemed to be affecting the signals on another, completely different, port. Ugly.

Then I remembered. This is hardware. Hardware is not like software. It's, well, harder. Weird things happen in hardware. Things that end with comments in the code like "I'm not sure why this statement is here, but if it isn't here the device doesn't work". 

When I turn the motors on, this makes the robot take quite a bit more juice from the power supply. If you're careful with your cash, like me, then you run your robot of the PC USB cable when you can, and keep the batteries disconnected. Which means that when the motors fire up the supply voltage takes a bit of a nose dive. Now, it turns out that my distance sensor is rather sensitive to low supply voltage, so this seems to offset all the readings.

In other words, I could fix my broken program just by turning the power on. 

3D Printing "Snap Off" Components

I'm putting together some Hull Pixelbot kits and one of the components that I need is a set of spacers to separate the circuit boards from the perspex base and top. You can of course buy these, but I'm too mean to do this, and I happen to have a 3D printer that I can play with. 

I wanted to print all the spacers as a single item, so that I don't have to count them into each kit. One way to group a bunch of components together is to print using a "brim". A brim extends around the base of a piece and helps it stick to the printer base. If components are placed close together the brim merges to form a single sheet which holds all the components together. This works well but it can be quite a pain to then peel the brim off the items once they are printed, particularly if the items are small, like the washers above. 

The solution I've come up with is to print a single layer which sticks all the elements together,  followed by another layer on top of that which stiffens the support layer. If you look at the picture above you'll see that the top layer doesn't go all the way up to side of each spacer, there's a tiny gap around each one. This lets you "snap" the spacer out of the base.

One other trick that I'm using with my spacers is to print the first layer of the spacer with a hole which is slightly smaller than the others. This means that the spacer will grip onto a bolt, so that they are a bit easier to fit onto the robot when you are building it. 

Hull Pixelbot Scripting Language lives

One of "Robert's Rules" of programming is that things that sound simple often aren't. And things that sound complicated often aren't. A while back I had an idea for a simple scripting language that could be used to control Hull Pixelbots (or anything else embedded). It sounded simple. It's not.

I've been playing around with the language and I've just about got it going. It's not as simple as I might like, but it does work. The biggest change that I've made from previous versions is to use the "Python" style of code blocks. I did have "endif" keywords to mark the end of conditions but I found these really irritating (I kept missing off the endif and then wondering why the program wouldn't compile). So now you indicate which statements are controlled by a condition (or a loop) by just indenting the statement. Want to see some sample code?

begin
move 100 wait
turn 180 wait
move 100 wiat
end

This program would move the robot forward 100, make it turn 180 degrees and then move back. The wait element means "wait for this move to complete before performing the next statement". If the wait element is omitted the program starts the action and then moves onto the next statement immediately. We can make more interesting behaviours:

begin
forever
    green
    move 100
    if @distance < 100
        red
        turn 90 wait
end

This program makes the robot move forwards. As the robot moves it checks the value returned by the distance sensor . If the program detects an object less than 100 mm away it turns the robot 90 degrees and then continues moving forward. The red and green commands change the colour of the pixel. The indenting above tells you that the red and turn 90 statements are only obeyed if the distance is less than 100. 

The programs are compiled and executed inside the robot. I've written a tiny Python program to send them via the USB port. 

Update: I've made some tiny changes to the way that the wait behaviour works after showing someone the language and realising that it could be better. 

HullOS in the Hull Pixelbot

I've spent a day having some "quality time" with the Hull Pixelbot scripting language. Which is now called HullOS.

The idea is that the computer in the robot (which can be a lowly Arduino Uno) is entirely responsible for converting the plain text of the program into actions. The behaviour will be rather reminiscent of the early 8 bit computers like the BBC Micro and Sinclair Spectrum, which had built in BASIC. They had tiny processors a bit like the one in the Arduino, but they had a lot more RAM than I've got. However, I've just about managed it. A typical program will look a bit like this:

do
    if %dist<10
        yellow
        move -10
    else
        green
    endif
forever

This HullOS program would make a "cowardly robot". The program repeatedly reads the distance sensor. If the robot is less than 10 cm from something it turns the pixel yellow and moves backwards. Otherwise it turns the pixel green. 

There are a few things to sort out, but I'm rather pleased with how it is going. And I've still got around 500 bytes of memory left....


Build a Robot in a Day with RB

We did another "Build a robot in a day" course today. It was for a bunch of folks from Reckitt Benckiser. We call it "Build a robot in a day" because that's what you do. But it's not really about robots. It's about learning how embedded devices are created and programmed. 

It was great fun. Everybody managed to build their robot and get it moving around and reacting to its environment. We were using the latest iteration of the Hull Pixelbot chassis, which was lovingly laser-crafted by the wonderful crew at Inno-Plaz. It still needs a few 3D printed parts, but these take around an hour to print, rather than eight. It also looks rather spiffy, as you can see above. 

Everybody proudly took home their robot at the end of the day, I really hope that they keep playing with the robot and making it do new things. 

Hull Pixelbot Scripting Language

About nine months ago I finished off a design for a scripting language for the Hull Pixelbot. The idea was that you could enter programs in clear text and the robot would understand and act on them. You'd not need anything else, and the programs would be compiled and stored inside the robot in an intermediate code. Then "Begin to code with Python" hit me, and everything else stopped as I frantically wrote chapters. 

Well, on Friday I decided to dust off the script design and actually start to build the language. I'm nearly finished. I had a problem when I ran out of memory (I've only got 32K of program space and 2K of memory) but I found that in one part of the program I'd used the sprintf function (which is huge). I've deleted that, freed up a few K of code space and it very nearly works. I've just got to drop in the while loops and I'll have the complete language running. There's nothing quite like designing your own language and then making it work on a tiny device.