"The Ding of Death"

Perhaps I can sell it on ebay as “untested”

Things were going well today. I was working on my clever telephone and I had the code doing just about what I wanted with the hardware. So I thought I’d pop the whole thing back in the phone to make it easier to work on.

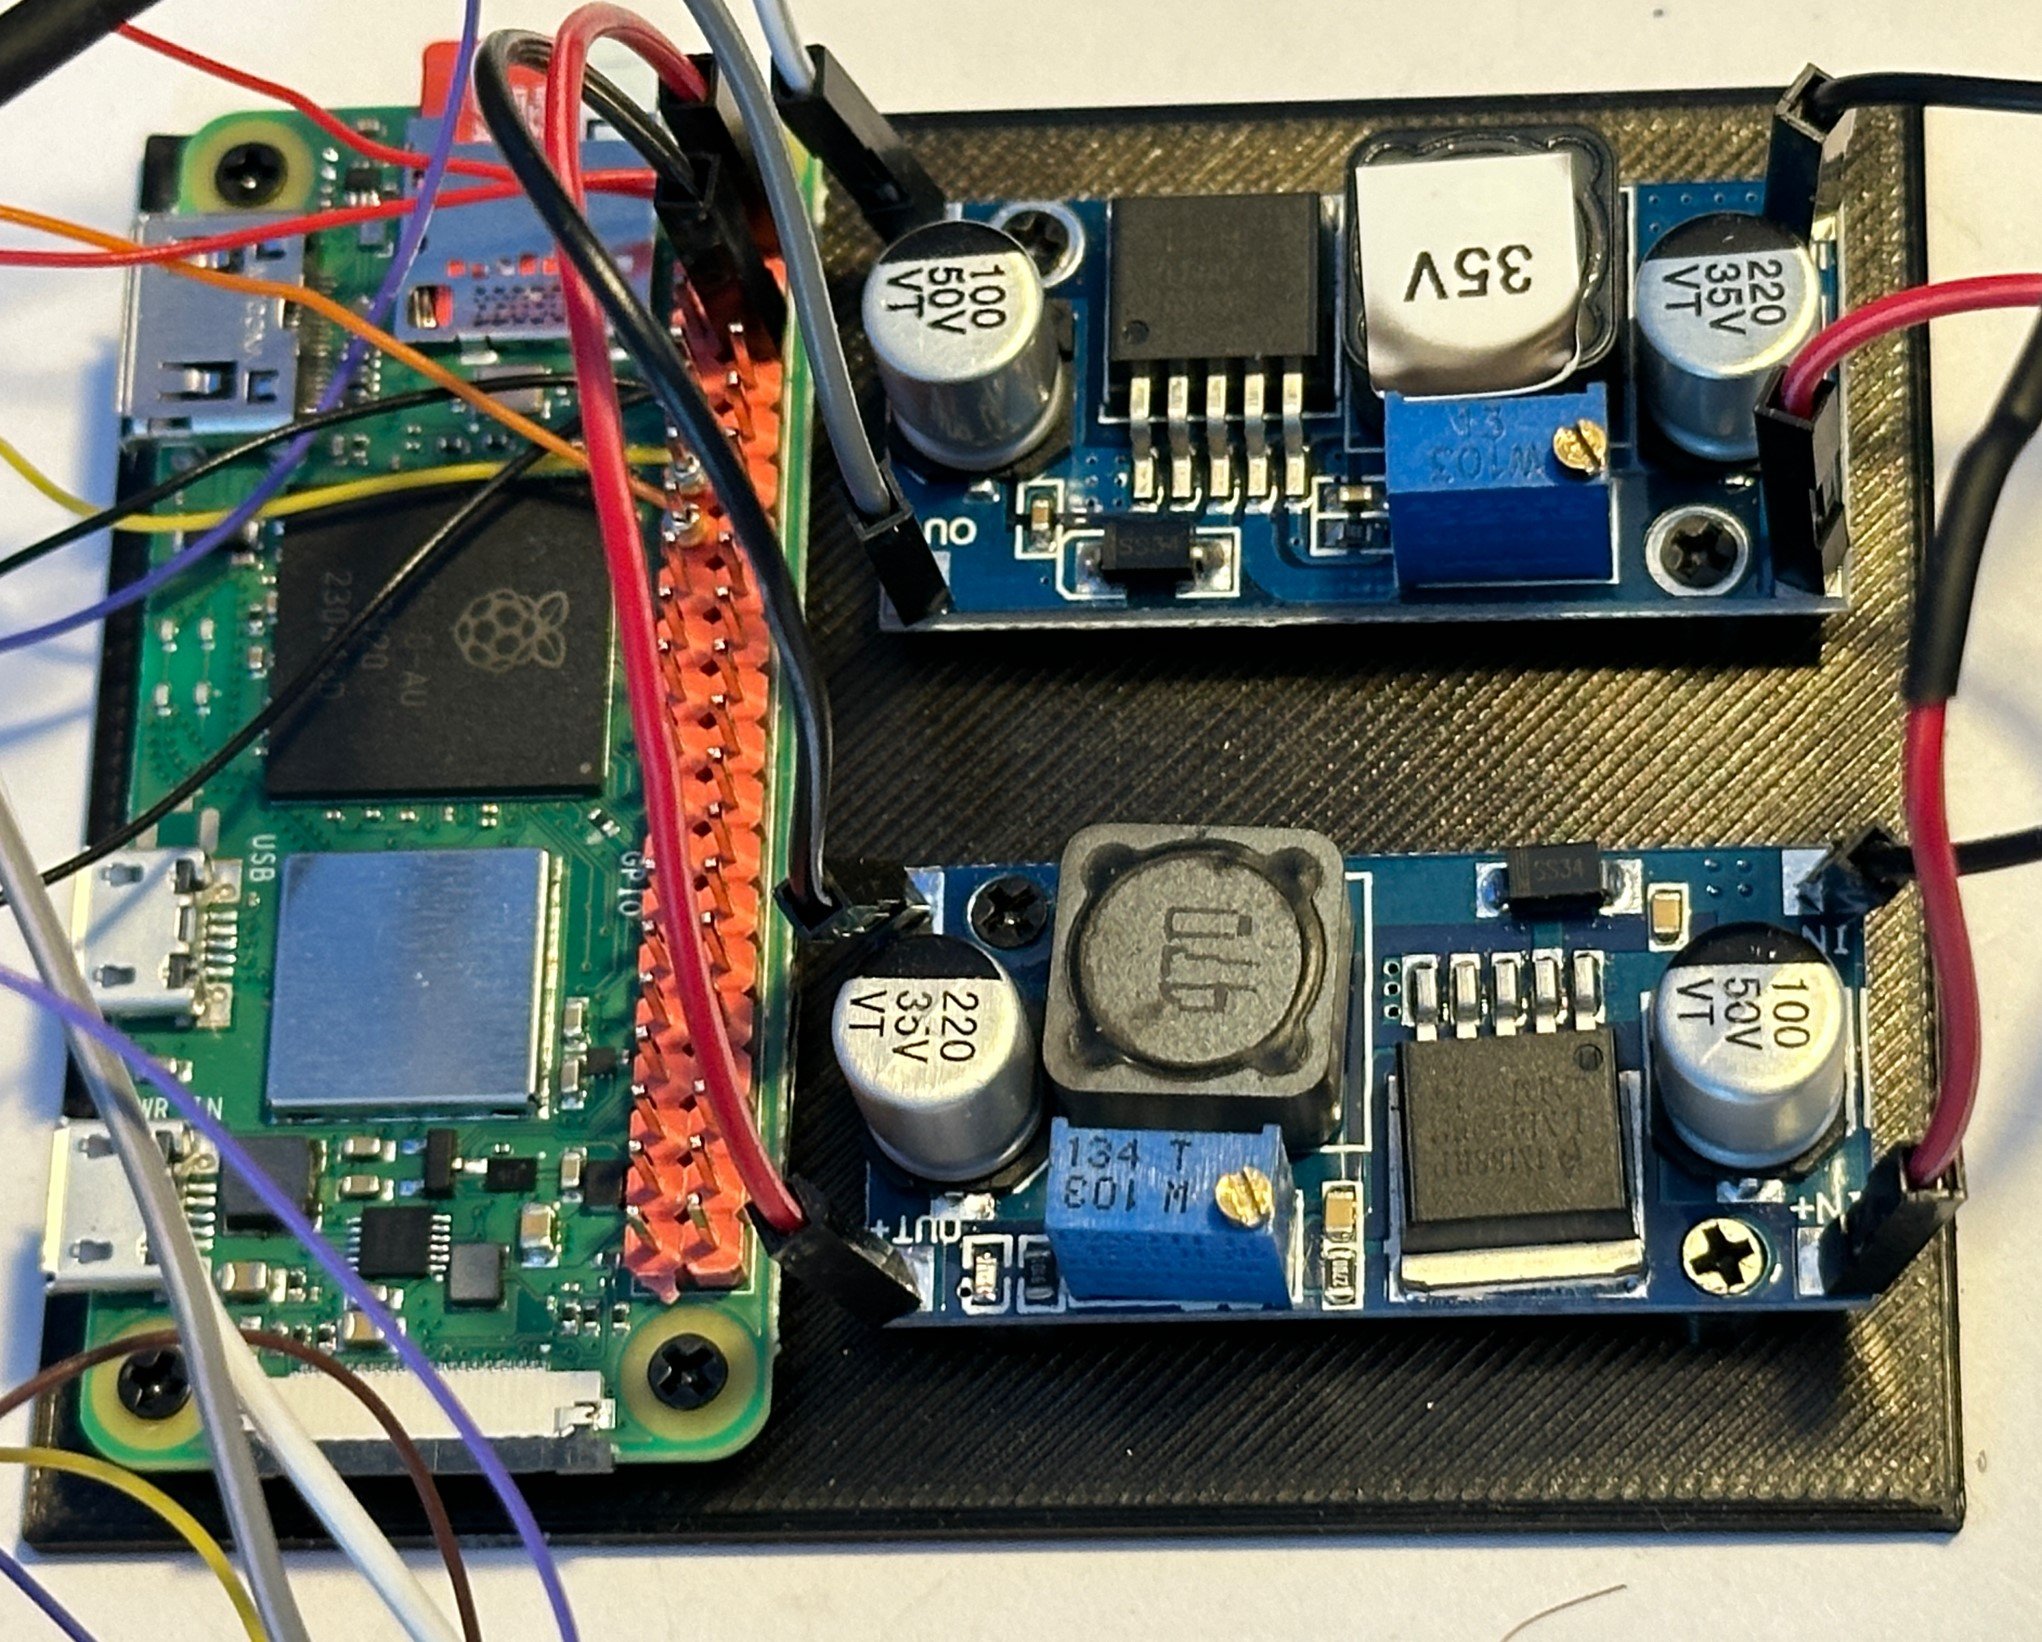
I shoehorned the Pi Zero and the power supplies and MOSFET controllers into the case and it seemed OK. Then I discovered that some of the hardware interfaces (notably the switch that is triggered when you lift the handset) didn’t work. So I took the lid off and started tracing circuits. At one point I must have let one of the GPIO input wires touch a terminal on the telephone bell coil. At this point a rather unfortunate sequence of events occurred:

  • The bell terminals are close to ground voltage level, because the bell coils have low resistance. Touching the bell terminal with the wire caused the GPIO input to be pulled low, making the software think that the handset switch has been triggered.

  • The phone program rings the bell when the handset changes state. This is because when you lift the handset on an old phone you hear a “ding”. So turns on the bell coil to start the ding. This sends 35 volts to the coil……

  • This 35 volts goes up the GPIO input and blows away the Raspberry PI. Completely dead. Could be used as a heater but not much more.

The good news (if there is any) is that I happen to have got a spare device in stock just in case something like this happens, so I just have to wire it into the circuit. I’ve also put all my software on GitHub already, and so I’ve only lost around 20 minutes worth of coding.

I’m going to redesign the hardware connections to reduce the chances of this happening and insulate the bell terminals properly. A thing like this is only a problem if you don’t learn anything from it……

Stepping up and Stepping Down

Power supplies mounted on a correctly sized holder…

I’m building something to make an ancient (1976) telephone more interesting. I’m putting a Raspberry Pi inside it. It’s very important to me that the Pi is able to ring the telephone bell. To do this I need a 35 volt supply. I also need a 5 volt supply too. The device itself will be supplied with 12 volts. The device at the top right of the picture is my “stepper up” which makes 35 volts from 12 volts. The one at the bottom right is my “stepper down” which makes 5 volts from 12 volts. Both of these devices work in the same way. They have a little transformer coil which is driven by the chip you can see on each. The blue trimmers have a little screw you can use to adjust the output voltage.

You might think you could use two copies of the same device and just adjust one to produce 35 volts and the other to make 5 volts but this is not the case. The step-up ones can’t produce a voltage which is lower than the power input (in this case 12 volts) and the step-down ones on the can’t produce a voltage which is higher than the input. You can buy a bunch of these for not much money and it is useful to have both types in stock. Search your favourite suppliers for “buck converter”.

Strawberry Flavoured Milk for the Win

I suppose that now I’ll have to drink it all…

I’ve had my strawberry flavoured milk obsession for a while. Today I found a use for it. I’ve been looking for a nice box I can “upcycle” into a remote control for my latest project. Having decided that putting radios in tins is a bad idea I’ve now discovered this plastic Nesquick box. It looks like it will be perfect. I’m a big fan of getting boxes that are plenty big, and it seems like the top will be able to take the controls I want to mount on it.

Achievement unlocked: First PCB built

The bag was very hard to undo, but worth it

A parcel arrived from PCBWay today. These are the boards that I designed last week. They turned them round in double quick time and they look great.

These are the key positions for right handed use

I lost no time soldering the key sockets into place and getting a test program into the PICO. I have made a few mistakes with this board. The key spacing is a tiny bit close. I had to file a bit off a couple of keytops to make them move smoothly. The next version will have the keys a mm or so further apart.

It is traditional that your first board needs a fix or two….

I’d also made a mistake with one of the OLD display sockets, reversing the clock and data lines. But I managed to fix that and get the board going with some Python code. The good news is that the left handed versions is wired perfectly. I’m going to build one of those too just to see if it is easy to learn to use the keyboard with your left hand. Now I have to write the C++ code to read the keys and send the keypresses over Bluetooth.

Connecting Wires Artistically

To install the new burglar alarm I had to extend a power supply cable by cutting it and inserting a new piece of cable. It was important to preserve polarity. If I’d got the wires the wrong way round I’d have let all the smoke out of the device and its power supply. Which is a bad thing.

So I cut the wires as you can see above. This meant that it would be very hard to me to join the wires incorrectly. I’m quite proud of this, although it is probably something that everybody else has been doing for years.

Additional bonus: This approach meant that when I added the heat shrink tubing over the top of the joined cable the join made a slimmer lump.

Choosing power connectors

connector.png

The two power connectors above look pretty similar. The one of the left looks shinier and fancier, but actually I don’t like it very much. This is because of the way that it is fitted onto the box you’ve made for your device.

You need to push the back of the connector into the box through the hole from the outside. So when you are soldering wires onto it you need to remember this, and also thread the retaining nut onto the wire that you are soldering into place. All of this adds up to make fitting a connector like this much more tricky. My experience has been that I get the first one right, and then get the second and third ones wrong, or vice versa.

The connector on the right fits from the inside of the box so you can solder it up first and then add it to the box afterwards, pushing the front of the connector through a hole and attaching the retaining nut from the outside. Which is much, much easier to do.

When you’re choosing connectors for a project it is well worth considering things like this.

Things not to do with PIR sensors

pir lense.png

“Hi. I’m Rob. I do stupid things with hardware so you don’t have to”

Today I thought it might be a good idea to see what happens if you try to use a PIR sensor without the plastic dome lens on top. I figured that I’d be happy to sacrifice a bit of sensitivity for a cooler aesthetic. In other words I wanted to get rid of the ugly dome and put the sensor behind a 3d printed panel.

Preliminary tests suggested that this might work, so I designed and printed a case lid and put the sensor behind it. Then it didn’t work at all. I think that 3D printed PLA is probably a bit too opaque to the infra-red signal that the sensor uses. Oh well.

New Keyboard Time

newkeyboard.png

The quick brown fox jumps over the lazy dog. This is a nice keyboard with a good long key travel. Need to work on the wrist support perhaps, but it is a step forwards from the previous one if it remembers what it is doing and stays powered up all the time. The stand isn’t much of a help for my wrists but the angle is very good. The keyboard layout is a dead ringer for the Microsoft one that it replaces apart from the function keys and arrows which tend to be all over the place anyway.

I’ve pulled off the Apple keycaps it had on when it arrived and replaced them with Windows ones that are supplied with the keyboard (along with a key puller). I had a nasty moment when one of my favourite keyboard shortcuts (WIN+SHIFT+S) failed to start up the screen capture but I fixed this by flicking the keyboard configuration switch underneath the keyboard to the Windows position.

I’m surprised that I’m deserting Microsoft comfort keyboards in this way, but this is a very good price and I’ve decided that Bluetooth is just not a good technology for a keyboard that you want to leave switched on all day. Plus the Bluetooth interface on my desktop is flakey. I can make this keyboard into a Bluetooth one if I fancy, but at the moment I’m using the supplied dongle and it works very well. I’ve always been a big fan of split keyboards and this is a nice option. It doesn’t have the premium feel of the Microsoft keyboards but it seems sturdy enough. Let’s hope it keeps going.

Windows for Free

In 2013, after a lot of effort, I bought myself a new laptop. It was a new fangled (for the time) UltraBook. I’ve used it on and off for years, lent it around the family and last week I popped a 40 quid SSD into it with the aim of speeding it up a bit. That worked a treat. Then I discovered that someone I know needs a laptop to work from home. And of course their employer won’t/can’t supply one.

So on Thursday I took the 7 year old machine from 0 to fully configured laptop in about 30 minutes. By the time I’d finished I had a newly setup machine with a new Microsoft Outlook email account. At no point did I enter any licence keys and it just worked. Just a tiny bit of fixing up because of a faulty touch screen.

The machine is well powerful enough and apparently it works a treat. Apple make a big fuss about the way they support their new smartphones for five years. Big deal. This was a seven year old laptop and it just worked. The Windows 10 installation was a breeze, I even had Cortana talking me through it.

If you have an old laptop that is not doing much, buy yourself a cheap SSD (I got a 250G one from Amazon for around forty quid) and slap a free copy of Windows Home on it. If you’re a student you can then top that off with a free copy of Microsoft Office 365.

Mid-life computer upgrade

Four years ago I got myself a “proper” desktop PC. With help from number one son I specified a beefy processor, speedy motherboard, oodles (for the time) of RAM and a fast SSD.

Over the last few months it’s been slowing down though. The first thing that happened was that I noticed I was running out of memory. Mainly due to the penchant of some browsers (I’m looking a you here Chrome) for finding out how much memory you have and then trying to use all of it. The second thing that happened was that I ran out of space on my main disk so Windows 10, without asking, moved my swap drive onto a hard disk that I was using to store files. These two things together meant that I would get lots of hard disk rattlage when moving between applications and if I decided to run Chrome and Lightroom together the resulting ram turf war brought the machine to its knees.

So today I shut the machine down, popped the lid off and dropped in a couple of slabs of memory and a new internal SSD. The SSD uses a new connection - M2. I’d bought an expansion card that I could use to link my new drive to the bus in my motherboard, only to discover when I actually opened the box that my motherboard already has interfaces for this kind of drive. Oh well, the card can go back to Amazon.

Once the chips were down (as it were) I unplugged all the other disk drives, fired up the system and did a brand-new Windows 10 install. That went a treat. I had a working system before my cup of tea had cooled down. Once I’d got Windows working I then plugged in the other disk drives and put the case back together.

This is kind of cunning, in that my original system disk is still running so I can boot from there at a pinch if I really need something from the old installation. It is also kind of not cunning, in that I’ll have to install all my applications and files onto the new disk drive. I’ve started doing that now, with most stuff being on Onedrive it shouldn’t take too long.

First impressions are that the machine is much more sprightly.

Pimoroni Black Friday week

Of course Black Friday is a bit of a racket. But there are some bargains to be had. Pimoroni are making a week of it. Today they’ve reduced all their Breakout Garden sensors. These are very well packaged and you can either solder to them or plug them into their “Breakout Garden”. which attaches to the top of a Raspberry Pi. They have a nicely managed set of libraries on GitHub which make it very easy to get to grips with the devices and the range of sensors you can get is very wide. There are also some nifty little displays and lights too. And the individual devices are pocket money prices. And a lot of them are around a third off at the moment.

They are great fun for playing with. I’ve just saved a fortune by buying a whole bunch.

Don't buy the wrong Heltec device

It turns out that I’m perfectly capable of making the same mistake twice. In fact, I seem to insist on doing this.

A couple of years I bought three Heltec devices that were configured for the American market. They worked fine, but only on the 433 MHz network that they use for Lora in the ‘states. For the UK and Europe you need 868 Mhz ones.

A while back Adam told me about a new Heltec Wireless Stick that looked interesting. I was intrigued, so I bought one. The product listing implied that it worked on all of the wavebands.

Mine doesn’t. It has 433 written on the box. It’s a nice enough device, but much less useful than I was planning.

Moral of story: check the transmit frequency of any LoRa device that you might think of buying.

Server Discussions at c4di

We had a quiet, but useful, hardware meetup today at c4di. Although most of the talk was of servers and software.

We’re in the process of migrating our services onto a shiny new Azure platform (if virtual machines can ever be regarded as shiny). As of today we’ve got the bulk of the work done. This means that you can go to our map and see something useful. We made some changes to the configuration live at the meeting which was great fun. I also insisted that we turn off the server and then turn it back on again, so that we could make sure that there are no manually started services that we need that would cause things to break if we ever had a reset. I’m pleased to be able to report that the server passed with flying colours.

Next we have to move our web sites and a couple of other services and then we’ll back in business. Huge thanks to everyone, particularly Starbeamrainbowlabs and Brian, for making the move.

Starbeamrainbowlabs has written some neat blog posts on the migration process that you can read here.

Any Solar Power experts out there?

I went to a meeting yesterday with some folks who are interested installing some of our air quality sensors. However, we have a major problem with this because at the moment our devices are all mains powered. This is mainly because the particle sensor is quite a power hungry beast. It needs to be fed with around 120 milliamps. This is not a huge amount, but it is enough to make long term battery powered deployment a bit of a no-no.

It looks like there are some devices out there, I’ve ordered some of the one above, based on the MCP73871 chip. If anyone has ever used this kind of device and got a happy ending I’d love to hear from you.

Cheap project boxes

What you can get for seven pounds

Making boxes to put projects in is hard work. You can 3D print them but that takes ages. You can laser cut them (but you need a laser cutter). And making things waterproof is really hard too.

Turns out that terminal boxes make great project boxes. They arrive waterproof and the holes in their sides have nifty little rubber plugs in them which you can cut to fit whatever you really want connect to. It turns out that the buttons that I bought last week can be made to fit in the sides with just a modicum of surgery. We’ve also used these holes to provide inlets for air quality sensors.

If you’re lucky you might find that you can shine neopixels through the rubber plugs to get a nice lighting effect - like I do for the two button game. I don’t think this will work with the boxes above though, their plugs seem quite opaque.

Terminal boxes are available in lots of sizes and really good prices. I got the ones above from Screwfix.

Cables for a pound each

If you’re looking for some cheap cables I can recommend you wander down to your local pound shop. I’ve been using their cheap usb cables for a while and they work a treat. They are especially useful if you want to connect up a Wemos or Heltec device to a power supply. They have a good length, 1.5 m, the connectors are sturdily attached, they are packed in a nifty little bag and they only cost one pound each.

Astonishing.

I’ve also been using their one pound HDMI cables and they seem to work fine. It seems that electricity doesn’t mind the price of the wires that it travels down…..

Bringing an Alien back from the grave

Me and my Alienware laptop go back a long way. We need some spare laptops for a course that I’m helping with, and I was wondering how hard it would be to get an 8 year old laptop to run Windows 10.

It turns out to be a bit tricky, but possible. I had to ignore dire warnings about graphics cards and press on with the installation anyway.. Then, afterwards I found some original drivers and installed enough of them for the automatic Windows 10 update to take over and install the rest. The biggest headache was spending some time trying to work out why the WiFi card hadn’t been detected, only to discover that I hadn’t actually turned it on using FN+F3.

It now works a treat. I’m missing drivers for the SD card and the firewire port, but I don’t need those. As a machine it is pretty responsive. In fact it now books more quickly than it used to. If you have an old machine that you want to rejuvenate, I’d strongly advise you to have a go. The Windows 10 update process has a very good rollback behaviour that means you are unlikely to break the machine and you might end up with something much more useful.

Pick and Mix Nuts and Bolts

I’m building an Air Quality sensor. As you do. I need a variety of different nuts, bolts and washers to hold bits of it together. Normally this would be a pain, as I’d have to buy twenty of something I only need four of.

But now B&Q (the big diy warehouse in Hull) have a “pick’n’mix” display for things like this. It’s like it used to be with the sweets at Woolworths. A full bag like the one above is around two pounds fifty, which is fantastic for making things.