Raspberry Pi 5 is really rather good

I didn’t order a brand new Raspberry Pi 5 when it was first announced. I think I managed to buy the earlier versions on release day, but for some reason this time I wasn’t that interested. However, I had a need for a fast Pi recently and so this week I finally got one.

It is really rather good.

When I got the Raspberry Pi 4 I was kind of expecting it to be a viable desktop alternative. After all, that is what some people were saying it was. It wasn’t. Browsing was slow and Visual Studio Code ran too slowly to be properly useful. But the Pi 5 is much more of a contender. Some of this might be down to the amount of memory available, my Pi 5 has 4G of ram which must help things along. I’m using it over VNC and I think I’d be happy enough to work there. Visual Studio Code seems to trundle along quite happily and web pages open instantly.

It is much more expensive than the original Pi. And of course you have to add the cost of the case, power-supply and micro-sd card to the total price. But for the money I reckon you get something pretty impressive and properly useful. And if you want to go back to the days of tiny, cheap Raspberry Pi’s you just have get yourself a Pi Zero.

Effortless Debugging with Your Pico Probe: No More Sudo!

Hey there, Raspberry Pi enthusiasts! Are you tired of summoning sudo every time you need to commune with your Pico debug probe? Fear not! Today, we're delving into a nifty trick to make your Pico probe obedient without the superuser incantations. And for those of you using Visual Studio Code, this trick is a game-changer.

Why Bid Farewell to sudo?

Summoning sudo for debugging is like wearing a full suit to a casual brunch; it's overkill and can be risky. Moreover, when you're using elegant tools like Visual Studio Code, running the debugger as a superuser inside the tool is a bit tricky. Let's simplify this, shall we?

The Power of udev Rules:

In the Linux realm, udev rules are like spells that control how the system interacts with various devices. By crafting a specific udev rule, we can grant ourselves permission to access the Pico debug probe without escalating our privileges to the superuser level.

Crafting the Universal Pico Probe Rule:

Most Pico debug probes share the same Vendor and Product IDs, so we can usually use a standard rule for all. Here's how to do it:

The Magic Numbers: For the Pico debug probe, the typical IDs are: Vendor ID 2e8a and Product ID 000c. We'll use these in our rule.

Creating Your Rule: Head over to /etc/udev/rules.d/ and conjure a new file called 99-pico-debug-probe.rules Sprinkle the following line into it:

SUBSYSTEM=="usb", ATTRS{idVendor}=="2e8a", ATTRS{idProduct}=="000c", MODE="0666"

This incantation essentially tells your system, "Hey, let everyone read and write to this device, will you?"

Enforcing the Rule: To make the rule take effect, use this spell:

sudo udevadm control --reload-rules && sudo udevadm trigger


What If My Device Is Different?

Got a different device? No problem! Plug it in, run lsusb, and look for the ID format VendorID:ProductID. Use these values to create a custom rule.

Post-Reboot Harmony:

Your new rule is like a loyal house-elf, diligently working after every reboot, ensuring smooth, sudo-free access to your debug probe.

Conclusion:

And there you have it! A simple yet elegant solution to make your debugging sessions with Raspberry Pi Pico as smooth as butter. No more sudo, no more hassle, especially when you're working in sophisticated environments like Visual Studio Code.

Happy debugging, and may your code be bug-free!

Author’s note: I didn’t write this. ChatGPT did. I worked with ChatGPT to solve my problem and then asked it to write a blog post about the solution “In the style of Rob Miles”. I’m quite proud of this, although I didn’t do much of the work….

Raspberry Pi Popup in Leeds

I bought a new mousemat too

We were in Leeds today Christmas shopping. I was really pleased to see a Raspberry Pi popup in Victoria Gate. We went in and had a look around. I tried to impress the staff by showing them my by-line in a copy of HackSpace magazine they had on sale. I think it worked. They did give me a free sticker.

The store was excellent. The staff were great and it was lovely to be able to take a proper look at some devices I’ve only ever seen in pictures up to now. I hope they open it again.

Redphone for Halloween

Only a bit scary

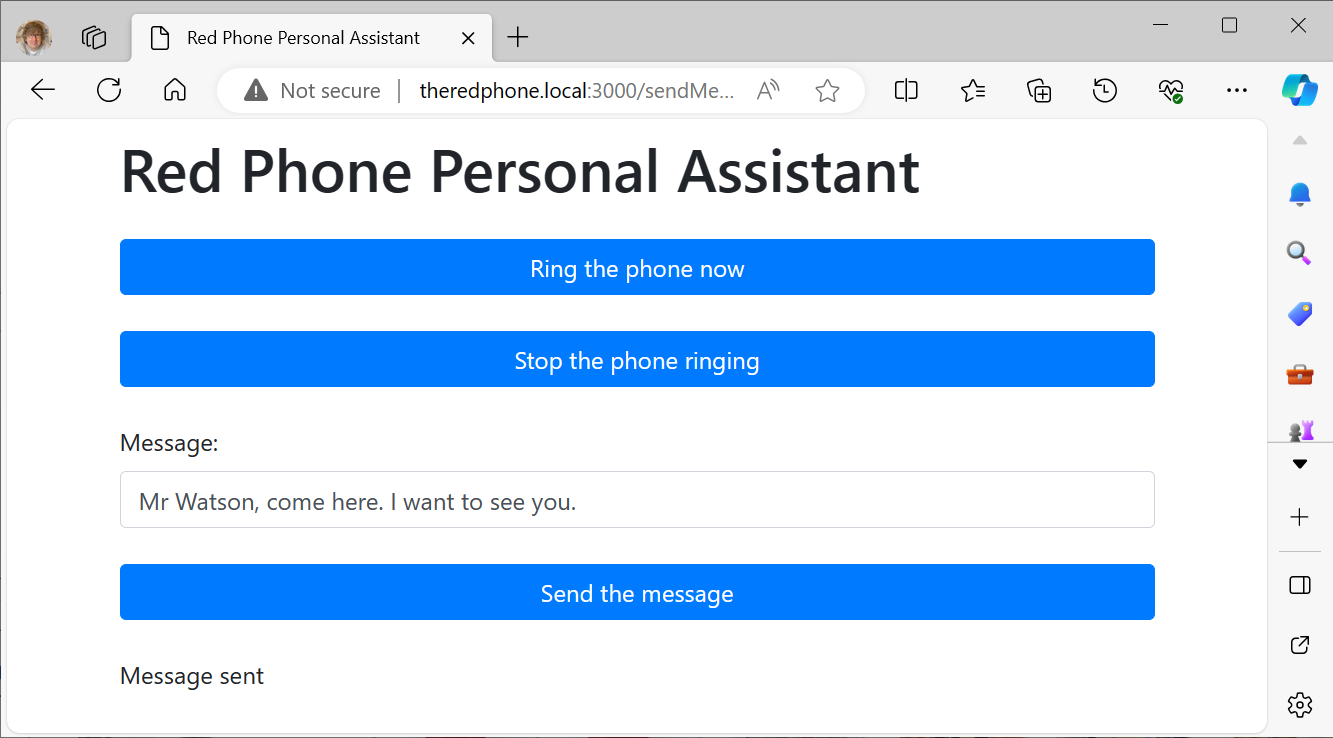
The “RedPhone” lives. The bell sounds like a real phone. But the insides are now possessed by a Raspberry Pi running JavaScript…..

This runs on the local network

It hosts a web page into which you can type messages and send them to the phone. When you send the message the phone rings and if you pick up the receiver you hear a ghostly voice dictate the message to you. If you pick up the receiver to make a call you get the dial tone. If you dial “2” and replace the receiver the phone will ring a few seconds later and deliver a ghostly message of doom:

randomMessages = [
    "I know what you did last summer",
    "Is that you, Boris?",
    "Look out of the window.",
    "They are on to you.",
    "Look behind you."
    ];

Other messages may be available later….

It’s been great fun to build. You’ll be able to find out all about it an upcoming article in HackSpace magazine.

Don't Buy a Raspberry Pi3 Model A+

Just Say No

It seemed an appealing purchase. I need a small Raspberry Pi to put inside a telephone (as you do) and this looked like it might offer a bit more power and connectivity than a Pi Zero. It arrived yesterday and I must say I’ve been completely underwhelmed by its performance. I was kind of hoping to be able to use remote development in Visual Studio Code to write and deploy Python code in the Pi. It doesn’t work. It never actually displays an error message. It just maxes out and then stops.

On the other hand the Pi Zero 2 that I got seems to work a lot better. I thought the devices would be broadly equivalent, but it seems that the zero is much better.

Magazine Takeover

They are both jolly good reads

I’m in two magazines this month. Which is nice. If you pick up a copy of the latest HackSpace magazine you will find my article about creating a PICO Powered Bluetooth remote control for a light. This is known as the “milkshake” project because I put the device in an empty milkshake container. Delicious. Then, in MagPi magazine you can find a reprint of my article about making a chord keyboard. This is known as the “missing wires” project because I forgot to add some of the wiring to the design.

PICO Examples vs OneDrive - Fight!

Size comparison with an SD card. Remember them?

I’m doing some work on the Raspberry Pi PICO. To make things easier I bought a debug probe. It’s tiny. It comes with all the cables that you need for your PICO, but you do need to solder three pins onto your PICO device to connect it up. That is, unless you get the much sought-after “H” versions of the PICO which come with pre-soldered pins and a tiny socket that connects directly using the cable provided with the kit.

It works a treat. Rob’s pro-tip: read the instructions very carefully and do all the steps, otherwise getting it working takes twice as long.

I installed the PICO SDK using a script you can find here. The script works fine, but by default it installs the examples into one of your document folders (or at least it did for me). I use OneDrive for file synchronisation and the next thing that happend (at least on my machine) is that OneDrive went nuts and started uploading thousands of tiny files into the cloud. I don’t remember seeing an option to install the examples somewhere else when I ran the script, but if you do the install I’d strongly recommend you look for it and put the examples somewhere in a folder which is not being synced with the cloud.

Heading to Driffield

David asked me if I fancied giving a talk to some sixth formers at Driffield. A chance to perform in front of an interested audience? Count me in. I took along a few toys, the trombone controller and my cut-price laptop. Much fun was had. The students were great. Lots of lovely questions (although one person did ask how tall I am - and after I had specifically told them not to do that). Kids eh?

I love telling the tale of embedded development. This is the best time ever to be doing it. Making stuff has never been so easy, so cheap, and so useful for building up your personal brand. I’m looking forward to going back some time in the future to see what they have been making.

David had brought in some trombones for me to look at, including the super shiny one above. It was nice to be able to compare the action of my sensor with something real.

Rob at Dot Net North

I’m back on the road again. Dot Net North have kindly invited me to be the speaker at their first in-person event since the pandemic kicked off. Really looking forward to the event. I’m going to be talking about making music with hardware. There will be devices you can build, devices you can marvel at and hopefully devices that work in front of an audience.

The event is in Manchester on the evening of Tuesday 20th September. You can sign up here.

Using the comport object in Pure Data

I’m building a Raspberry Pi 4 based device that uses a thing called Pure Data to play sounds in response to incoming MIDI messages. The device also has a controller and display which is controlled by a Raspberry Pi PICO. I’ve connected the hardware for a serial connection and discovered how to send serial messages from the Circuit Python program in the PICO. Now I need to get the messages from the PICO into my music making software. This is how to do it.

The above patch fragment (is that even a thing?) shows how it we can surface serial data in a Pure Data patch. However, before we can do this we have to add the comport object to your Pure Data installation. If you re using a Raspberry Pi it turns out that this is very easy:

sudo apt install pd-comport

This console command installs the comport object. Now we can add one to our patches. The patch above shows that we can send it messages to make it do things. The message on the left sets the device name. The second messages sets the baud rate. The third message asks the comport to display all the available comports that Pure Data has found.

When the above patch is triggered by a message on the inlet it will set up a comport and set the baud rate to 19200. Any messages that we send to the comport object will be sent out of the comport. These need to just lists of bytes. If the comport receives any bytes from these are sent out of the bottom of the comport object. In a while we’ll take a look at how we can encode and decode messages that we want to send over the serial connection.

Linking a Raspberry Pi 4 and a PICO over a serial connection

I want the Pure Data patches in my Chocolate Synthbox to be able to display lights that flash in time with the music. The lights in question are a bunch of neopixels connected to a Raspberry Pi PICO which is handing all the inputs and outputs for the device. I’ve done this to keep the design simpler and to remove any chance of issues with the sound code on the Pi interfering with the pixel animations.

However, to make it work I have to connect the Pi and the PICO together. Both devices have plenty of serial ports, so the best way is just to use one of those.

On the Raspberry Pi 4 (note that this only works for the 4) there are four serial ports which are surfaced on the “hat” connector. You have to enable them and they surface as devices you can use.

You enable them by editing the /boot/config.txt file:

sudo nano /boot/config.txt

Then, if you want to enable serial port 2 (which I do) add the following line at the end of the file:

dtoverlay=uart2

Save the file and then restart the Pi. You can now ask it which pins it uses with the command

dtoverlay -h uart2

The important part of this information is the “uart 2 on GPIOS 0-3. This means that the pins will be assigned as follows:

Pin 27 GPIO0 UART2 TX
Pin 28 GPIO1 UART2 RX

The other two pins (GPIO2 and GPIO2) can be used for hardware handshaking, but I’ve not enabled that. The device will appear as /dev/ttyAMA1, I’m going to use it in Pure Data (but that’s a different blog post. For this one, let’s discover how to connect the port to a PICO. I’ve decided to use uart1 in the PICO. This can be used on pins GP8 (TX) and GP9 (RX). So the wiring I need is:

Raspberry PI         PICO
Pin 38 GND           Pin 13 GND
Pin 27 GP0 UART TX   Pin 12 GP9 UART1 RX
Pin 28 GP1 UART RX   Pin 11 GP8 UART1 TX

Note that the TX and RX are crossed over. The PIC is running Circuit Python, this is how to connect a program to this port:

serial_port = busio.UART(board.GP8, board.GP9, baudrate=19200,receiver_buffer_size=500)

Now if the Circuit Python program in the PICO sends data to this port it can be picked up in the PI.

Auto-Start a Pure Data Patch on Raspberry Pi Bootup

Today I needed to find a way to auto start a Pure Data patch when a Raspberry Pi boots up. This is so that the Chocolate Synthbox (patent pending) can play sounds without the owner having to do anything to get it going.

Above you can see how I did it. The /etc/xdg/lxsession/LXDE-pi/autostart file contains commadns that are obeyed once the desktop has loaded. I used this command to start the editor:

sudo nano /etc/xdg/lxsession/LXDE-pi/autostart

I added the line you can see at the bottom:

sudo pd /home/pi/Desktop/Synthbox/ChocSynthboxMain.pd

This works well for me because the file Synthbox on my desktop contains the file ChockSynthMain.pd If you want to use it you change this to the location of your Pure Data patch.

You can use this technique to start any other programs on power up.

Moving a Raspberry Pi window around

I love working with PureData on the Raspberry Pi. But there are one or two issues. You can see a partiularly irritation one above. When you create a new window in PureData the window is positioned so that the top of the window us underneath the task bar. This means that you can’t click on the top of the window to move it around the screen. I’ve been racking my brains for ages to find a way to get the window into a more useable position. It turns out that the solution is really simple. If you hold down the ALT key and then click anywhere in a window you can then drag that window around the screen.

Wonderful when you know it….

Fixing slow Visual Studio Code on a Raspberry Pi 4

I never thought I’d be running Visual Studio Code on a Raspberry Pi. But now you can. The Raspberry Pi 4 is just about powerful enough to make it useable. Normally I’d be using remote Visual Studio Code from my PC, but for some environments - in this case using the Raspberry Pi PICO in-circuit debugger - you have to work on the Pi itself.

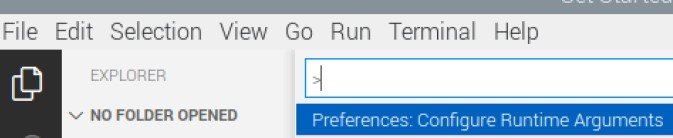
I tried this and was surprised just how horrible it was. Keystrokes were talking seconds to register. It turns out that there is a fix for this. You need to turn of hardware acceleration in Visual Studio Code. Open it up, use CTRL+SHIFT+P to open the command window and type: Preferences: Configure Runtime Arguments

This opens up a configuration file which contains a property called disable-hardware-acceleration which is normally commented out. Remove the comments so that the line “lights up” as below. Then quit Visual Studio and restart it. And you should find the user interface properly useable.

I’m connecting to the Pi on my PC via a VNC connection. It might be that working this way interferes with the way that graphics are rendered too, but it is easy to reverse if you find it makes things worse.

Swapping SD cards between Raspberry Pi devices

Today I had the magical experience of finding a Raspberry Pi 4 that I’d forgotten I had. It was bought for playing retro games but I never used it much. So it’s been moved into the Chocolate Synthbox where it works really well. Transferring the program code was very easy. I just removed the sd card from the existing device and popped it in my “found” one.

It just worked. The only problem was that ssh (which provides the secure terminal connection between my desktop PC and the synthbox) got upset because some of the properties of the network connection hardware were different after the swap. If you ever have this problem the solution is quite simple. Open up a command shell and navigate to the folder .ssh folder.

cd .ssh

Now use notepad (or your editor of choice) to open up the known hosts file:

notepad known_hosts

Now you have to delete the line of the hosts file that refers to the machine named in the sd card that you have just moved. Next time you try to connect to that machine the ssh command will make a new entry in the file for the new machine.

I was moving the card between one Raspberry Pi 4 and another. I’m not sure what would happen if you moved it to a different model of Pi.

Pi Zero Version 2 Released

The Pi Zero has always been a favourite of mine. It’s a bit hard to get hold of sometimes, its frequently out of stock and they only let you buy one at a time. I don’t see that changing any time soon. They’ve just released version 2 which delivers a serious boost in performance, they say up to the level of a Raspberry Pi 3. It has a 64 bit architecture and four processor cores along with a general speedup of around 40%. I’ve been planning on making Pure Data output device to use with the PICO MIDI cheese box. It looks like this would be the perfect candidate.

Waveshare WM8960 Audio Hi-Fi Sound Card HAT

soundcard.jpg

I’ve been looking for a soundcard that will let me let me create a PureData powered musical instrument based on a Raspberry Pi device. This one looked like it might fit the bill. It even has two tiny microphones and comes with a pair of speakers.

The hardware isn’t directly supported by the Raspberry Pi operating system, so you have to do a mildly complicated install which involves downloading GitHub repository and then running an init script. My pro tip: rather than using Git clone from the command line (which will insist on you giving a GitHub username and password that you’d really rather not) use the browser to download the zip archive and then unzip the files onto your desktop.

I couldn’t get it to work (which is nothing new for me). I filed an online support request from the product page and was very surprised to get a prompt response offering help. Buoyed by this I had another go, starting from a brand new fresh install of Raspian. This worked a treat. Better yet, both the speakers and the microphone work perfectly with PureData (as long as I remember to start PureData in supervisor mode):

sudo puredata

If you are looking for an “all in one” audio solution for your Pi this is a very good bet. The speakers are OK for their size. The only thing it is missing is line audio in. You can only record from the onboard microphones. However, they do supply a full schematic, so if you are handy with a soldering iron and fine wire you might be able to make your own. And the support is very good. They even got back to me to ask how I was getting on after their first response.

Neat USB Hub for Raspberry Pi

usb hub.jpg

I really like the Raspberry Pi Zero. It's tiny and powerful. But connecting things to it can be a bit of a pain, particularly when you are setting up a system and really need a USB mouse and keyboard.

This little device makes things a lot easier. It is a hub which can plug straight into a Pi Zero and give you four ports of USB goodness. It even has an adapter so that you can use it as a “normal” hub as well. I found it in Amazon here.

Haunted USB sound adapter for Raspberry Pi

haunted usb connector.jpg

I needed a USB sound adapter for a Raspberry Pi device. I found this one on Amazon and also Pimoroni. it works fine. You get stereo audio output and mono microphone input. But the strange thing about it is the eerie glow that you get from the two sockets:

sound lights.jpg

I don’t think the device supports an optical audio connection (which is the only reason I can think of for there being lights in there). However, they do seem to flicker when you plug the device into a Pi.