Running ASP.NET on a Raspberry Pi
/
I'm really going to have to have a go at this. Awesome.
I'm really going to have to have a go at this. Awesome.
Simon, Liam and I took a bunch of Raspberry Pi devices into Hull today to do a bit of Minecraft and Hardware interfacing with folks who'd come along to Platform Expos 2014.
Great fun was had, in spite of the rain which made carting the equipment around a rather wet affair. You can find the notes for the hardware exercise here.
Today I did a Rather Useful Seminar all about the Raspberry Pi and how to get started with it. Someone asked if I could record the screencast. So I did. You can find it above.
Well, that was a fight and a half.
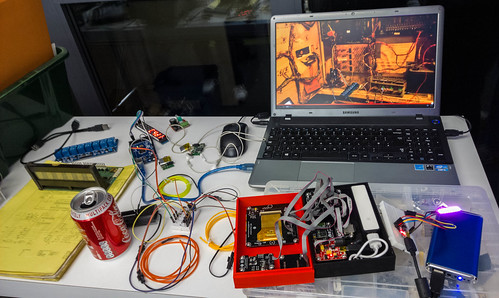
I've finally got the Minishift that I was building connected to the Raspberry Pi and working. This turned out to be a lot less trivial than I expected. One of my strongest beliefs is that the best way to learn stuff is to try and do things. I've sure learned a lot this time.
You can put items into the Minishift in a variety of ways. It supports SPI (Serial Peripheral Interface), so you can just connect an Arduino (or probably a Raspberry Pi) directly and it should just work. However, it is supplied with a rather spiffy USB-SPI interface and so I thought I'd use that instead. It looks neat.
So I plugged the board into my Pi and up popped a new HID (Human Interface Device) in the dev folder. So I thought all I'd have to do was install the Minishift Python program and I'd be good to go.
Wrong. Wrong, wrong, wrong.
What I had to do (from memory, there may be steps I've forgotten) was to:
Anyhoo, it now works fine and the hardware looks great. The next step is to get a perspex case for the Pi and then make a little mounting bracket so I can put the Pi and the display on the wall somewhere and have a clock/RSS feed reader/weather forecast thing going.
The MiniShift is great fun to build. You can find it on Tindie.
Still a work in progress...
It's been nearly two years since I started on my Raspberry Pi powered arcade tabletop. I got it to the point where it was just about working and promptly lost interest. For a considerable while the poor thing has been languishing in my office. I even took the drastic step of removing the monitor in the hope that the sight of the empty hole might motivate me to actually finish it off.
Anyhoo, this week I've decided to actually get the project finished. I've made an arrangement with Robert that if I've not got the table finished by the time he comes back from his travels I'll give him fifty quid. I figured that this would force the issue nicely. So far it is working....
Another reason for finishing it off is that I needed a solid reason to play with the new Raspberry Pi B+ device. This has lots of advantages for this project. It has four USB ports so I don't need a USB hub or separate power supply. I now just need two power cables to the device. One for the monitor and the other for the Pi.
My B+ arrived today and I spent a little while getting it going. There is actually an operating system image specially for emulating games machines now, it is called PiPlay and it is rather nice. You just download the image and it has emulators for lots of devices. It hooks into Mame4All, which is the latest incarnation of Mame for the Raspberry Pi.
However, I found that Mame4All is not quite what I want for all the games I want to play. It is based on a slightly older version of Mame which is good because it performs better, but bad because it is missing one or two crucial features. The biggest omission is the lack of the "cocktail table" button.
One of the things I want to be able to do is have a player at each end of the table so that they can get proper Player 1 vs Player 2 action. This means that I need to be able to invert the screen when each player takes their turn. Mame4All doesn't do this, but AdvMame does. But then Mame4All works with some games that AdvMame doesn't like...
So it looks like I'm going to have to have several different Mame installations installed and then write a script that fires up the appropriate version depending on which game we want to play. Which shouldn't be too much of a stretch.
As for the Pi B+, it works very well. The only problem that I've found is that if you connect a USB device that wants a fair amount of current, for example a USB hub or speaker, it causes the Pi to reset. I think there are some settings that you can adjust to allow more current from these ports. I'll have find out more about this.
I've also ordered some glass from Jack's Glass for the top. I just hope that Robert will be impressed when he gets back....
Talking Pi
Today Mike and I took a bunch of Raspberry Pi systems to a teachers conference for the day. Great fun. Particularly if, like me, you contrive to arrive just after all the machines have been carried in and set up. Actually we have got this off to a bit of an art now. We have a kind of Pi road show which consists of a bunch of Ikea bags containing the monitors (the heavy bits) and a couple of boxes with all the other parts that we need to run the systems. Anyhoo, we set up shop and then talked Scratch, Python, Hardware and the philosophy of education and the role of teaching programming.
Then we packed it all back into Mike's car boot and left.
If you want to find out what we were talking about, and get notification of any new courses that we are running in the future you can sign up for our newsletter at: http://www.wrestlingwithpython.com/
Tonight we had our first meeting of the new C4DI hardware group. There seem to be lots of peple who are keen on getting to grips with hardware and embedded systems, with interest in Raspberry Pi, Arduino and Gadgeteer to name a few. I took along some toys, as had other folks. Above you can see the insides of my Tagomatic device, along with some pinball machine related shenanigans which includes using an Arduino to capture messages inside the pinball table circuitry and some coils of electro-luminescent wire. That lights up and looks really cool.
Stay tuned for details of future events, this looks like it is going to be great fun, and it's not too late to sign up over at the meetup page for C4DI.
I’ve done some small tidying up of the notes that we used for our Raspberry Pi Hardware sessions a couple of weeks back. You can download them from here. If you do use them in any way, I’d love to know how you get on.
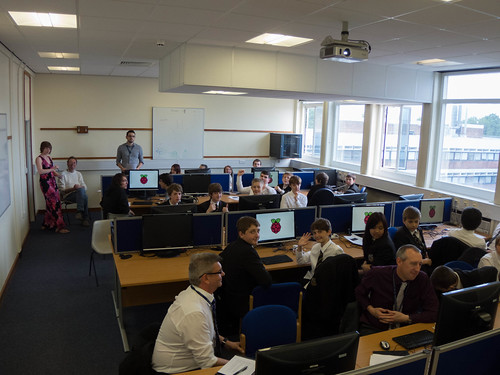
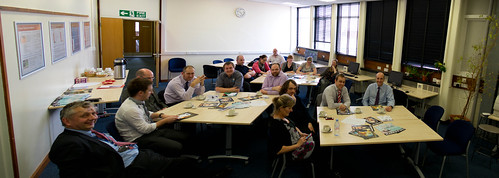
The room just before we started.
Today we had a bunch of folks from a local school come and see us and play with our Raspberry Pi systems. To say we had loads of fun would be a bit of an understatement. Great stuff. With kids like these I can see why folks become teachers.
I said I’d put some links on the blog if you are thinking of getting a pi. You can get the Raspberry Pi, plus cases, power supplies, keyboards and mice (or a kit with all those) from CPC. Follow the link here. You can get the wiring kit that we used in the labs from SK Pang, here.

Simon and me with a couple of satisfied customers. We’ll post the notes for the labs once we’ve finished tidying them up a bit.
Not too shabby for a phone camera, eh?
My plan was to spend today writing content for a Raspberry Pi course that we are doing next week. The idea of my session is that we connect a Raspberry Pi to a bunch of LEDs and switches and then have fun writing Python programs that read the switches and flash the LEDs. Of course, the content needs lots of pictures of the hardware and the wires. And of course this is the one day of the week I didn’t bring my camera to work. So I used the one in my Lumia 920 and the results were astonishingly good.
To make things even better, I could take the pictures on the phone and then, when they appeared on Skydrive a few seconds later I could cut out the images that I wanted and paste them into the document on my PC. This made for a really fabulous workflow. If I had been using a “proper” camera I’d have had to take the pictures, get the SD card out of the camera, plug it into the computer and then drag the pictures off one by and drop them into the document in the right order.
Mobile phone cameras are great for close up photography. This is mainly because the focal length of the lens in a mobile phone camera is very short, which means that it has good depth of field (near things are focused as sharply as far things). This is great when taking pictures which are very close to the lens, when it is hard to make sure that everything in the frame is the same distance from the sensor.
The bad news with mobile phone cameras is that tiny cameras make for tiny sensors, so that images can be grainy. But my Lovely Lumia doesn’t seem to have that problem and so I was able to get good quality pictures into my document much more quickly than if I’d remember to bring the camera in. I’m definitely going to work this way again, it might even be worth making a little macro stand for the phone.
I’ve been playing with Python for a while now and I quite like the language. If you’re looking for a good book to get you started writing Python for the Raspberry Pi and having fun doing it, I can recommend this one. It covers the language in a very useful way, and also has space for some nice coverage of game development and hardware connections.
The audience, still smiling at the start of the session.
We had our second Raspberry Pi session today. Good to see more people keen on spreading the word about the fun you can have with computers. And the Raspberry Pi is a great vehicle for that. If you want a really nice guide to getting started with the Pi, one of the folks that came to see us yesterday, Mark, has put together a most excellent guide which you can find here. You can also find the notes from the last session, along with another set of smiling faces, here.
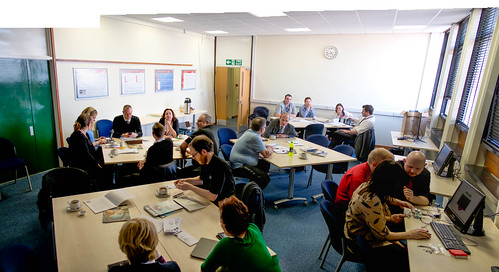
Just as we were getting started.
Tonight Emma-Jane, Simon, Neil and myself did our first “Raspberry Pi” event. Thanks to Emma-Jane’s special trip to the supermarket we even had some actual raspberry pi’s to eat, which was nice.
The event was organised for local schools and colleges who want to find out more about the platform and how it can be used for teaching and fun. Simon showed off the neat way that you can interact with Minecraft from within a Python program and I told my polar bear joke. Again. It was nice to see so many people who were keen to work with this splendid little piece of technology. You can download the slide deck for the presentation from here. If you want to find out more about my Raspberry Pi powered arcade table you can find out here. And yes, it is still “nearly finished”…
We are repeating the whole thing tomorrow, including probably the polar bear joke….


