Lithophane Fun

This is about half way through

What better way to start the year than by printing some lithophanes.

This is Melbourne

I’m quite pleased with the results. I got a Cyan, Magenta, Yellow, White kit from Bambu. They have a little wiki which tells you how to do it. This image took around 2 and a half hours to print, which is not bad. Next step is to try a 0.2mm nozzle and see how that turns out.

Bambu Printers: A1 versus P1S

One of the standout things about technology is that as soon as you have bought something a newer and possibly better one is released. A month or so ago I summoned up the courage to invest in a new 3D printer - the P1S made by Bambu which was acclaimed as the best one you could get. Then, last week Bambu released the A1 printer which seems to do everything that my printer does, but for a bit less money. Should I be upset? Read on to find out.

When number one sun arrived here for Christmas the first thing he did was order up a Bambu Lab A1 printer (the new one) to be delivered to our address. This means that for a while we’ve had both 3D printers working in the same room. Let’s take a look at them. The pictures here are from the Bambu website. I hope they don’t mind. I totally forgot to take any shots of my own.

This is the A1. The thing on the right is the Automatic Media selector (AMS)

This is the P1S. The AMS is on the top.

The A1 is what is known as a “bed slinger”. The print head moves left and right over the bed, which moves forward and back. The print head gantry is lifted up as the object is being printed. The P1S puts the print head on a carriage above the print plate. The build plate moves down as the object is printed. But which is best? And should I have waited for the A1 (assuming that I knew it was coming)? Some points to ponder:

  • First things first. Both printers produce excellent prints at very high speed. There is little if anything to choose between them on print quality. At one point we were printing different parts for a gadget (the amazing Toriodal Launcher) When we finished we just put the parts together and they fitted perfectly. So I can’t say one printer is better than the other at printing.

  • The A1 really does sling its bed around at speed while it is printing. It made the desk underneath really bounce. This would worry me if I was printing something tall and thin, but we didn’t have any problems during printing.

  • The P1S is completely enclosed, which means you can print materials which need to be kept warm. The AMS system on the P1S is also enclosed, which means that reels of filament won’t get damp or dusty while they are waiting to be used. Everything is open on the A1.

  • The A1 has a lovely little colour display which shows you what is being printed and provides a nice touch interface. The P1S has a four line text display which does the business but is nowhere near as fun to use. Having said that, you can control both printers from you phone, so the amount of button pushing you do on the device can be zero.

  • Both devices (as purchased) have automatic media selection. They can change filament during a print. This lets you do multi-colour printing and would also allow the printer to switch to a different filament roll if one runs out. I think the AMS solution of the A1 is much more elegant than that on my P1S which seems to involve lots of toing and froing as the filament is wound all the way back onto the roll when it is changed out. The A1 just retracts the filament from the print head itself (although it does have to have four filament feeds to the head). The A1 can only support 4 different filaments; the P1S can be expanded to use 16 by using 4 AMS units.

  • It is much easier to get at and change the print nozzle on the A1 series. The print head itself is more accessible and the nozzle is clipped in rather than screwed in, as it is on the P1S. If you want to regularly switch nozzle sizes this might be a thing to consider.

So, am I regretting my purchase? Is the A1 better than the P1S? I reckon they are pretty much the same. The decision goes down to form factor. I started 2D printing 12 years ago with Una the Ultimaker who was very similar in design to the P1S. I prefer this “enclosed” design, although this is very subjective, so I’m happy with my P1S. Number one son started with a Crealty Ender 3 which is a bed slinger, so he went for the A1. The P1S also takes up less desk space as you can put the AMS on top of it (although you can print a bracket to mount the AMS on top of the A1 as well).

If you are looking to buy one of these formidable devices my advice would be to go for the A1 unless, like me, you prefer the look of the P1S. Both work well and should be equally reliable.

Safemaking with the Bambu P1S

somewhere safe to put all the money I haven’t got

One of the great things about having the Bambu printer is that I seem to be able to decide to print something and then just print it. Even if the thing is large. Today I had a go at printing this bank vault. It just worked.

These are the main parts

I was expecting a bunch of problems and a ten hour wait. After all, I’ve been printing for a very long time. What I got was all the important bits printed before lunch.

The lock contains a surprisngly complicated latch

I had the whole thing built by mid afternoon. The design cost me a couple of quid or so and it was very well worth it. I even got instructions telling me how to assemble the different parts.

Bambu printer top tip: pick the right buildplate

If your plate is gold (which is most likely) it will be the Textured PEI plate)

I’m getting to really like the Bambu P1S. It’s unlike printers I’ve had before. With those the very first prints I got with them turned out to be some of the best prints they ever made. With the Bambu it seems that the more you use it, the better it gets.

This is the first printer I’ve had with swappable build plates. They are held on with magnets but you can pop them on and off - especially useful for removing prints. There are also a few different types of plate, and herein lies a problem that I (and lots of other folks) had. My first prints looked good, but kept coming off the print bed or curling up at the corners.

It turns out that the print is supplied with a Textured PEI Plate, but the default setting for the Bambu slicer is the Cool Plate. So the temperature of the print bed was far too low. A peek at the forums revealed that lots of other folks have had this problem. So - if you are lucky enough to get one of these machines, make sure that you make the build plate match the slicer for best results.

The Bambu P1S 3D printer

Scary fast

I’ve been working quite hard recently. And rather than fritter my earnings away on fripperies like food and fuel I decided to get a new 3D printer. This is my third one. I’ve still got number one, Una the Ultimaker because she has huge sentimental value (and can still print up a storm when required). But number two, Edna the Ender, has now moved on to a new home.

I’ve been watching videos about Bambu printers for a while. I didn’t think I’d be able to afford one of their amazing X1-Carbon printers. In fact, I still can’t. Instead I’ve got myself a P1S which seems to offer all the advantages with a much smaller price tag. They also offer the very interesting AMS which can switch prints between four different filaments. I’ve wanted to try using multiple filaments in a single print job for a while, and now I get the chance to have a go.

The printer arrived yesterday and it is lovely. So far. It reminds me of one of those posh “bean to cup” coffee machines. You set it off and it makes all kinds of whizzing noises. Then some filament goes in one end and a well printed item drops out of the other. Unlike previous printers which I spent many happy (and some unhappy) hours fettling I’m kind of hoping that this one will just work and keep working. I’ve printed a “benchy” (the standard little boat design used to test these things) and it came out very well in double quick time.

I’m looking forward to printing a few more things in the future.

Minox Scanning Report

The height steps are in .2mm because that’s the print layer height

The story so far: “Rob has become mildly obsessed with getting the best possible results scanning the tiny negatives produced by his Minox camera. He’s 3D printed a holder for his scanner which had different negative heights. The idea is to scan a negative and determine which height works best”. Now read on…

It wasn’t taken for testing, but it works really well

I took the picture above down at “the dock” in Hull. It is of the C4DI building and a tiny bit of the tidal barrier. The railings going off into the distance are a very good test for resolution. I used my “different height scanner thingy” (really must think of a better name) and got the following results:

A print of the entire image at this magification would be around 24 inches or so across

It was interesting to see the difference that 0.2mm height makes to the image quality. The best way to see it is to look at the lamppost at the end of the walkway. That is better defined against the background in the -0.2mm height scan. The next thing to do is to print a complete scanning frame for that height.

Next Hardware Meetup is all about 3D printing

YOu could have one of your very own….

We’re having our next Hardware Meetup in Hull library in the Makerspace on Wednesday 1st November starting at 5:30pm. It’s all about 3D printing. There’s an exhibition of 3D printing on at the Makerspace at the moment and lots of stuff worth looking at, whether you own a printer or are thinking of getting one.

It would be lovely to see you there. If you have something you’ve printed that you want to show off, bring it along. There will be a small (3D printed) prize for the object that everyone likes the most. I’ll be talking about the fun you can have making 3D printable objects from Python code - which is something of a thing for me.

We’ll also have free tags of fun to give away, and we might have a Tag Joust championship. It would be lovely to see you there.

If you are around earlier on Wednesday I’m going to be in the Makerspace fiddling with stuff for the entire afternoon if you want to drop round for a chat about hardware.

3D printing exhibition at Hull MakerSpace

This picture was taken with my 3D printed film camera

Today I went down to Hull MakerSpace to hand over some bits and bobs for an exhibition of 3D printing. Lee-Ann is organising the display and some events to make folks more aware of what 3D printing can do. I’ve contributed a Hull Pixelbot, some Connected Little Boxes, tags of fun and a few other things. If you’re in Hull over the next few weeks you can take a look at the stuff. There are some amazing printed models using some fantastic types of filament. Great fun.

Using OctoPrint without a bed sensor

The line you want to comment out is highlighted

This is a rather selfish post, in that it is here so that I can find it in my blog if I need to do it again. Although if you’ve just tried to use OctoPrint and had the print fail because of a “Bed Levelling Not Enabled” error you might find it useful…

Anyhoo, a while back I disabled the bed level sensor on my printer, what with its habit of bashing the print head into the print bed every now and then. I decided that I could manage without automatic bed levelling and things have been going fine. I’ve been copying my print files onto an SD card and plugging it into the printer. But today I decided to reconnect my OctoPrint server. This is useful because it means I can print directly from my computer rather than hopping around with memory cards. But it didn’t work. OctoPrint kept shutting down the printing with an error.

I eventually tracked down the problem, and it wasn’t OctoPrint. It’s just that OctoPrint cares when the printer sends out an error message, whereas if you print from a memory card all printer errors are ignored.

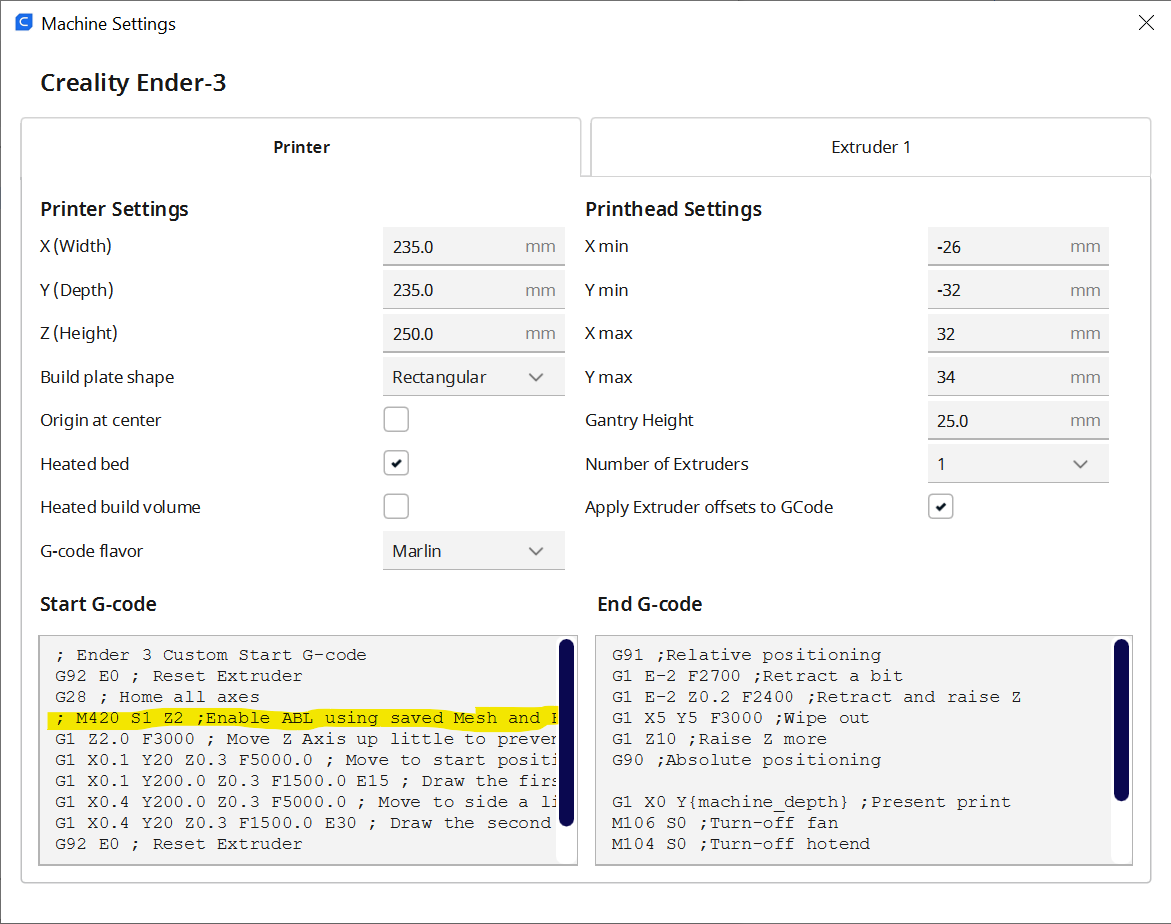
The problem is with Cura, the program I use to convert my designs into code files that control the printer. Cura adds a header of instructions to the printer code file. One of these was asking the printer to turn on bed levelling. The printer complains it hasn’t got bed levelling, sends out an error message and OctoPrint stops the print. The solution is just to comment out the M420 statement that does this, as you can see above. To get to this menu you use Settings>Printer>Manage Printers>Machine Settings

Lensboard a gogo

This makes the camera a lot more useful…

Today, after a trip to the dentist for a filling (am I the only person who gets to the dentist half an hour early?), it was time to print yesterday’s lensboard design for my Micro-Press camera. It just fitted. I’m very pleased with myself, even though it was actually a pretty simple design. The board seems quite light-tight and my test pictures came out fine.

The hardest part of the job was finding where I’d put my black filament - the board nearly ended up being printed in shocking pink.

I might do another one with higher infill. This will make it slightly heftier and even more lighttight, but the camera was quite usable with the first version I printed. I’ll put the design on Thingiverse later for those many readers of my blog who have a need for a lensboard for a 1950’s Micro-Press press camera.

Making a lensboard

I already had some code that made rounded cornered plates

One of the truly great things about having a 3D printer is that if you have a need for something you can just print one. My “auction packed” camera arrived last week and today I thought I’d pop a lens in it so that I can try taking some pictures. For these type of cameras the lens is mounted on a plate called a “lensboard” which is then fitted into the camera. This makes it much easier to swap lenses when you are out and about. The camera didn’t come with a lens, but it did have a lensboard.

Unfortunately it was the wrong size. The hole in the middle was too big for the lens I wanted to use. So, I decided to make my own lensboard. I’ve made a quick version in OpenScad and tomorrow I’ll print it out and discover just how wrong it is.

Bye bye BLTouch

It seems we are not quite out of the woods yet…..

I was showing off my 3D printer last week and it promptly buried its head in the print bed and dragged it around. Wonderful.

I’ve had this problem for a while. The BLTouch sensor on my machine has got very unreliable. This is the little probe that tells the printer when the had is close to the bed. Or not.

Anyhoo, I’ve spent the afternoon removing it. I’ve been manually adjusting the print height for years and I don’t mind doing it again. I’ve loaded up the Jyers firmware which has a very nice automated levelling function which moves the head to the different corners so you can set it up by hand. This works very well. Now all I need to do is solve the bed adhesion problem I had while printing some more Tags of Fun. The good news is that the print quality is excellent. The bad news is that half way through the print process the thing I’m printing tends to want to go off for a walk…..

3D Printing Rule 0

This is the most important rule for anyone with a 3D printer.

Never start to think of your 3D printer as an appliance.

My printer has been behaving very well of late. So well that I’ve started thinking it is something I can switch on and it will just work. Silly me. This morning I started a print and it promptly embedded the print head in the bed - necessitating a bunch of re-alignment and fiddling to get it back working again. Lesson learned.

3D Printed Camera article now in Hackspace magazine

One of the funnest articles I’ve written

The article about my 3D printed camera is now in HackSpace magazine, which you can find in all good newsagents. There’s lots of great stuff in there along with my few pages. If you fancy making a camera like this you can find the designs and lots of useful stuff here.

The camera is now light tight and works a treat

I took the picture above with the 3D printed camera. The amount of detail in the branches is very impressive.

Thick Printing

This is the newly printed left hand version of the chord keyboard.

I’m printing some items for a HackSpace magazine article. This one is about making a Bluetooth version of the chord keyboard I made a while back. Today I printed the top of the left handed version of the keyboard. I’ve thickened up the top plate quite a lot. This has done a few things to the print job; perhaps the most notable thing is that it now takes over 6 hours to print. However, it has also added a really nice bit of extra “heft” to the keyboard.

Lots of things benefit from a bit of extra weight, and this is one of them. Up until now I’ve usually printed the thinnest structures I can get away with to save time and filament. However, I think from now on I’ll live with the extra time and cost and print things a bit thicker.