Visiting Concorde
/
When we’re in Bristol we always go down to Filton and take a look at the Concorde they have there. We went today and I think I’ve finally managed to get a reasonable picture of the controls.
When we’re in Bristol we always go down to Filton and take a look at the Concorde they have there. We went today and I think I’ve finally managed to get a reasonable picture of the controls.
This is awesome. I’ve stayed away from buying any of the Nintendo Labo kits because, after all, they are only cardboard. However I couldn’t resist the purchase of the Labo VR kit above. And I allow myself one silly purchase after giving a course (thanks GSK). And I get to play Zelda in VR.
So today we tracked down a copy of the game and starting folding things together. The game comes in a box around the size of a large pizza and is made of similar cardboard (to the pizza box, not the pizza). The instructions are an object lesson in how to tell you how to assemble something. They even have funny names for the cut-out parts. One was referred to as “two pandas holding hands”. If you follow the directions you’ll have no problems, and great fun putting the things together.
We started with the 3D visor. This is very reminiscent of Google cardboard. The lenses are supplied pre-mounted and are of good quality. The Nintendo Switch is not really a 3D device, but it works really well in the role. Just remember to clean the screen before you put it into the goggles. The biggest problem is that you have to hold the goggles up to your face while operating the controls, so you’d probably not want to spend too much time using them. But you do get a convincing 3D experience.
Then we moved on to the rocket launcher. There is only one word for this. Fantastic. The construction is properly long, with lots of different elements to be fitted together. When it’s complete you really feel that you’ve built something. And it works. The Switch “goggles” fit into the end of the launcher and you have a positive slide reload action that you can see in the game. Then a press of the trigger launches a rocket with a solid “thwack”. I was a bit worried about the strength and durability of the cardboard construction but it seems pretty solid and works really well.
I reckon if you have a Switch you should get this. The whole thing is such fun.
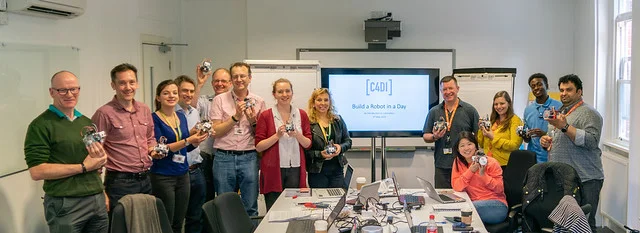
We’ve taken “Build a robot in a day” on the road and today we spent a lovely day today down at GSK in Weybridge. Things went so well that at one point we thought we might have to rename the course “Build a robot before lunch”. Everyone got their robot moving around and interacting with them.
If you were on the course (or are just interested) you can find all sample programs here.
If you want to work further with the Arduino I’d recommend that you search Amazon or ebay for “Arduino Kit” and buy something that costs around 25 pounds or so.
Update:
I’m back home now and I’ve put a few pictures of the event on Flickr here.
Last yer I gave a session at the Insider Dev Tour in Manchester. It was great fun. And they’ve invited me back to do it again. Different topic (IoT) but probably the same jokes.
If you fancy coming along; keep the 20th of June free. The sign in page will be coming soon.
I mentioned on Sunday that I was a bit worried about the SD card reader on my lovely 3D printer being potentially unreliable. For years (seven actually) I’ve been writing my gcode files onto an SD card and then plugging into the printer for each print. This is probably not a good idea (and hasn’t been one for a while).
Anyhoo, a couple of failed prints on Sunday left me wondering about a better, and less physical, way of connecting the computer and the printer. I could just plug the printer straight into my computer, but I’ve never been keen on doing this. Knowing my luck the Windows 10 update process would steam in and break a print 8 hours in.
So today I took a proper look at Octoprint. Its a server that you attach to your printer. It gives you a lovely web interface that you can use to manage your prints and it also has a plugin for Cura, my favourite slicing tool so I can just open the files in Cura and then send them straight to the printer.
It’s wonderful. The installation is a breeze. There’s a boot image for Raspberry Pi that you just have to copy onto an SD card and you are in business. You don’t even have to attach a keyboard and screen to the Pi you are using a s server because you can do it all over SSL and via the browser.
I’ve done a couple of prints and they’ve worked very well. The next thing I’m going to do is attach a webcam to the server so that I can view print progress remotely.
If you have a 3D printer and a spare Raspberry Pi lying around you should definitely take a look at this.
Me and my Alienware laptop go back a long way. We need some spare laptops for a course that I’m helping with, and I was wondering how hard it would be to get an 8 year old laptop to run Windows 10.
It turns out to be a bit tricky, but possible. I had to ignore dire warnings about graphics cards and press on with the installation anyway.. Then, afterwards I found some original drivers and installed enough of them for the automatic Windows 10 update to take over and install the rest. The biggest headache was spending some time trying to work out why the WiFi card hadn’t been detected, only to discover that I hadn’t actually turned it on using FN+F3.
It now works a treat. I’m missing drivers for the SD card and the firewire port, but I don’t need those. As a machine it is pretty responsive. In fact it now books more quickly than it used to. If you have an old machine that you want to rejuvenate, I’d strongly advise you to have a go. The Windows 10 update process has a very good rollback behaviour that means you are unlikely to break the machine and you might end up with something much more useful.
I’m doing another talk for in the “AI Frenzy” series at c4di on Thursday 9th of May. I’m going to be talking about chatbots, how to make one and how to hook it into cognitive services that will make it usefully intelligent.
Oh, and we might try to control some robots with the perhaps a bit of world domination thrown in.
You can sign up here.
Una, my Ultimaker printer has been very busy over the last week. We’re doing a “Build a robot in a day” course and we need 15 sets of printed parts for the robots. Up until today she was printing beautifully, and I made the mistake of thinking “My goodness, the printer is working well”. Bad move. She promptly stopped dead in the middle of a print. Oh well.
It made me thing a bit about what we regard as reliable. The way I see it, as soon as a thing fails once you have to regard it as unreliable. There are not that many “acts of god” that can come out of the blue and stop something from working just one time. What usually happens is that you either face up to the fact that something is broken at the first point of failure, or you spend the next few weeks discovering just how broken it is.
I think I’ve traced the problem to the SD card that I was using, which might be going a bit “soft”. That or the memory card connector in Una. I’m thinking about installing Octoprint and removing the need for SD cards.
And I’m trying really hard not to think how well things are working…..
I've been working on an an air quality sensor that we are hoping to attach to a lamp post somewhere in Hull. I’ve got the hardware just about sorted (as you can see above) and the software should work fine.
But it doesn’t.
As soon as I connect everything together the serial interface to the host computer stops working. This is not a problem in operation, but it makes it hard to configure the device. I spent a little while trying to find out how the software could behave in this way and failing. After all, it works fine in other devices that I’ve made. And then I realised a very important aspect of embedded development.
“It’s often a power supply problem. Especially if it can’t be.”
The problem appears when I connect the SDS011 sensor. This is not particularly greedy in power terms, but it does take a bit more out of the device and this seems to tip something over the edge and stop it from working. If I add a second power rail to a different point in the circuit all is well. Now, it might be that the Heltec that I’m using is sensitive in this way, but we can’t have unreliable devices. I think I’m going to have to acquire some PCB design skills and make a proper carrier board with sends the power to all the right places.
I really like the way that I can go for a walk at lunchtime and within a few minutes I can be in a place where I can take pictures like this.
Continuing on the theme of “Imitation is the sincerest form of flattery” I’ve noticed a bit of traffic on my blog post from 2013 introducing the coursework that I’d set that year for the first year programming course. When I was teaching I had a strict policy of always creating new software scenarios because of the dangers of recycled solutions.
It seems that the folks at the University of Bedford are a bit less fussy. There are some changes to the original text that I set but apart from that it’s the same. Oh well.
I got an email from a reader who was very enthusiastic about the Chinese version of one of my Begin to Code books. Apparently even the jokes (both of them) have been preserved in the translation. I asked for a look at the text, and this appeared on my Twitter feed, which was nice.
Of course, the thing that makes this most interesting is that I don’t think that Microsoft has made a Chinese version……….
I’m starting to really like FreeCAD. I’ve used it for years, but I’ve been cheating in that I’ve used internal Python engine to run programs that design things. However, over the last few days I’ve hit up against things that are a bit hard to do programatically, so I’ve been investigating the tool itself. It’s awesome. I can now draw paths and then use those to create curvy objects like the pipe above, which also has a cutout for the BME280 environmental sensor. And then I found that FreeCAD also supports spreadsheets.
You can bind properties in your drawing to values in a spreadsheet. So, if I want to change properties in my drawing (perhaps increase the base thickness) I just change the value in the spreadsheet and the drawing is automatically updated. Dimensions in the drawing are mapped back to the spreadsheet cells. It’s wonderful.
I’m building an Air Quality sensor. As you do. I need a variety of different nuts, bolts and washers to hold bits of it together. Normally this would be a pain, as I’d have to buy twenty of something I only need four of.
But now B&Q (the big diy warehouse in Hull) have a “pick’n’mix” display for things like this. It’s like it used to be with the sweets at Woolworths. A full bag like the one above is around two pounds fifty, which is fantastic for making things.
A completely uncharacteristic easter continues with a fantastic Sunday. Hope you had as much fun as we did.
It turns out that my original C programming notes are coming back into fashion. Thanks to the archiving efforts of a site in China (thanks foks) I’ve managed to get hold of the PDF of the notes, but I can’t find the 25 year old original of the document. I’ve spent a big chunk of today turning on ancient laptops and finding that their disks don’t go round any more, including this one above. I think the platter has kind of stuck. Or something. I’m tempted to open it up and give it a tiny twirl. After all, it can’t make things worse……
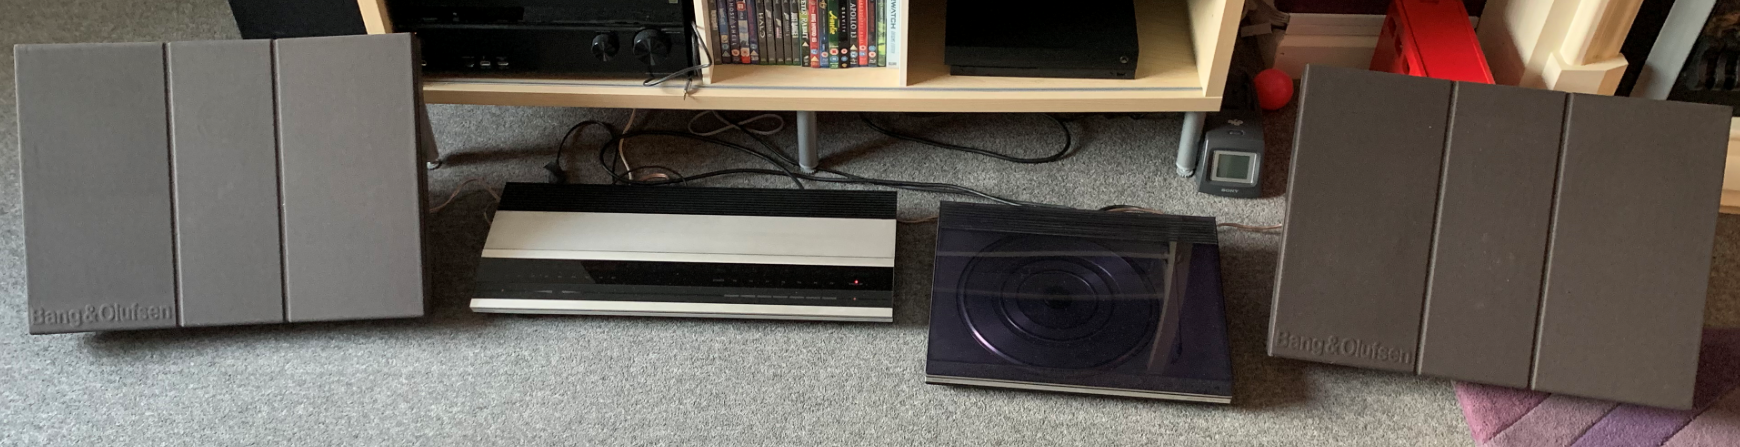
Number one son has been buying vinyl. Just like I was doing forty years ago. In celebration we got his B&O system down from the loft and fired it up. It used to be my dad’s pride and joy, and it was wonderful to hear it back in action. The word was that if it didn’t go bang when we powered it up it would probably work fine. And it did. There’s something about proper analogue sound that I really like. Perhaps I’ll get my deck (and all the records) down and have a go some time.
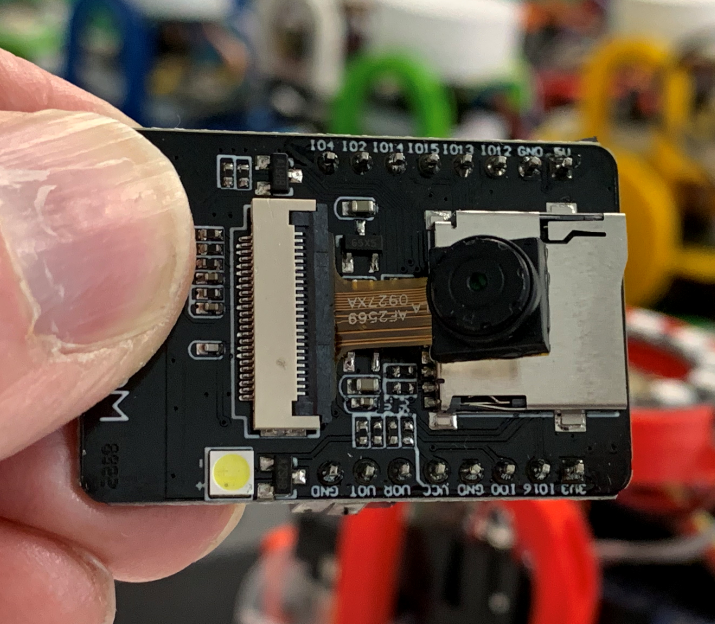
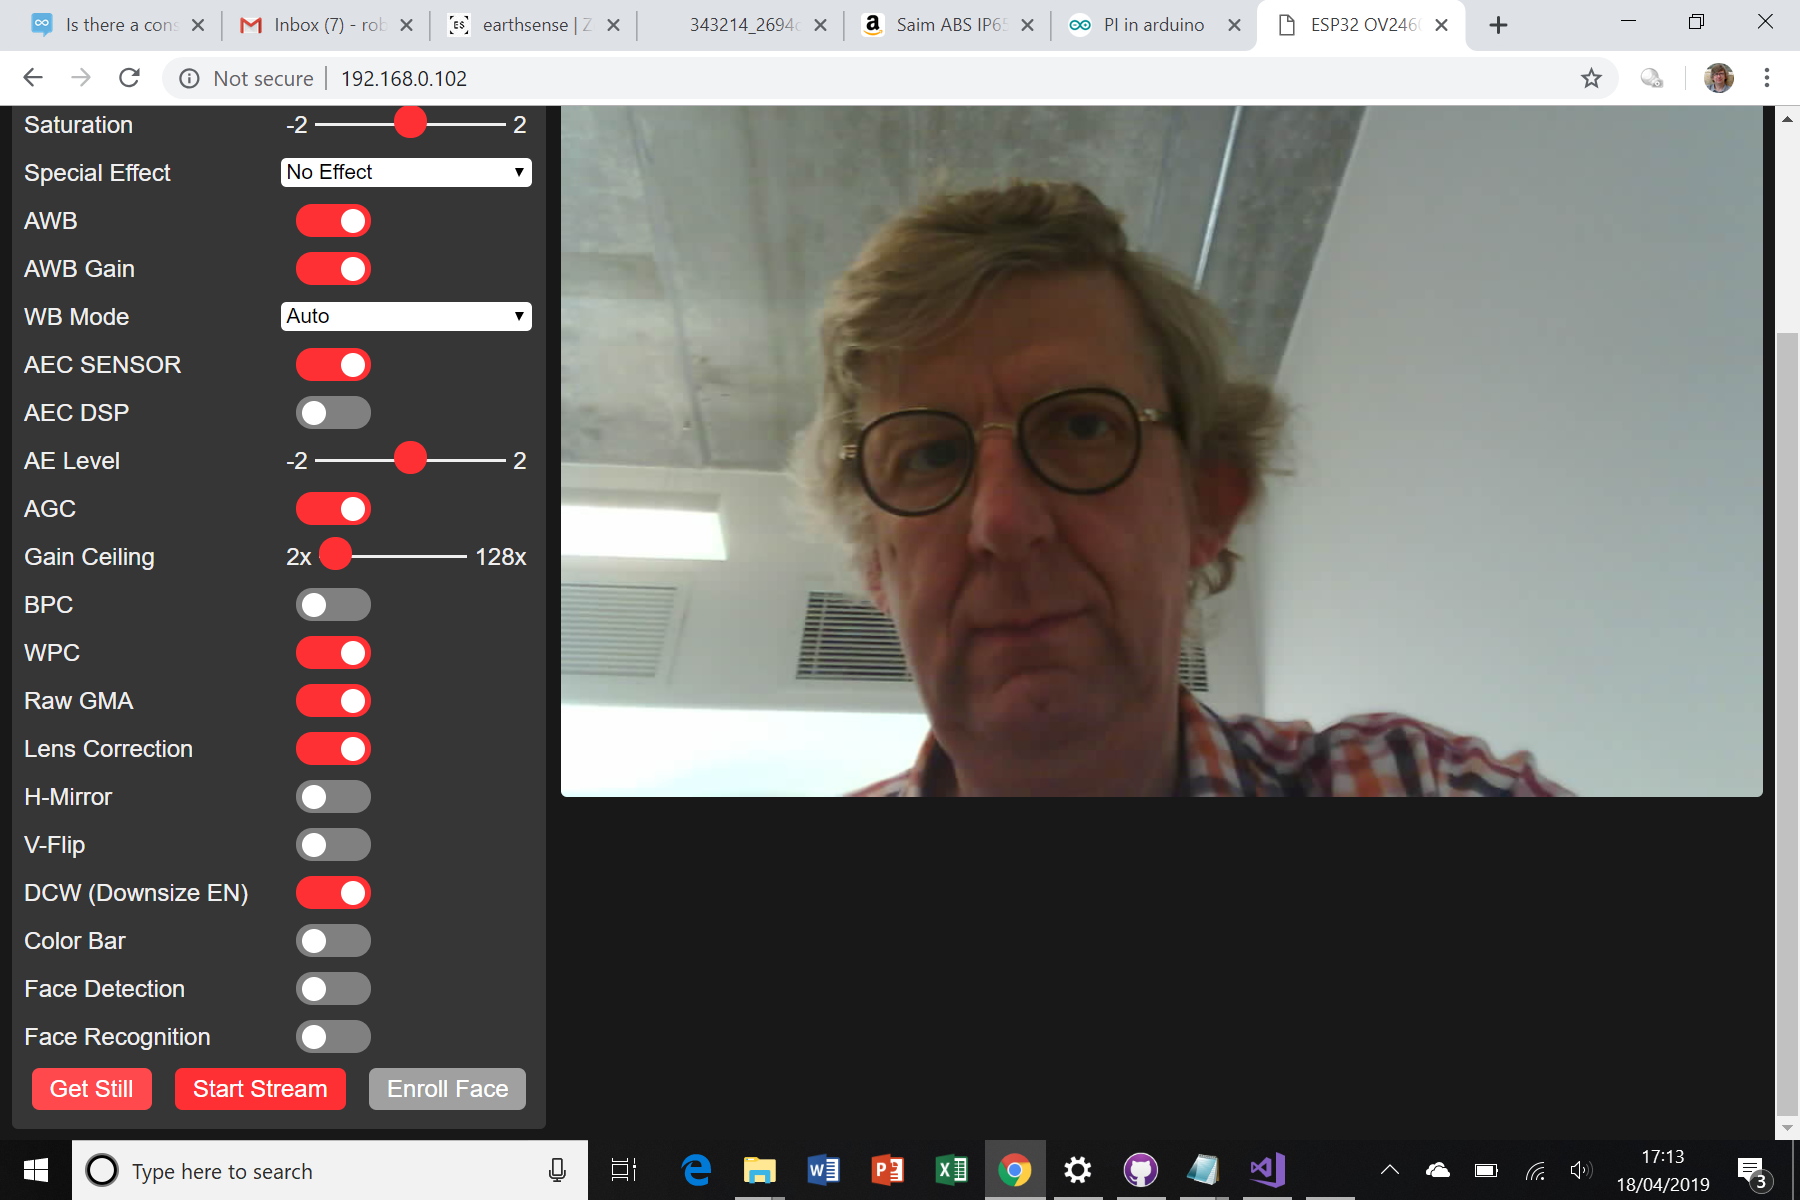
In my fingers above you can see something rather amazing. It’s an ESP32 powered webcam and it is priced at a stupidly low level. Mine arrived earlier this week and I’ve found a splendid howto that gets you started. You’ll need a serial interface to program the camera as it doesn’t have a usb connection. I used the one I got with some Arduino Pro-minis a while back. A couple of tips:
make sure you update to the latest version of the ESP32 board. The older camera sample will not compile.
the device can be a bit picky about power supplies. Mine gave “brownout” warnings for a while before I connected the 5V input to a slightly beefier supply than the 3.3V I used to program it
The camera serves up a website with a wealth of controls that you can use to change the image quality. You can use it to grab stills or watch a video stream. It even supports facial recognition and it has a micro-SD slot for saving stuff to. Amazing.
For the price you really should get one of these and have a play. I’ve been looking for a quick way to get pictures into Azure for training image recognition. I think I may have just found it.
I’ve just turned on Two Factor Authentication for GitHub. It occurred to me that seeing as how GitHub is now my “weapon of choice” for organising anything, and I can make my own private repositories, I should take some steps to keep them private.
It’s actually very easy to do, once you have an app that can produce “Time Based On Time passwords” or TOTPS. I’m using Microsoft Authenticator. I figure that since Microsoft now own GitHub, it’s likely that Authenticator will work well with it.
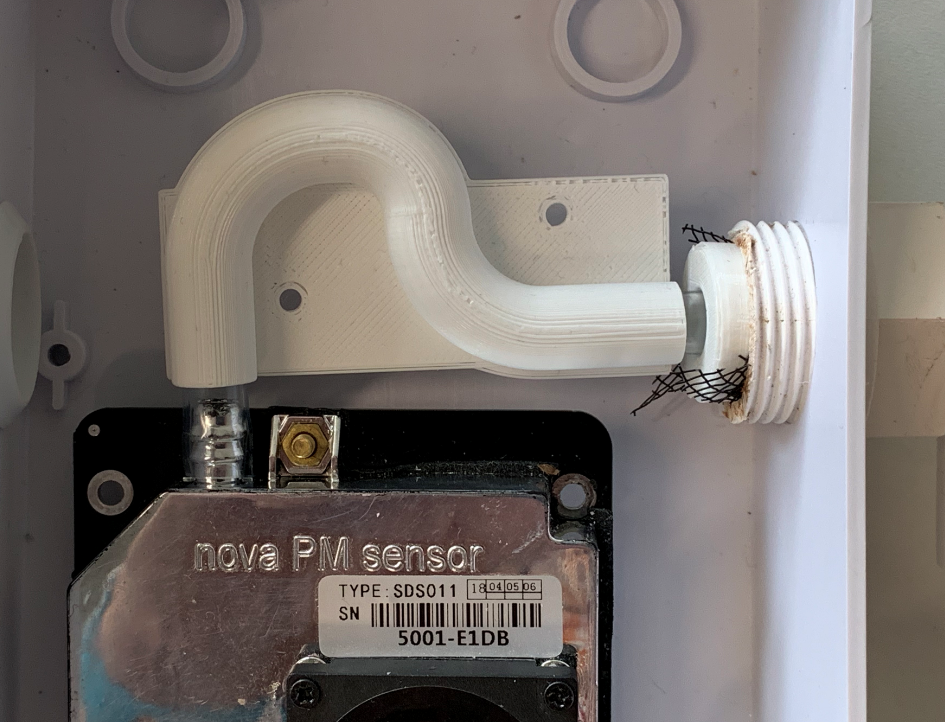
Achievement unlocked. I now know how to make “bendy” things in FreeCAD. It’s actually not that hard once you work out what FreeCAD needs to know. Essentially you use one Sketch to define the path of the template and another (which should be at right angles to the path) to define the closed shape to be created. You can even add another closed shape at the end of the path and then have the shape smoothly change from one to the other. I’ve used this to create tapered tubes.
I’m doing this to make another Air Quality sensor. I want to send the air path round a curve that is too tight for pipe. I also want to add a “u-bend” so that it is harder for water to get into the sensor. I’m quite pleased with the above. Now I just have to figure out how to mount it in the case….
Rob Miles is technology author and educator who spent many years as a lecturer in Computer Science at the University of Hull. He is also a Microsoft Developer Technologies MVP. He is into technology, teaching and photography. He is the author of the World Famous C# Yellow Book and almost as handsome as he thinks he is.