XNA Resources Follow-up

DSCF1380_1_2.jpg

Further to the talk on XNA earlier this week, some folks have been in touch for any other XNA references that I might know of. Here are a couple.

You can find a complete course which teaches programming using XNA at Microsoft Faculty Connection here. There are slides, labs and all kinds of good bits and bobs that you an asset strip and use as the basis of your teaching.

My Microsoft Press XNA 3.0 book (not the most recent, but still good for getting started) can be found as a free download from here.

All of the stuff will work on MonoGame too.

Trance Movie Review

image

We went to see Trance tonight. We got a two for one deal on the tickets, which is kind of appropriate, because you get around twice as much plot as you need in the movie. The starting point, art heist that goes wrong when the man on the inside forgets what he did with the haul, is enticing enough. But then things go pear (as well as a whole number of other fruits) shaped really quickly. It is as if they sat down and decided every possible permutation of bad person and sucker and then worked through them in sequence for completeness.

The gushing interviewer on the “One Show” (always a source of unimpeachable and incisive movie reviews) said something along the lines of “Just when you think you have it figured out there is another twist that changes everything”. What happened to me was that after the film has led the audience through the third successive “bait and switch” move with the plotline you just stop caring who did what to who and just wait for the credits to roll so that you draw some kind of line under the thing.

Sometimes when I write about a film I worry about spoiling the plot. But this time I reckon that this time the director Danny Boyle (who did a great job on the Olympics)  got there first.

Windows Gaming Awareness Event

DSCF1395.jpg 

A great audience. I kind of have to say that because I’ve not left Birmingham yet. Although they actually were a great audience.

Just done a talk at the Windows Gaming Awareness event about XNA and MonoGame.Great fun. Well worth getting up at 5:45 am to catch a train to Birmingham to deliver. You can find all the content here.

It has also been very interesting to see what other gaming tools and techniques there are out there. I’m going to have a play with quite a few of the things that have been discussed.

Game State Management in MonoGame on Windows 8

ApplicationLog

I’ve been trying to make sense of how Windows 8 and MonoGame interact when the application changes state. I think I’ve figured it out.

There seem to be broadly two things that can happen to your game when it is running. It can get deactivated (the user finds something better to do) or it can get “snapped” to the side of the screen. If you are going to sell the program in the marketplace it needs to handle both these situations.

protected override void OnActivated(object sender, EventArgs args)
{
    addMessage("activated");
    base.OnActivated(sender, args);
}
protected override void OnDeactivated(object sender, 
EventArgs args) { addMessage("deactivated"); base.OnDeactivated(sender, args); } protected override void OnExiting(object sender,
EventArgs args) { addMessage("exiting"); base.OnExiting(sender, args); }

To handle the activation issues you override the event methods above. I’ve just put some logging code in so that I can work out what is going on. The events are fired when you would expect them to be. When the game starts you get an “onActivated” message and when anything happens to interrupt your game (for example the user minimises it or switches to another application) you get a “onDeactivated” message. At the very end, when the user quits your game you get the “onExiting” message. The activated and deactivated message come in matched pairs. The only slight trickiness is that a game will get an activated message at when it starts and when someone returns to it, but you can use a variable to keep track of this.

When your game is deactivated it should probably pause the game (because the user will not be able to interact with it). When your game is reactivated you can either resume the game or stay in pause mode and give the player a few seconds to compose themselves before continuing. When the game is exited your game should store any persistent game state and the first time it is activated your game should load the state.

The next thing you need to do is handle changes to the application view. These occur when the user “snaps” you to the side window or when the orientation/size of the screen changes. The first thing you need to do is bind an event handler to the event which fires when the application view changes:

ApplicationViewChanged += 
(sender, args) => ViewChanged(args.ViewState);

Your event handler will have to deal with changes in orientation and also “snapping” to the edge of the screen.

private void ViewChanged(ApplicationViewState viewState)
{
    switch (viewState)
    {
        case ApplicationViewState.Filled:
            addMessage("filled");
            break;

        case ApplicationViewState.FullScreenLandscape:
            addMessage("fullLand");
            break;

        case ApplicationViewState.FullScreenPortrait:
            addMessage("fullPort");
            break;

        case ApplicationViewState.Snapped:
            addMessage("snapped");
            break;
    }
}
This is my test method. It just sends a message out for the different states.

When you get snapped your game could display a “Mini-screen” in the snapped area. Above you can see what a snapped game looks like. The cornflower blue area on the right is the snapped area. When the game is unsnapped it will get a message to indicate the orientation of the screen. My games just pause when they are snapped.

One thing to remember is that when you get snapped the size of the screen changes.You need to change the size of the screen so that things are still drawn correctly in the snap panel area. You can grab the new values of the viewport size to do this.

cheeseRectangle = new Rectangle(0, 0, 
_graphics.GraphicsDevice.Viewport.Width,
_graphics.GraphicsDevice.Viewport.Height);

The above snippet resizes a cheese drawing rectangle to fit the whole screen. I could use this to make sure that my cheese is always displayed full size (although when the program is snapped this will make for a rather long and thin display).

Having got this far you are pretty much sorted. There is just one more thing you need to know, and that is the sequence of the messages. The log sequence at the top of this post will help here. The important thing to note is that you get viewport changed messages after you have been deactivated. If you think about it, this makes sense. The user can start to drag your application screen and then either put it back, or drop it into the snap area. It is important that the application is stopped when the user begins to perform such an action. So if your program is snapped you will get the sequence:

  1. deactivated
  2. snapped
  3. activated

You never get the view changed messages in isolation. This even the case when you use the Windows + . command to snap the game from the keyboard.

Gaming in Academia Event

Doncaster

I got this email from TripIt today. It doesn’t seem to understand that I’m changing trains in Doncaster to go on to Birmingham for the Windows Gaming Awareness event. Not that there is anything wrong with spending time in Doncaster.

I’m doing a session tomorrow in Birmingham about XNA and MonoGame in Windows 8 and Windows Phone 8. If you want to come along too, I think there may be a few places left if you are quick.

Building a Door of Mystery

IMG_6031_2_3.jpg

After a considerable amount of tweakage of designs and waiting for the printer to finish I now have my “Door of Mystery” machine complete. This is how it looks inside. I’ve added a WiFi card so that the door can upload pictures after they have been taken.

After all my careful planning the box needed a bit of surgery because I’d forgotten that power connector protrudes from the front of the board, but apart from that (and having to go and get some more bolts) it is now pretty much complete.

IMG_6067.jpg

This is the finished device. I’m going to have to slightly adjust the hole for the RFID reader in the next version, but it is quite pleasingly solid and works a treat.

You buy an RFID tag to enter the competition, show it to the “Door of Mystery” above and it will give you your entry number and take your picture. Then, I can use my special “Pick a Winner” tag to pick a random entry and even view their picture. We might even use this for bashes, where we might want to give out random prizes, pick team members or let people take it in turns to use some of the games.

Get a Scope

image

I really am a sucker for mailshots (hmm. Perhaps I shouldn’t put that in the blog). Anyhoo, I got a mailshot from Cool Components advertising the above (or actually the slightly cheaper version 2 which you don’t seem to be able to get any more). So I bought one. It is a tiny digital storage oscilloscope which costs around 80 quids or so. I reckon this is extremely good value. It has an SD card that you can use to store waveforms and the whole thing is powered by a Cortex A3 and open source, so you can even put your own firmware in there if you fancy it. It is powered from a rechargeable battery and will go up to 1 MHz which for me is fine.

If you are not sure what an oscilloscope is, it lets you “see” electrical signals. It draws a plot of the voltage in the signal as it changes over time. The original ones used a cathode ray tube that drew a single dot on the screen. The dot was moved across the screen at a regular rate by a timebase generator and the value of the voltage in the signal was used to control the height of the dot. If the signal was regular then you could take a a peek at the waveform and see what it was doing.  Newer ones are of course digital. The input voltage is converted into numbers which are then used to draw a graph on the screen.

Sometimes, when a circuit just doesn’t work you need to take a look at what is happening. A voltmeter will tell you if there is anything on the wire, but not how it is changing over time. If you have any hardware aspirations I think a little device like this is a pretty good investment, and it only costs around the same as a couple of video games.

Just the Wrong Size

IMG_6046.jpg

So today I had a go at printing out my designs. Above you can see the result. And I’d made a mistake that I’ve made before. I made the holes exactly the same size as the things intended to fit into them.

Do. Not. Do. This.

Of course they don’t fit. One thing just sits on top of the other looking exactly the same. Wah. I did think I could solve the problem by filing a bit off. Not a win.Turns out that PLA is actually quite tough stuff. After about ten fruitless minutes and quite a bit of pain (who knew you could get splinters from plastic things) I gave up and went back to the software. The good news is that I just have to tweak a couple of values and rebuild everything. I’ve even added a feature where objects can cut holes in the entire finished piece, so that the SD card and the screen can cut slots for themselves.

Ongoing.

Making Boxes with Software

BaseDesign

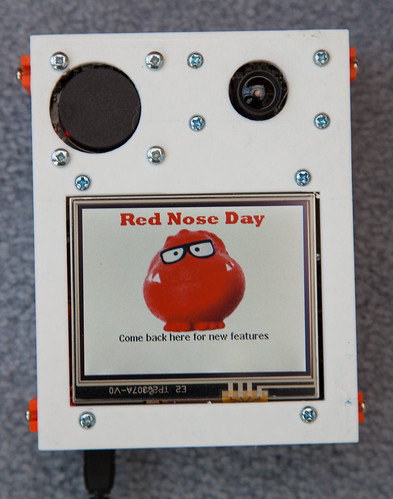
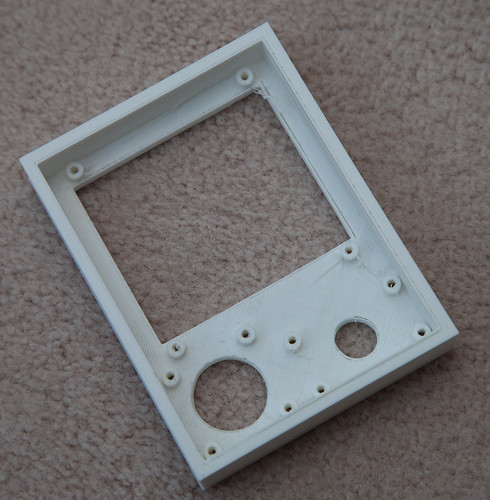
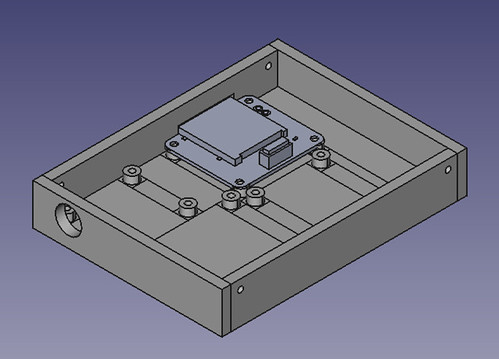
This is the base design I came up with. You can also see one of the Gadgeteer part designs where it will be fitted in the finished product.

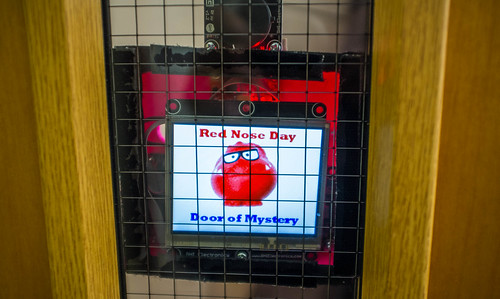
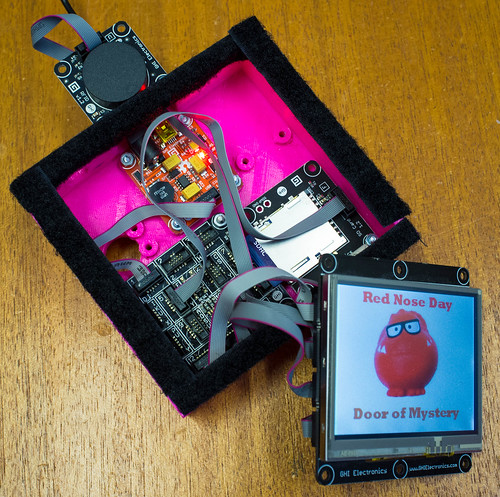
I’ve been designing a box for the “Door of Mystery” Gadgeteer device that I built for the Red Nose Day event. But I’m very lazy. I don’t want to have to lay out the various elements by hand and position them individually. I want this to happen automatically. So I’ve wanted to write a program to do this. Peter likes OpenSCAD, so I went there first.  OpenSCAD lets you create 3D images programmatically. It is really easy to use, and you can preview your designs very quickly.

module panel(width, height, x, y)
{
    translate([x,y,0])
    {
         cube(size=[width, height, baseDepth]);
    }
}

I used this tiny snippet of OpenSCAD to place a panel on the drawing surface. I move the axis to the position of the panel and then create a box of the required size. You can perform unions to merge things together and differences to cut one shape from another. In no time at all I was programmatically creating bases for the Gadgeteer devices. And then I hit a brick wall. What I really wanted to do was have the program work out where each device goes in relation to the other ones and lay out the box contents.To do that my program has to keep track of where things have been put. This means that I need some variables.

OpenSCAD does not provide variables as such. It provides constants (such as baseDepth above) but these are evaluated at compile time, and so I can’t use them to keep track of things as the program runs. This is not necessarily a criticism of OpenSCAD, it isn’t really meant to run programs, but it does mean I can’t use it.

So I went back to my old friend FreeCAD. I first used this ages ago, when I made the case for my Tweet Printer. FreeCAD can be controlled by Python programs and I’ve always fancied learning a bit of Python, so of I went. The designer has a Python console into which you can paste and run lumps of code. You can also add libraries and user interfaces on top, but I was happy to cut and paste for now. All the actions you take in the designer are exposed as Python calls via the console, which makes it quite easy to figure out how to do things. You just do it in the designer and then look at what comes out on the console. There is also an API reference which tells you how the commands work.

def makeBoard(self,x,y):
    b = Part.makeBox(self.width,self.height, 5, Base.Vector(x,y,0))
    return b

This method is a member of my “Filler” class which places the filler (which has a width and a height) at a particular place on the design. Note that the filler is 5mm thick in the above code. The program can take the object that is returned and fuse or cut it with other shapes as you build up the finished design. By the end of all my fiddling I’ve got a class hierarchy of Gadgeteer device specifications and a layout engine that will place them in a box of a particular size.

def MakeTop():
    doc=FreeCAD.newDocument()
    f1 = Filler("Filler", 5,25)
    f2 = Filler("Filler", 6.5,25)
    f3 = Filler("Filler", 6.5,20)
    rfid = RFIDReader("rfid", "landscape")
    camera = Camera("camera", "landscape")
    display = DisplayT35("display", "portrait")    
    topComponents = [rfid,f1,camera,f2,display,f3]
    test = Layout(91,121,topComponents)
    board = test.layout()
    Part.show(board)
    Gui.SendMsgToActiveView("ViewFit")
    Gui.activeDocument().activeView().viewAxometric()

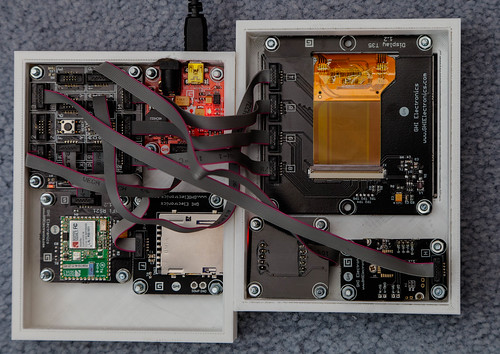
The MakeTop method creates the top of the box which contains an RFID reader, a touch display and a camera. These are laid out in an area with a dimension of 91x121 mm. Each component can be either “landscape” or “portrait” orientation and you can create filler elements to push things around in their row. The design method is given a list of components and an output area. The finished design looks like this:

TopDesign

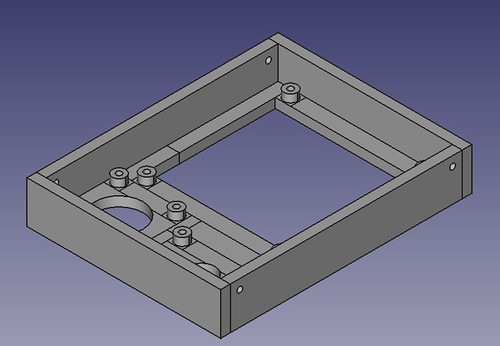
These elements cut extra holes for themselves so that they show through the front of the box. The layout method also creates the sides and puts fixing holes in them, so that I can join the top and the bottom together. If I want different size of panel thicknesses I just change the static members that control these values and run the method again. If I want to make a different design I just create a new method which contains the devices that want.

The system is not completely automatic, what I end up doing is fiddling with the output from the method and then changing the orientation and adding fillers until I get what I want. The good news though is that it provides a really quick way of making Gadgeteer boxes. I’m going to have a go at printing the designs later in the week.

I find it fascinating that I’m now writing programs where the output is a physical artefact. We do live in interesting times.

New Kinect SDK now out

image

The new SDK for the Kinect sensor is now available for free download. This brings with it a whole ton of upgrades for those who want to make their computers more aware of their surroundings. There are new sensor modes and all kinds of good stuff. There is also a sizeable gallery of sample programs which you can just play with. This makes it worth a look even if you don’t intend to write any programs for the sensor, but just want to get a feel for the kinds of wonderful things it can do.

The highlight, which I’m really looking forward to playing with, is “Kinect Fusion”. This lets you use the sensor as  kind of hand held 3D scanner. You wave the Kinect around a scene and the program will build up a 3D model of what is in front of it. You’ll need a fairly beefy graphics card in your PC to make it work quickly (it uses the power of the GPU to crunch the scene data), but the results look really impressive. I’m really looking forward to printing little plastic models of me that I can give as Christmas presents…

You can download the SDK from here.

TechDays 2013 Sessions Now Online

image

If you want to see a proper Gadgeteer session, not in rhyme, but with working demos and a lot more detail, then you can get hold of my TechDays session on gadget development by clicking on the above image. If you want to see all my Channel 9 sessions (including the ones on Windows Phone Agents and Windows Phone Speech) you can find them here:

http://channel9.msdn.com/Events/Speakers/Rob-Miles

Red Nose Day Lecture now online

image

I’ve lovingly rendered the entire lecture, along with slides, into a 28 minute or so action packed video which is packed with action. You can find it above. Thanks again to everyone who came along. To Simon and Peter for taking the videos and Amanda for collecting money. I’d also like to thank the lovely folks at Gadgeteer (particularly Scarlet and Clare) for sending me such a wonderful prize. If you want to do something with Gadgeteer (and you really should) you can find out more about the platform here:

http://www.netmf.com/gadgeteer/

Oh, and there have been some mutterings about the fact that I did manage to raise a thousand pounds but did not perform the lecture wearing a tutu. Turns out that I passed the target last night (Saturday) and the lecture was on the day before (Friday). So this means that there was (and is) no need for any kind of tutu sporting.

And anyway, I think the audience had a lucky escape. The ever-helpful Simon Grey prepared an artist’s impression of what I would look like:

image

..although I don’t think my arms are quite as muscular as the ones above.

Sooo Close.

Raised.jpg

By a combination of RFID tag sales for the prize draw and accosting people who were injudicious enough to turn up at the lecture carrying money (I did let one lad keep his bus fare home though) I was able to take 210.90 pounds in cash down to the bank this morning and pay it into the prize fund.

Added to the amount given by my wonderful sponsors, this takes the total to 984.98. Just fifteen pounds and two pence short of me having to wear a tutu for the lecture.

Talk about precision planning. Go me.

If you haven't got round to sponsoring me and want to send me over the edge, so to speak, you can still donate at: http://my.rednoseday.com/sponsor/robmiles

Red Nose Day Fun and Games

IMG_5998-Edit.jpg

Some of the audience, before the show started. Profuse apologies to the folks on the very front row. For some reason I didn’t point the camera in your direction.

Today did not dawn in an auspicious manner. I went into work prepared to put the starting touches to the presentation (only kidding, it was actually mostly written, but I have a policy of never finishing a talk until just before I really need it.). Anyhoo, I plugged in my shiny Sony and got all manner of USB “in and out” sounds. Truly, my machine was playing the hokey cokey with all my devices. A dance which ended with a bunch of unknown USB devices in Device Manager. Oh well. My first thought was my keyboard, but experiments indicated otherwise. USB hub then.

Ho hum. Time for a reboot. So I shut the machine down. And found I had 14 updates outstanding. Arrgh. This of course made my machine unusable for a lot longer than I had planned for. Wah. And when it came back, of course the USB drivers for the Gadgeteer (the thing my Lecture in Rhyme was all about) had broken. After another reboot (five updates that time) I managed to get something to work. By now we were about fifteen minutes from the presentation. No pressure.

Anyhoo, thanks to an awesome audience I managed to get through it all. Even when the demo failed because of lingering USB issues. Fortunately “The Door of Mystery” worked fine, and picked key number 71.

IMG_6003.jpg

This is the lucky winner. I look a lot more pleased than him, perhaps because I’ve finished the lecture.

There are videos of the lecture, but they are kind of meaningless without the slide deck. I’m going to spend some time this weekend making a “director’s cut” with a narration that will hopefully make more sense.

IMG_6002.jpg

Thanks to every one who sponsored me, the folks who turned up and had their pockets emptied, and apologies to the three people who wandered into the lecture theatre just after we had started only to have me point at them and shout “NEW PEOPLE. GET MONEY FROM THEM!” Apparently they turned tail and left in a hurry. I hope they’ve stopped running by now….

Red Nose Day Rhyming

ShortHeader


I spent a big chunk of this evening writing poetry. Thanks to Carl for his donation, which gets him into the script.

As long as I can find something that rhymes with “Carl”.

If you want to sponsor me, and who doesn’t, then visit:

http://my.rednoseday.com/sponsor/robmiles

If we get more than 1,000 pounds then I will wear that tutu. You can find out more about my previous Red Nose Day triumphs here and here.

We will definitely video the lecture, and who knows, some of the students might try to live stream it too. Keep coming back here, and to my Red Nose Day sponsor page for news.

Red Nose Day Door of Mystery

DSCF0363.jpg

Sometimes a good idea can take away your entire Sunday.

“The Door of Mystery” is an unique fundraising idea that takes the old style, simple, raffle idea and turns it into a new, high-tech, complicated form. To take part all you have to do is buy one of our special “Red Nose Day” tags for two pounds and then take it to “The Door of Mystery” at my office in the Robert Blackburn building to find out your entry number. Then, at the presentation on Friday we will build a “Door of Mystery” machine of our own and then use it to pick the winner of the competition. The prize, courtesy of Microsoft Research Cambridge, is a Gadgeteer kit of your own.

The tags contain an RFID chip which is read by a Gadgeteer board inside the door unit. The unit contains an SD card with a list of RFID values which are mapped to entry numbers. Show your tag to the door and it will tell you your magic number.

DSCF0373.jpg

This is the guts of the prototype device. I’ve cannibalised my Tweet Printer case to use for the project. I’m going to print a proper one later. If I get round to it.

DSCF0383.jpg

I’ve got 100 RFID tags to sell for Comic Relief. Each one has been keyed to the system and you can buy them from the departmental office. Perhaps we’ll think of other uses for them over time..

You can sponsor the whole shebang over at: http://my.rednoseday.com/sponsor/robmiles