Redphone for Halloween

Only a bit scary

The “RedPhone” lives. The bell sounds like a real phone. But the insides are now possessed by a Raspberry Pi running JavaScript…..

This runs on the local network

It hosts a web page into which you can type messages and send them to the phone. When you send the message the phone rings and if you pick up the receiver you hear a ghostly voice dictate the message to you. If you pick up the receiver to make a call you get the dial tone. If you dial “2” and replace the receiver the phone will ring a few seconds later and deliver a ghostly message of doom:

randomMessages = [
    "I know what you did last summer",
    "Is that you, Boris?",
    "Look out of the window.",
    "They are on to you.",
    "Look behind you."
    ];

Other messages may be available later….

It’s been great fun to build. You’ll be able to find out all about it an upcoming article in HackSpace magazine.

Curse you British Summer Time

You’ll never guess where I bought this

The good news is that my Agile Octopus Tariff Display (which tells us how much electricity will cost us each day) handled the clock change yesterday with aplomb. It just worked. The bad news is that one of my clocks can’t be adjusted because the little knob that you turn to move the hands has broken. So I’ve taken the battery out for an hour.

In March next year I’ll have to take the battery out for 11 hours. Perhaps I should make a “time corrector” device. You plug it into the clock in place of the battery, tell the “time corrector” the time the clock is showing and over the next day it makes the clock correct.

Speeding up writing with ChatGPT

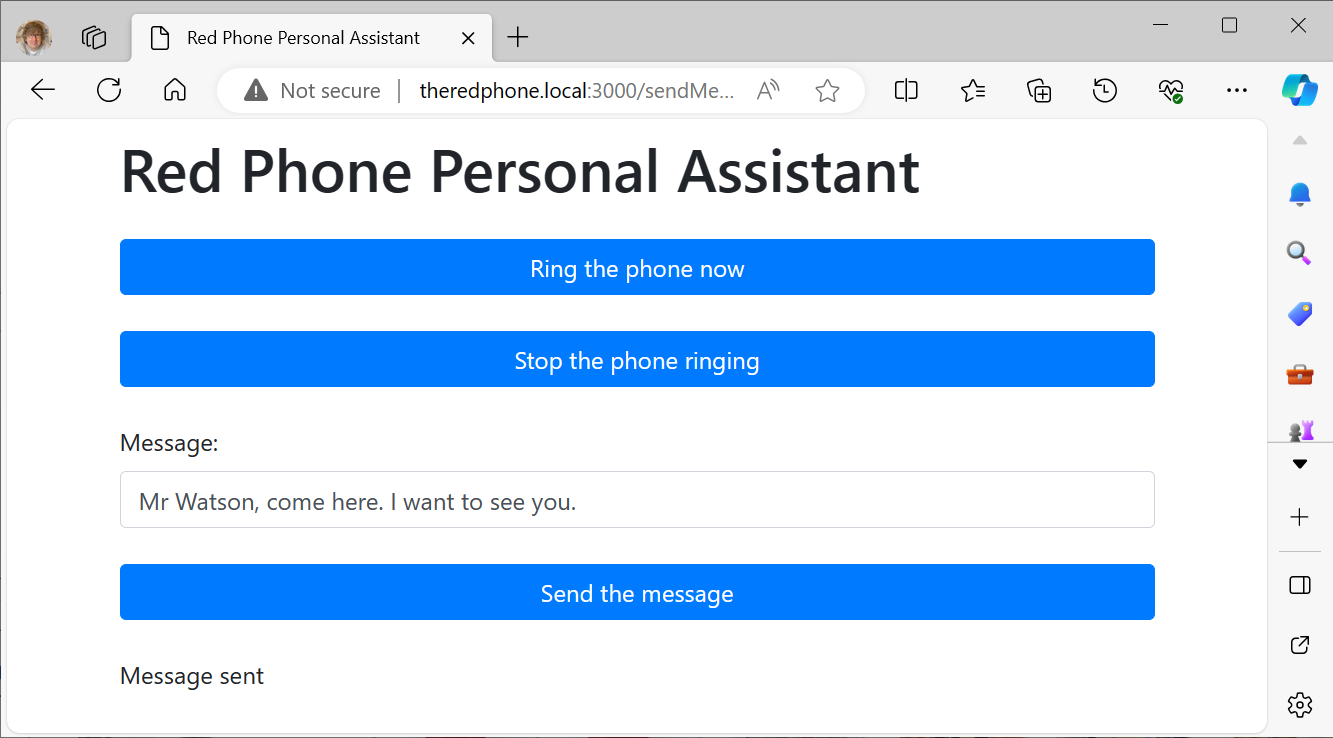
I’m painfully aware of the fact that AI has the potential for huge problems on lots of levels. But I don’t think ignoring it is a viable solution. Today I was writing a section of the red phone article (coming to a magazine soon). It was a bit about how JavaScript async and await works. I’d come up with some text and I said this to ChatGPT:

“Would this be a good explanation of async and await: imagine that you could create new versions of yourself at will. If you need to queue to buy something you just create a new version of yourself, put that in the queue and then go about your business. At some point the “new you” will reach the head of the queue, get what you want and then call you and say it has finished before vanishing in a puff of smoke. That’s how awaits and promises work. “

I got this response:

Your analogy is creative and can be a fun way to explain how await and promises work, especially to someone with a vivid imagination. It captures the essence of asynchronous operations, concurrency, and non-blocking behavior, but it might be a bit metaphorical for some audiences who prefer more technical or straightforward explanations.

Here's a breakdown of your analogy:

Creating new versions of yourself represents spawning asynchronous tasks.

Putting a new version in the queue and going about your business relates to the non-blocking nature of asynchronous tasks.

The "new you" reaching the head of the queue and getting what you want symbolizes the completion of an asynchronous operation.

The call and the puff of smoke represent the resolution of a promise and the continuation of your code.

While this analogy can be engaging and illustrative, it's essential to gauge your audience and their familiarity with programming concepts. Some may find it relatable and memorable, while others might prefer a more technical explanation. In many cases, using both a metaphor and a technical explanation can be a helpful way to cater to different learning styles and levels of understanding.

I think this was generally useful critique. It turns out that you ChatGPT doesn’t just answer questions, it can also make sure your text makes sense. Although I can’t help wondering what it would have said if it didn’t like what I’d written.

Speed up Visual Studio Code Remote Development

These are the two you need to disable.

I’m writing all the code for the red telephone project in JavaScript as a node application. This is because it makes it very easy to host a website on the phone. Also I need a lot of multi-threading and events stuff and JavaScript’s await and async stuff makes this so easy to write. Also, I like writing JavaScript.

I’m writing the code on the Raspberry Pi W that is powering the phone. This is a really useful thing to be able to do. I can set breakpoints which are triggered when hardware events occur. Then I can step through the code. I’m using Visual Studio Code, but the environment is running on my PC and I’m using the amazing Remote Development feature to develop on the Pi. But it is not without its problems. When I started doing this, things would work fine for a while and then suddenly the Raspberry Pi would lock up and progress would grind to a halt.

I did some searching and thanks to this wonderful post I discovered how to fix it. It turns out that some of the language plugins for Visual Studio Code consume humungous amounts of computer power. And when they wake up on the Raspberry Pi it is pretty much game over for development on the machine. If you search the extensions for “@builtin type” and then disable the two shown above you’ll find that things work swimmingly. You miss out on a few useful goodies, and you’ll have to re-enable these to get them back, but in the meantime at least you’ll be able to do useful work on a device costing less than a couple of burgers and fries.

Soldering Idiocy

The only person I allow myself to get really cross with is me. Today I had a perfect opportunity. I’d just received the rather nice MOSFET power switches you can see above. They are rather nice because you can connect them directly to a 3.3 volt signal and they will switch a high power load (in this case 35 volts going to a telephone bell). So I soldered a pair to a prototyping board. They’re the funky blue things with the terminal blocks.

We’ll leave aside the quality of the soldering on the connector terminals at the front of the board. I was finding it hard to make any kind of soldering work when I did those. I really did think I was losing my touch. But it turned out that it was because the solder bit had broken inside the soldering iron and the temperature had got set way too low.

The reason I got really annoyed was because the MOSFET board on the left hand side has been soldered into the wrong column. It should be one position to the left. This means that all the wires (several of which are underneath the board) are in the wrong place. Idiot. And especially idiot because I thought to myself “Careful not to solder this in the wrong place” as I actually soldered it into the wrong place.

Oh well, I’ve got spares.

Agile Octopus Tariff Display in HackSpace magazine

I get my copies of the magazine from Readly

If you’re wondering what that distant rumbling noise is, it might be crowds of people rushing to the newsagents to buy their copy of HackSpace magazine so that they can read my article in it.

Or it might be a bus going past.

Anyhoo, the article is out there. You can find the project on GitHub here.

Minox Scanning Report

The height steps are in .2mm because that’s the print layer height

The story so far: “Rob has become mildly obsessed with getting the best possible results scanning the tiny negatives produced by his Minox camera. He’s 3D printed a holder for his scanner which had different negative heights. The idea is to scan a negative and determine which height works best”. Now read on…

It wasn’t taken for testing, but it works really well

I took the picture above down at “the dock” in Hull. It is of the C4DI building and a tiny bit of the tidal barrier. The railings going off into the distance are a very good test for resolution. I used my “different height scanner thingy” (really must think of a better name) and got the following results:

A print of the entire image at this magification would be around 24 inches or so across

It was interesting to see the difference that 0.2mm height makes to the image quality. The best way to see it is to look at the lamppost at the end of the walkway. That is better defined against the background in the -0.2mm height scan. The next thing to do is to print a complete scanning frame for that height.

Next Hardware Meetup is all about 3D printing

YOu could have one of your very own….

We’re having our next Hardware Meetup in Hull library in the Makerspace on Wednesday 1st November starting at 5:30pm. It’s all about 3D printing. There’s an exhibition of 3D printing on at the Makerspace at the moment and lots of stuff worth looking at, whether you own a printer or are thinking of getting one.

It would be lovely to see you there. If you have something you’ve printed that you want to show off, bring it along. There will be a small (3D printed) prize for the object that everyone likes the most. I’ll be talking about the fun you can have making 3D printable objects from Python code - which is something of a thing for me.

We’ll also have free tags of fun to give away, and we might have a Tag Joust championship. It would be lovely to see you there.

If you are around earlier on Wednesday I’m going to be in the Makerspace fiddling with stuff for the entire afternoon if you want to drop round for a chat about hardware.

3D printing exhibition at Hull MakerSpace

This picture was taken with my 3D printed film camera

Today I went down to Hull MakerSpace to hand over some bits and bobs for an exhibition of 3D printing. Lee-Ann is organising the display and some events to make folks more aware of what 3D printing can do. I’ve contributed a Hull Pixelbot, some Connected Little Boxes, tags of fun and a few other things. If you’re in Hull over the next few weeks you can take a look at the stuff. There are some amazing printed models using some fantastic types of filament. Great fun.

"The Ding of Death"

Perhaps I can sell it on ebay as “untested”

Things were going well today. I was working on my clever telephone and I had the code doing just about what I wanted with the hardware. So I thought I’d pop the whole thing back in the phone to make it easier to work on.

I shoehorned the Pi Zero and the power supplies and MOSFET controllers into the case and it seemed OK. Then I discovered that some of the hardware interfaces (notably the switch that is triggered when you lift the handset) didn’t work. So I took the lid off and started tracing circuits. At one point I must have let one of the GPIO input wires touch a terminal on the telephone bell coil. At this point a rather unfortunate sequence of events occurred:

  • The bell terminals are close to ground voltage level, because the bell coils have low resistance. Touching the bell terminal with the wire caused the GPIO input to be pulled low, making the software think that the handset switch has been triggered.

  • The phone program rings the bell when the handset changes state. This is because when you lift the handset on an old phone you hear a “ding”. So turns on the bell coil to start the ding. This sends 35 volts to the coil……

  • This 35 volts goes up the GPIO input and blows away the Raspberry PI. Completely dead. Could be used as a heater but not much more.

The good news (if there is any) is that I happen to have got a spare device in stock just in case something like this happens, so I just have to wire it into the circuit. I’ve also put all my software on GitHub already, and so I’ve only lost around 20 minutes worth of coding.

I’m going to redesign the hardware connections to reduce the chances of this happening and insulate the bell terminals properly. A thing like this is only a problem if you don’t learn anything from it……

ChatGPT can be really useful

There’s a lot of muttering about the dangers of AI but there is also no denying that there are situations in which it is genuinely useful. Today I wanted to make sound on a Raspberry Pi from a JavaScript application. So I asked ChatGPT:

How do I play audio using a JavaScript program running in node on a raspberry pi? I want the sound to come out of the Raspberry Pi device.

ChatGPT came up with an npm module called Speaker which looked like it was just the job. I tried to install it and the installation failed. And this is where it gets proper. I asked ChatGPT:

The npm speaker command fails with an error locating alsa/asoundlib.h. Any ideas?

ChatGPT recognised the error and told me to install the ALSA development headers. I did that and the installation worked fine.

Now, none of this is really rocket science. ChatGPT “knows” this stuff because it has linked things together and can establish the context of a conversation and use this to find the correct items. But it is still darned useful.

My advice with things like ChatGPT is that if you have a context in which you think it might be useful you should try it. If it works, good for you. If it goes wrong you will learn more about problems with the way the technology works. Either way, you will be brushing up on your AI interaction skills, which is something you need to do.

Ringing a bell is surprisingly complicated

def ding(self):
        # start the clapper moving towards bell 1
        GPIO.output(self.bell1GPIO, GPIO.HIGH)
        time.sleep(0.016)
        # stop the clapper moving
        GPIO.output(self.bell1GPIO, GPIO.LOW)
        # pull the clapper back from bell 1
        GPIO.output(self.bell2GPIO, GPIO.HIGH)
        time.sleep(0.01)
        # leave the clapper in the middle
        GPIO.output(self.bell2GPIO, GPIO.LOW)
        # let the bell ring for a while
        time.sleep(0.01)
        # start the clapper moving towards bell 2
        GPIO.output(self.bell2GPIO, GPIO.HIGH)
        time.sleep(0.016)
        # stop the clapper moving towards bell 2
        GPIO.output(self.bell2GPIO, GPIO.LOW)

After a bit of experimentation I’ve managed to make the bell in the old telephone sound realistic. The original bell was just fed with 70 volts AC alternating at 18 cycles a second. The code above triggers the two coils in the bell to allow it to make do with 35 volts. It was quite fun to write. I hope the neighbours don’t mind the way that I seem to be getting a lot of phone calls…….

Decktective: Nightmare in the Mirror

A great way to spend a couple of hours

We had a great time tonight playing “Decktective: Nightmare in the Mirror”. It was passed on to us as something we might enjoy. We did. It’s a card based game which turns each player into a detective racing against time to crack a tricky kidnap case. Clues have to be evaluated, shared and decoded and a crime scene examined. It’s great fun, very clever, and you can only play it once. But then you pass it on to the next person who might like it.

There are more games in the series. We are definitely going to seek them out. Strongly recommended.

Using OctoPrint without a bed sensor

The line you want to comment out is highlighted

This is a rather selfish post, in that it is here so that I can find it in my blog if I need to do it again. Although if you’ve just tried to use OctoPrint and had the print fail because of a “Bed Levelling Not Enabled” error you might find it useful…

Anyhoo, a while back I disabled the bed level sensor on my printer, what with its habit of bashing the print head into the print bed every now and then. I decided that I could manage without automatic bed levelling and things have been going fine. I’ve been copying my print files onto an SD card and plugging it into the printer. But today I decided to reconnect my OctoPrint server. This is useful because it means I can print directly from my computer rather than hopping around with memory cards. But it didn’t work. OctoPrint kept shutting down the printing with an error.

I eventually tracked down the problem, and it wasn’t OctoPrint. It’s just that OctoPrint cares when the printer sends out an error message, whereas if you print from a memory card all printer errors are ignored.

The problem is with Cura, the program I use to convert my designs into code files that control the printer. Cura adds a header of instructions to the printer code file. One of these was asking the printer to turn on bed levelling. The printer complains it hasn’t got bed levelling, sends out an error message and OctoPrint stops the print. The solution is just to comment out the M420 statement that does this, as you can see above. To get to this menu you use Settings>Printer>Manage Printers>Machine Settings

Close up idiocy

This might be quite artistic if I could think of a good caption…

Developed some pictures today. I’d taken them with a Yashica 124G twin lens reflex camera. I’d used close-up lenses so that I could capture intimate portraits over the table in the restaurant. The close up lenses clip on the camera lens to shorten the focus. It’s all part of my “make photography much harder than just getting out your phone” campaign.

I had two close up lenses, one for the viewfinder lens and the other for the taking lens. But, for reasons I still can’t quite comprehend, I’d clipped both of the close-up lenses on the taking lens which meant that I was taking sharp pictures of the cutlery right in front of the camera rather than the person sitting opposite. I’m not completely unhappy with the result, but I think I’d be a bit happier if it was of what I was expecting.

Hull Fair in Daylight

I think the horse is called “Jedi”

I’ve been going to Hull Fair for a while. Take a look here and here and here. Today we went in beautiful sunshine. Hull Fair is awesome. They have multiples of things that most fairs struggle to attract one of. And we must have counted around 10 “Hook a Ducks”. Perhaps the hold the annual “Hook a Duck” convention at the same time as the fair.

This is just a small part of the fair

I went up a Ferris Wheel to take some pictures. They look a bit better in night,

They had three of these

When we left it was just starting to get mad busy. With nougat, fudge and of course brandy snaps. Great stuff.

Stepping up and Stepping Down

Power supplies mounted on a correctly sized holder…

I’m building something to make an ancient (1976) telephone more interesting. I’m putting a Raspberry Pi inside it. It’s very important to me that the Pi is able to ring the telephone bell. To do this I need a 35 volt supply. I also need a 5 volt supply too. The device itself will be supplied with 12 volts. The device at the top right of the picture is my “stepper up” which makes 35 volts from 12 volts. The one at the bottom right is my “stepper down” which makes 5 volts from 12 volts. Both of these devices work in the same way. They have a little transformer coil which is driven by the chip you can see on each. The blue trimmers have a little screw you can use to adjust the output voltage.

You might think you could use two copies of the same device and just adjust one to produce 35 volts and the other to make 5 volts but this is not the case. The step-up ones can’t produce a voltage which is lower than the power input (in this case 12 volts) and the step-down ones on the can’t produce a voltage which is higher than the input. You can buy a bunch of these for not much money and it is useful to have both types in stock. Search your favourite suppliers for “buck converter”.