Maketober Day 31: Christmas Cake to finish

cake.png

This is not actually something that I’m making. But I do get called in to give it a stir.

I’ve really enjoyed Maketober. Thanks to the folks at the Makerspace Hull for giving me the idea. It’s been very useful to have a focus on making (or at least achieving) something every day. I plan to keep on trying to deliver something useful each day and then write about it here. And I can’t wait until I’m able to go and show them what I’ve been making. And I might take along some cake too..

Makertober Day 29: Wiring up

wiredup.png

This is the completed light box, all wired up. I’ve printed a tiny little mounting plate that holds the ESP8266 device and allows it to be fitted onto the mounting pillars. I’m doing the wiring by soldering directly between the devices.

broken ring.png

I like using solid-core wire tor connections as it is easier to work with. But you have to be careful as it puts more strain on whatever it is connected to. Above you can see what happens when things go wrong. The solder pad for DI (data in) on the pixel ring has detached from the PCB and turned this ring into scrap. Fortunately I have a few spares.

fittingscrews.png

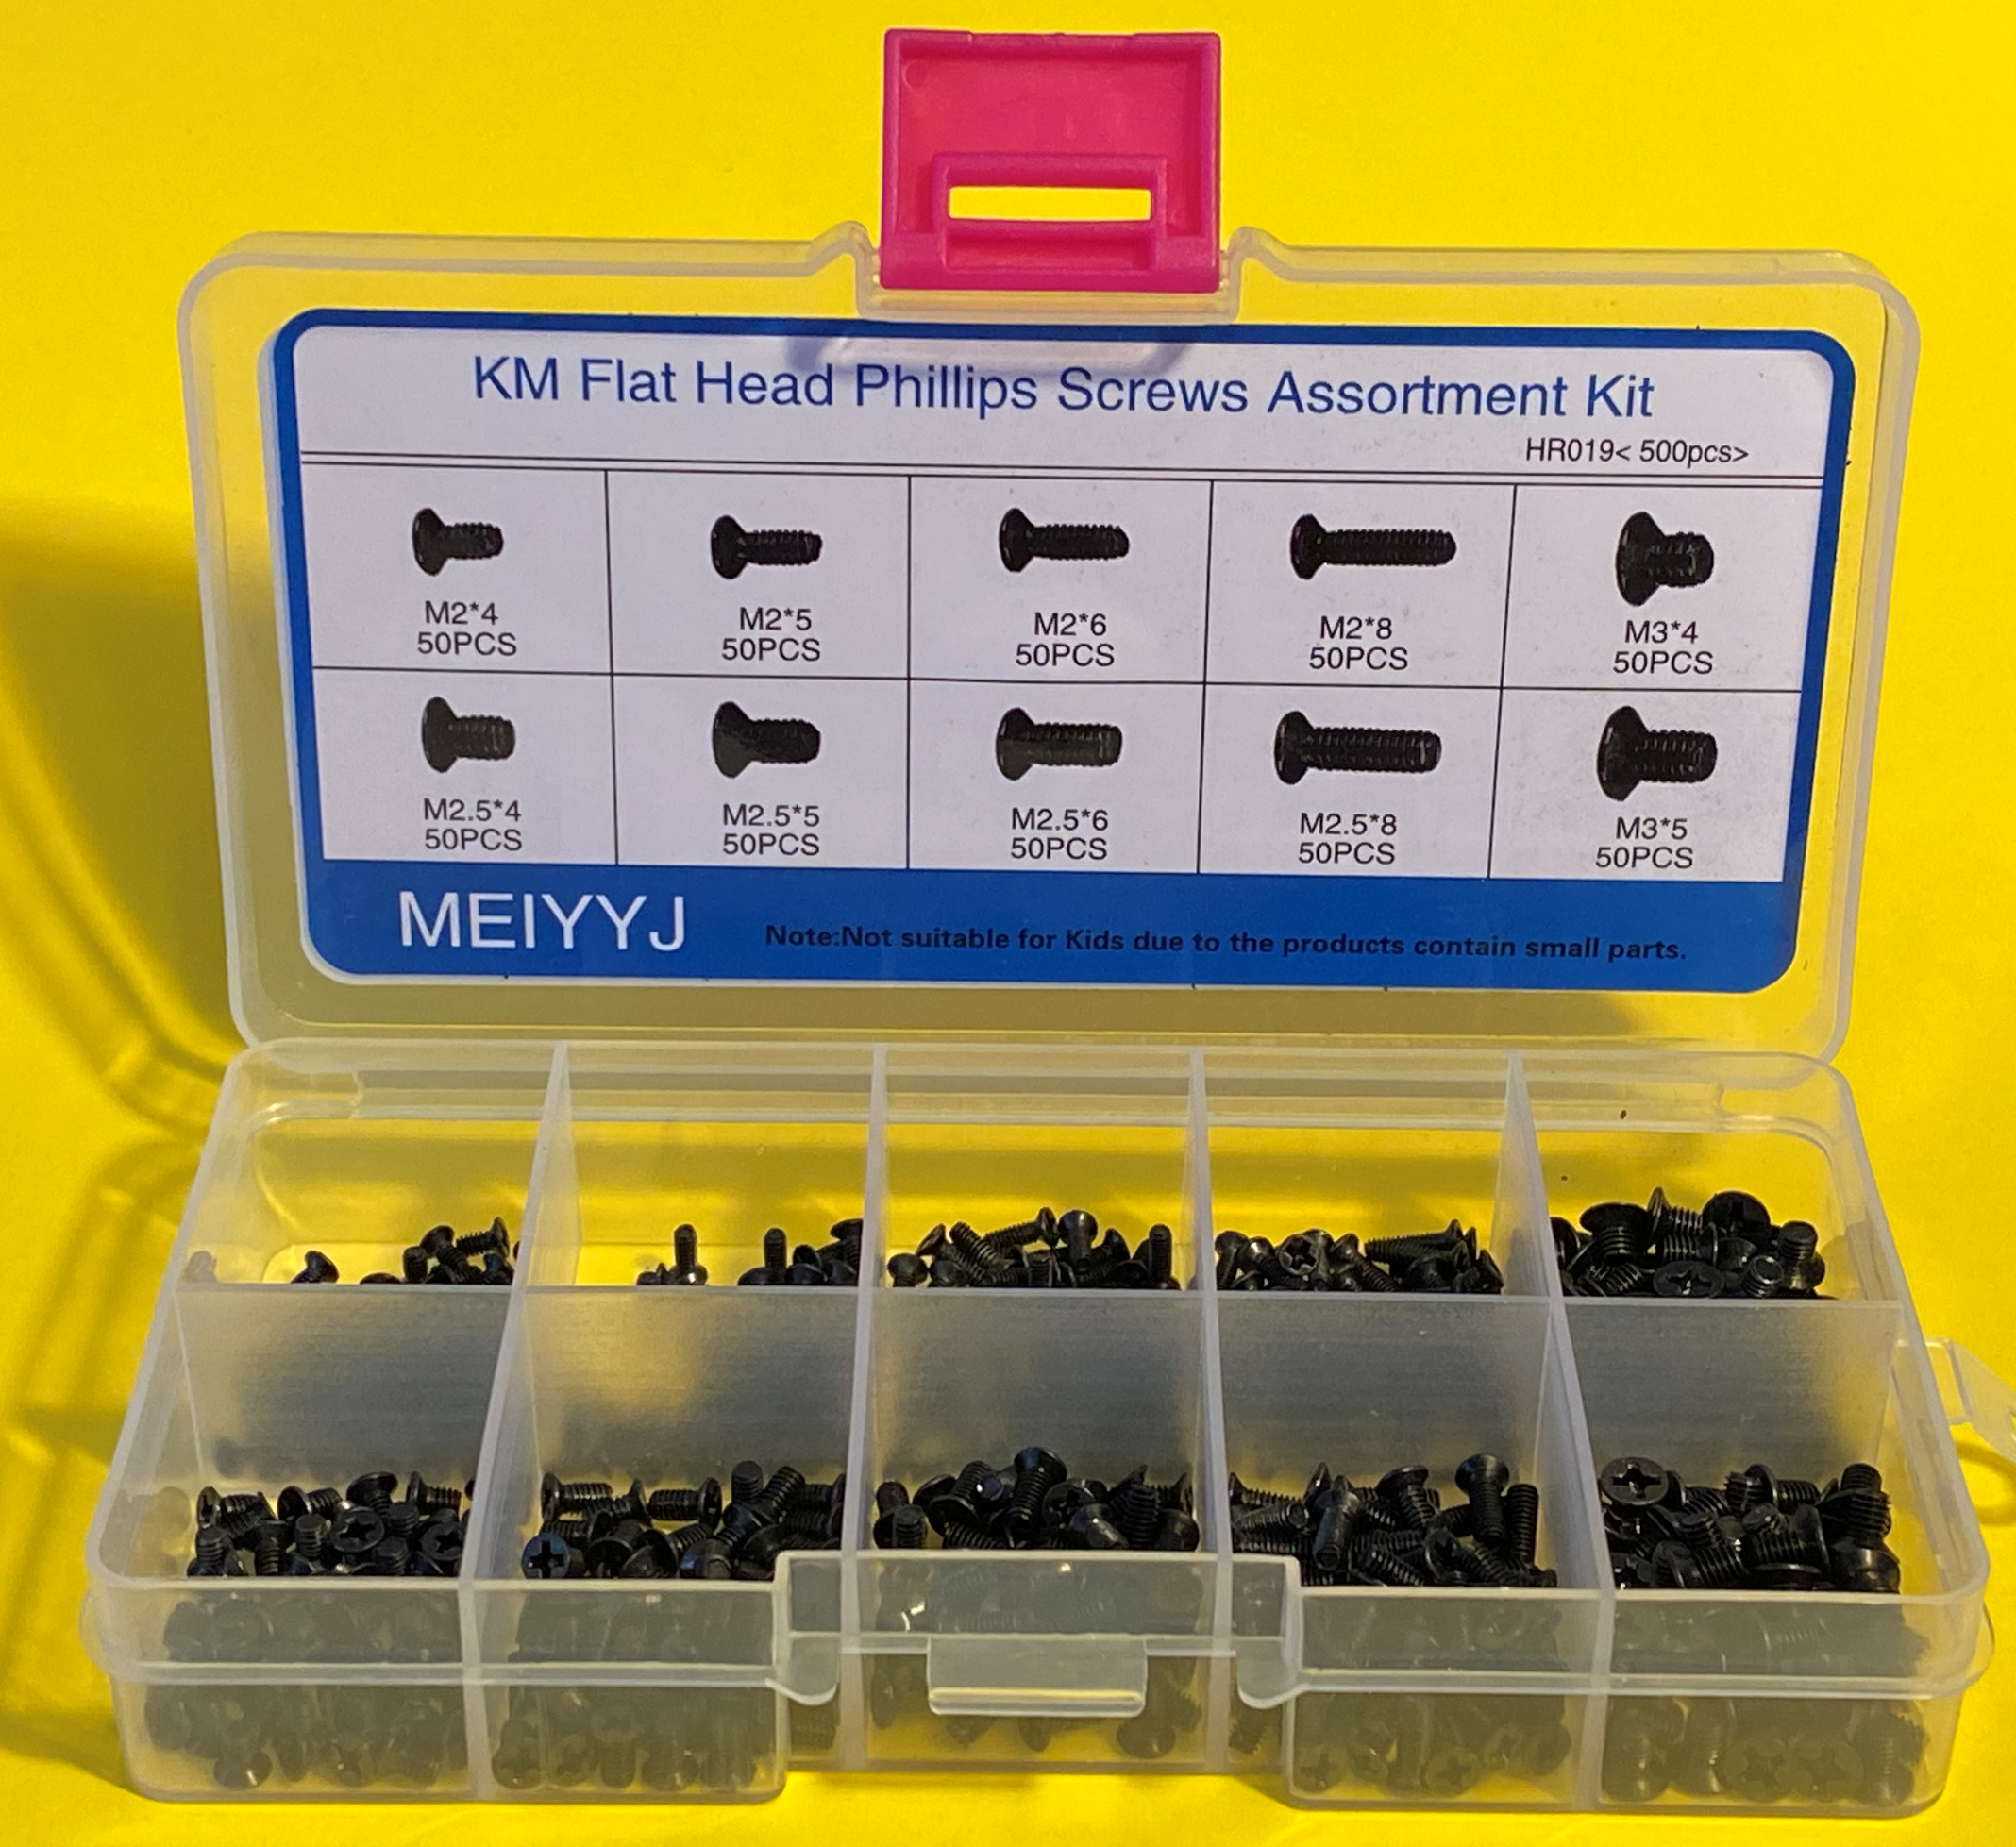
I’m fixing things together using tiny self-tapping screws. These can be hard to get hold of. I found this rather nice kit on Amazon for a reasonable price. The screws as supposed to be used when repairing laptops, but they work into 3D printed parts rather well. After a while I suppose I’ll use up all the screws of one particular size, but at least I’ll know which size to buy next time.

Maketober Day 20: Making Enemies with Game of Thrones

GOT.png

I never got round to watching the Game of Thrones TV series. But now I’ve played the board game. It was hilarious. In the game you take control one of the factions fighting for the famous “Iron Throne”. Not sure why, it doesn’t sound very comfortable. The strapline for the game is “win or die”. I was always fairly sure where I was going to end up when we started playing this evening, but I gave it a good go.

The game lets you make alliances. This is great fun. Some players tried to ally with everyone else. I allied with someone and then promptly attacked them. A move that didn’t end well for me. And I now have a reputation for treachery that will take a while to live down.

The game is all about strategy and planning, which put me at a bit of a disadvantage to be honest. But by the end I was starting to figure out how things worked. Unfortunately, by this time I was down to one footman and a single piece of land. Here are what I’m going to try and do next time we play:

  • Make an alliance right at the start and make sure that it is properly mutually advantageous. The game lets you perform supporting moves for other players actions. Use these with your ally as appropriate. There are also “raiding” actions you can use to frustrate opponents moves. Use them too.

  • Remember that you only need to capture a particular number of castles. This is quite easy to do without taking over the whole board. The trick is to pick the right time to ditch the ally and then go for it.

  • You can use ships to move people around very quickly. Discover how to do this and then use it.

  • Remember that you only have 10 moves before the game ends. So no point in playing the long game.

  • Don’t forget that the hand of cards you can use to augment your battles will be restored to you once you have used them all. So don’t be afraid to take people on.

These hints come to you courtesy of a player who finished sixth out of six, but I did have a good time. If you like games like Risk, Campaign and probably poker, you will have a bit of fun with this game.

Makertober Day 19: Python as a prototyping language

pixelpanel.png

I’ve been waxing lyrical about the joys of using Python to create embedded applications. It turns out that there is no better way to put programs into an embedded device as long as your program is less than 300 lines or so and you don’t mind it chugging a bit.

Today I managed to hit both of these brick walls at the same time, when the NeoPixel sprite program I’m making both ran very slowing and out of memory. Oh well. The good news is that having used Python to figure out how the program should work I can now take the code and convert it into C++.

This is not a bad approach to development. Python is great for trying out ideas and the way that you can type statements into the console to find out what they do makes prototyping very easy. C++ is a bit harder to work with quickly, but it s a nice place to write big programs that go very fast.

Makertober Day 18: Making a working printer

backprintng.png

I think you should all know that the little plastic rocket above was the product of a lot of effort today. In the end I discovered that last time I mended the printer I’d left a tiny gap between two parts of the path into the print head. If the plastic in this gap melted it then formed a plug which blocked everything up. All I had to do was take the printer to pieces, put it back together wrongly a couple of times and then finally get it right.

So I know have a 3D printer that works. As far as I know.

Maketober Day 17: Making a broken printer

printerbits.png

Una my lovely 3D printer is what I call a “Schrodinger Device”. She’s got this title in honour of the celebrated “thought experiment” involving a box containing a cat and something that might, or might not, kill the cat. The idea is that right up until you open the box and take a look inside you don’t know whether the cat is dead or not. From a quantum perspective you can regard the cat as both dead and alive until you find out what has happened. The same kind of thing happens with Una. At any given time I may or may not have a working 3D printer. I only find out which is true when I try to print something. I’ve owned many such devices in the past, including a Mini Traveller that sometimes was a car and sometimes wasn’t.

Anyhoo, today when I tried to print a box for a LED panel that I’ve been playing with I discovered that Una is no longer a printer. I’ve spent most of the day proving that this fact is most definitely true. In this time I’ve replaced some bits, recalibrated others and cursed all of them. Oh well.

Maketober Day 16: Making a mesh of things with eero

eero.png

Curse you, Amazon Prime Day. I wasn’t going to buy anything until you came up with a nice discount on a set of three WiFi mesh devices from eero. I’ve been having problems with WiFi reaching all round the house and so I ordered some. The idea is that the three devices work together to extend network coverage around your house. They can forward messages from one to another over the air or via a wired connection.

They do have one major limitation though, which I knew about before I bought them. They don’t do PPPoE authentication. What’s that? I hear you ask. It is part of the process of managing the connection to your network service provider (in our case KCOM and their lovely LightStream fibre). It’s used in lots of places around the world that aren’t America.

In a perfect (but perhaps less secure) world you could connect one socket on an eero node to your network modem and the other onto your local network and have eero look after everything. But because the eero can’t authenticate the connection to your service provider you have to do the next best thing, which is attach the eero to a network port provided by your router. You need to keep the router to do the authentication .This slows things down slightly in that the router is already managing a local network for your house and you are hanging another managed network off that one. However, I’m not interested in the fastest possible network connection. I just want my devices to work all round my house.

I copied the WiFi SSID and password from my KCOM router into the eero and then turned off the WiFi in my KCOM router. This meant that everything around the house has just kept going. The next step will be to put the router into “bridging” mode which turns it into a very simple network connection (rather than the manager of a network that I don’t need). To make this work properly I’ll have to put all the wired devices in the house “downstream” of the eero device which I can’t do at the moment because unlike my router, the eero doesn’t have multiple network ports.

It probably sounds a bit more complicated than it has turned out to be. The good news is that I’ve got much better WiFi around the house. The eero app that you use to manage everything has some very powerful features that let you do things like turn off specific devices and create profiles for combinations of devices. If you’re thinking of getting more WiFi around the place you could take a look at the system. Especially if it is nicely reduced.

Maketober Day 14: Making mistakes

Today I have been mostly making mistakes. Some people say that failures are more useful than successes because you learn from them. In which case I’ve learned a lot today:

  • It is possible for a drawer to contain 50 cables, none of which are the one that you need.

  • The esp8266 microcontroller does not produce high enough logic levels to drive an AdafFruit 8x8 NeoPixel array. I realised this his after I’d wired up a few and none of them worked. Update: It turns out that this is wrong. I’d connected the data signal to the wrong pin on the ESP8266. It works fine with the panels.

  • The logic level converters that I bought to address this issue do not solve the problem. See technique above.

  • The ESP32 device does produce levels that can be used to drive a NeoPixel array. Provided you have a spare one to hand.

  • I need to order some more ESP32 devices.

Maketober Day 13: MicroPython JSON file save and load

Today finds me saving setting information for my nightlight. I want to save the time the “on” colour and the “off” colour along with the times when the light should change from one to the other. Like a good programmer I’ve made a class to hold the setting information:

blue = [0,0,255]
yellow = [255,255,0]

class Settings:

    file_name = 'settings.json'

    def __init__(self, on, off, on_colour, off_colour):
        self.on = on
        self.off = off
        self.on_colour = on_colour
        self.off_colour = off_colour

    @staticmethod
    def getDefault():
        return Settings([06,30],[18,30], yellow, blue)

This is the first part of my Settings class. The __init__ method initialises a setting instance. The getDefault method creates a light that comes on at 6:30 and goes off at 18:30. The light is blue when it is “off” and yellow when “on”. So far, so good. Now I want to store the value of a setting in a JSON file.

def save(self):
    settings_json = ujson.dumps(self.__dict__)
    print('Saving:', settings_json)
    try:
        f = open(Settings.file_name,'w')
        f.write(settings_json)
        f.close()
        return True
    except:
        return False

We can use the save method to ask a Setting instance to save itself. It converts the data dictionary in the Setting object into a string of JSON and then writes this string to a file. If all is well it returns true. If you’re wondering why I’m using ujson rather than json its because this is a special JSON library for MicroPython. So we can now save the setting values in a file. But can we get them back?

@staticmethod
def load():
    try:
        f = open(Settings.file_name,'r')
        settings_string=f.read()
        f.close()
        print('Got settings:', settings_string)
        settings_dict = ujson.loads(settings_string)
        result = Settings.getDefault()
        for setting in settings_dict:
            print("Setting:", setting)
            setattr(result,setting, settings_dict[setting])
        return result
    except:
        print('Settings file load failed')
        return Settings.getDefault()

This is the load method. It is a bit more fiddly then save. The problem is that when we load the JSON back from the stored file we get a dictionary, i.e. a set of name/value pairs. We don’t want a dictionary. We want a Setting object. So we have to build one which contains the loaded data. The first thing we do is create a “default” setting as a target. Then we work through the dictionary that we loaded from the file and use the magical setattr function to set each of the matching attributes in the result to the loaded value. If the loaded data is “sparse” (i.e. some of the attribute values are missing) the result that is created will have the default value for that missing attribute.

Note that I’ve made the load method static which means that it can be called from the Settings class. This means that I can load settings without needing to make a Settings instance to do it for me.

We could use these load and save methods to store a Settings object with any number of attributes. The only thing we can’t do is have Settings attributes which are themselves objects. The other wrinkle is that if you save a tuple attribute it will be loaded back as an array. But it does work and I rather like it.

Maketober Day 11: PIR controlled ESP32

PIR light.png

I’ve been playing with PIR sensors. In this crazy world you can pick up five of them for around ten pounds. You can see one in the picture above. It’s the half bubble right in the middle of the frame. These trigger when they see something warm blooded walk past. They are used in burglar alarms and the like. I bought a bunch to play with. I want to make a PIR controlled nightlight that comes on when you walk past it. I’m going to use Neopixels as the light source.

The PIR sensor has an output pin that goes high when it sees someone go past. You can use the little orange trimmers on the device to adjust the sensitivity of the detector and how long it stays on once it has been triggered. You can also make the output signal a pulse or stay high as long as it detects something by moving the yellow jumper on the board.

I’d really like the whole thing to be battery powered. According to its data sheet the PIR sensor only sips tiny amounts of current, but this is not true for the ESP32 I’m using to control everything. The good news is that the ESP32 can be made to go into “deep sleep” mode in which most of the processor shuts down. We can use the trigger signal to wake up the processor when it sees someone. The ESP32 can then turn the light on and even log the detection over the network using MQTT or whatever. I’ve been playing with some code to make this work and I’ve come up with the following:

def startup():
    global np,pin,n
    if machine.reset_cause() == machine.DEEPSLEEP_RESET:
        # we can do stuff here when the PIR was triggered
        print('woke from a deep sleep')
    else:
        print('not been sleeping')
    # PIR on GPIO 4
    pin = machine.Pin(4, machine.Pin.IN)
    # configure to wake up ESP32 when the PIR is triggered
    esp32.wake_on_ext0(pin,esp32.WAKEUP_ANY_HIGH)
    # put the ESP32 to sleep
    print("Going to sleep")
    machine.deepsleep()

This MicroPython function can be added to a program that runs when the device is booted. In other words, you could put a call of startup() into the file boot.py

It checks to see if the ESP32 was woken from a deep sleep (i.e. the PIR triggered the restart. You can put whatever code you want to run in that part of the code. Then it configures pin GPIO4 as an input and tells the ESP32 to wake when this input goes high. Then it puts the ESP 32 into deep sleep.

I’ve tested it and it seems to work. The only problem is that not all ESP32 devices are equal as far as deep sleep power consumption is concerned. The DOIT board that I’m using leaves all the USB hardware switched on when it goes to sleep, which means that it still consumes quite a bit of power. If you want to do this kind of thing with an ESP32 I strongly recommend the DFRobot FireBeetle which only takes tiny amounts of power in sleep mode. Once I’ve made the code work I’ll move onto that platform.

Makertober Day 9: Little Bits Space Rover Cheap

space rover.png

Less of an “I’ve built this” and more of a “You should buy and build this” post.

I’ve spent a big chunk of today playing with LittleBits. They are awesome fun. Little electronic components that click together with magnets. Great if you happen to have a three year old to keep busy. Which I did.

I had a look to see if there were any new kits out there and I’ve discovered that they are selling Space Rover Inventor kits on Amazon for the silly price of 20 pounds. For that you get a controller you can drive from your phone via Bluetooth, two motors, a servo, a proximity detector and a bunch of other things. Well worth a look.

Makertober Day 8: Thermal Camera

thermal camera.png

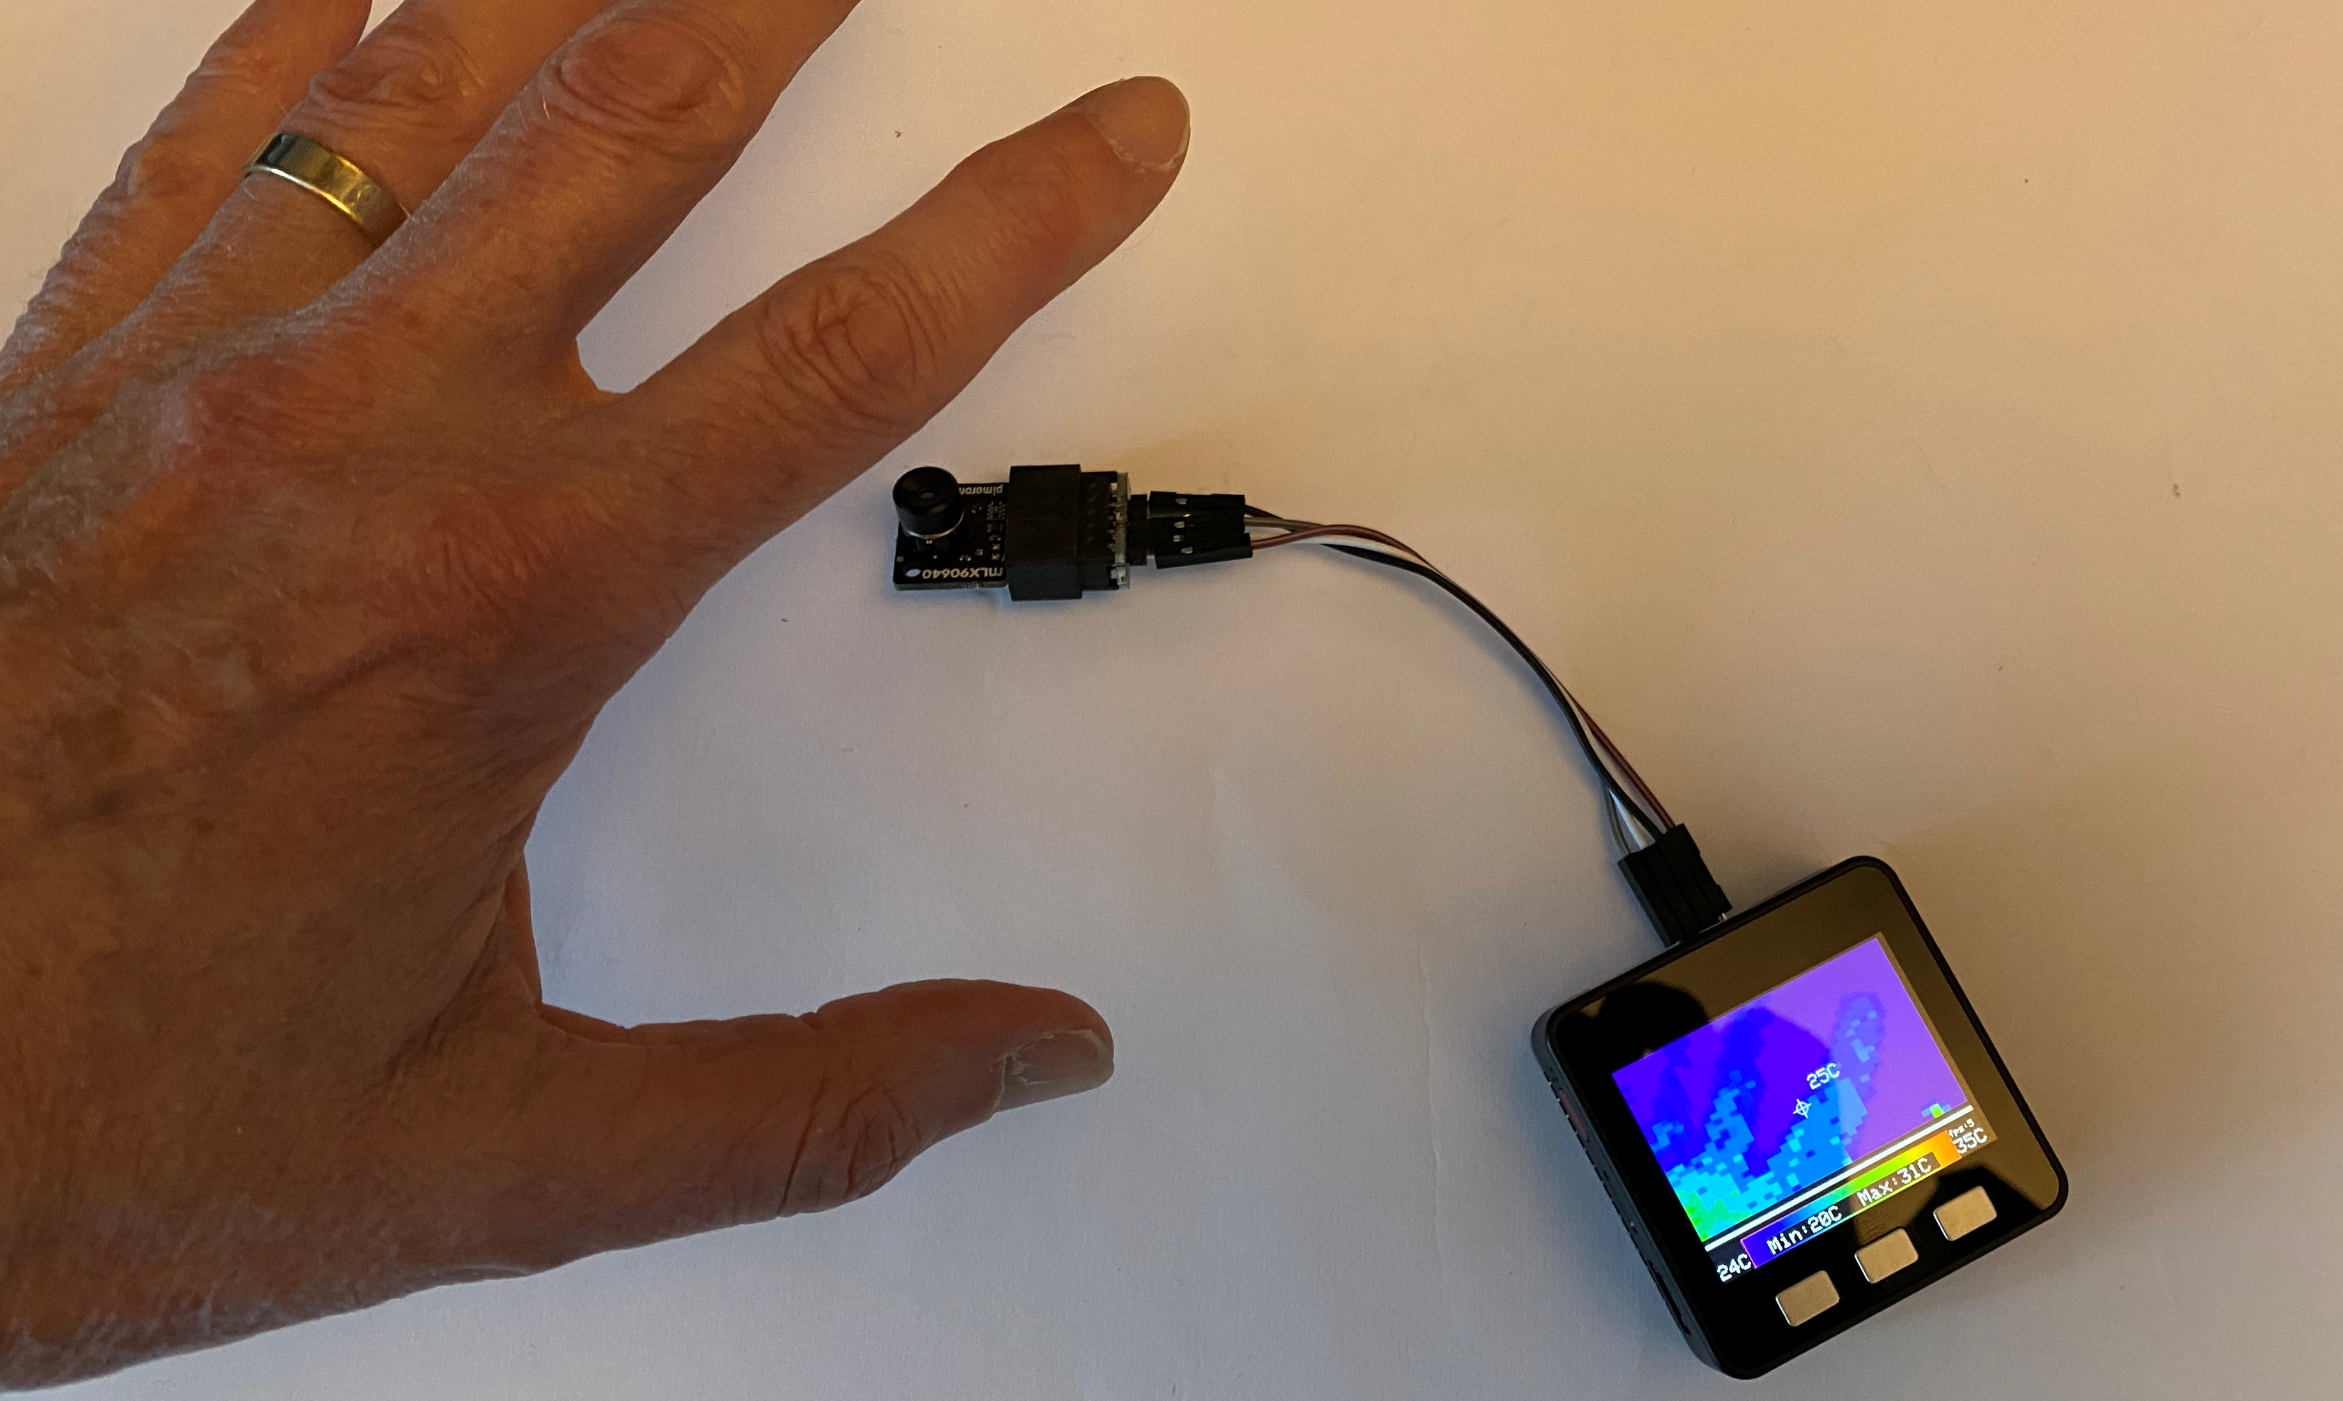
I suppose there should be more to making things than just plugging together devices and running their example programs….. However, until that time: here’s an M5Stack device connected to a thermal camera. M5Stack sell a camera unit but I used one sold by Pimoroni to be used with their breakout garden. Both devices are based on the same camera unit, the MLX90640 that gives 32x24 pixels of heat readings. I got the M5Stack sample program from GitHub which I found here. It works very well. At the moment these cameras are pretty much impossible to get hold of - I’ve had this one lying around for a while.

You can also use the camera with a Raspberry Pi although they are rather hard to get hold of at the moment.

Makertober Day 7: Led Array

led array.png

I’m totally sold on Python development for embedded devices now. I had an idea for a silly device and ordered an 8x32 led array powered by Max2179 devices. The leds arrived last night and I plugged them into one of my cheap ESP32 devices and got it sort of working. I found an Arduino library and, after tweaking the C++ library code I manged to make it build and almost display something. Writing and deploying C++ from the Arduino IDE again reminded me why I don’t like this very much anymore. The compilers are very brittle and prone to failing if you happen to use a library that contains code that is not supported by the device you are targeting . And deployment is tiresome and slow.  I think that the Arduino toolchain is an awesome achievement and makes lots of lovely things possible but it can be a bit of a pain to use sometimes.

Rather than continue with that I thought that today I’d try using putting MicroPython on the ESP32 and using a Max2179 library that I found on GitHub. This. Just. Worked. I used Thony to write and deploy the code. I was able to use the REPL command prompt to test out the code and my tiny little programs took no time at all to deploy and run inside the device. Best of all, the Max2179 library I found just sits on top of the Framebufuffer (http://docs.micropython.org/en/latest/library/framebuf.html) class and has lots of easy to use graphics commands.

I’ve got text scrolling nicely and now I’m going to hook it up to a data source. If you want to have a go at this kind of thing I’ve written a little HowTo that you can find here.

Maketober Day 6: Success Through Failure

I’ve spent a chunk of today making my “Success Through Failure” presentation for Hull University First Years this evening. I’ll post a recoding or screencast later. As you can see above, my PowerPoint design skills are coming along nicely…

Update: the talk went really well (or at least I thought it did). The team were kind enough to record the whole thing and you can find the video here. You might even find it useful.

Makertober Day 4: Letter Tiles

In a change of plan, rather than making a box for my temperature sensor, today I’ve spent a bit of time picking random letters. Years ago I I had an idea for a tiny Windows Phone game in which the player flicked letter tiles at targets to build words. I’ve decided to finish this off using my new JavaScript Matter.js skills. The first step is to pick some letters to use in the game. I reckon I’ll need 100 or so tiles to make the game work.

Now I could just pick the letters on the tiles by getting a random number in the range 1-26 and then just match that to a letter. That would work, but it wouldn’t be fair on the player as they would get as many letter Es as Zs, and that is not how the English language works. We use a lot more Es than Zs. So I went online, found a letter frequency table and popped it into JavaScript:

this.letterList = [
    { letterChar: 'A', freq: 8.34 },
    { letterChar: 'B', freq: 1.54 },
    { letterChar: 'C', freq: 2.73 },
    { letterChar: 'D', freq: 4.14 },
    { letterChar: 'E', freq: 12.60 },
    { letterChar: 'F', freq: 2.03 },
    { letterChar: 'G', freq: 1.92 },
    { letterChar: 'H', freq: 6.11 },
    { letterChar: 'I', freq: 6.71 },
    { letterChar: 'J', freq: 0.23 },
    { letterChar: 'K', freq: 0.87 },
    { letterChar: 'L', freq: 4.24 },
    { letterChar: 'M', freq: 2.53 },
    { letterChar: 'N', freq: 6.80 },
    { letterChar: 'O', freq: 7.70 },
    { letterChar: 'P', freq: 1.66 },
    { letterChar: 'Q', freq: 0.09 },
    { letterChar: 'R', freq: 5.68 },
    { letterChar: 'S', freq: 6.11 },
    { letterChar: 'T', freq: 9.37 },
    { letterChar: 'U', freq: 2.85 },
    { letterChar: 'V', freq: 1.06 },
    { letterChar: 'W', freq: 2.34 },
    { letterChar: 'X', freq: 0.20 },
    { letterChar: 'Y', freq: 2.04 },
    { letterChar: 'Z', freq: 0.06 }];

This array contains an object that has a letterChar property (the char of the letter, and a freq property which gives the number of times that letter will appear in 100 letters. In other words, in 100 letters we should find around 12 Es, 1 V and not many Zs. I now want some JavaScript that will pick 120 tiles based on this distribution. To make the game seem more real, I also want to make sure that there is at least 1 of each character - even the one that mathematically should not be there. It turned out that the code to do this in one pass through the array of letters was a bit hard to do. In fact I didn’t manage to do it without a bit of cheating. What I came up with steals 1 tile from each calculated letter and then fills in the last few random tiles with randomly chosen tiles that have a uniform distribution over all 26. I’m kind of proud of this, until someone suggests a better way to do it…..

var createdTileCount = 0;

for (let letter of this.letterList) {
    let noOfThisLetter = Math.floor(tileCount * (letter.freq / 100))-1;
    if (noOfThisLetter < 1) {
        letter.number = 1;
    }
    else {
        letter.number = noOfThisLetter;
    }
    createdTileCount += letter.number;
}

// add in some spare random ones

while(createdTileCount<tileCount){
    let lett= this.getRandomInt(0,25);
    this.letterList[lett].number++;
    createdTileCount++;
}

Once I’d got my letters picked the next thing to do is display them. I’ve used my list of tile numbers to build all the tiles, given them some physics and then dropped them on the ground. Below you can see the result.

falling letters.png

I guess this is more of a “work in progress” than a finished item. But it is still something I’ve. I’ll put the code on GitHub when it is finished.

Maketober Day 3: Use an M5StickC to display temperatures

Blockly code.png

I’m trying to use devices and things I’ve not used before. Today I’m using the Blockly environment provided by M5Stack to program their devices. This runs in the browser. You can find it here. You use the M5Burner app on your PC or Mac to program an M5 device with MicroPython plus a bunch of M5Stack libraries. You also use M5Burner to put your WiFi details into the device because (and this is wonderful) you can deploy the programs you are writing over a wireless connection.

You build a program by dragging blocks onto the workspace and fitting them together. Above you can see a program that fetches the temperature values and displays them. It took me a while to build this code what with the dragging and linking. I’m not really a fan of working like this, but then again I’m not learning to program so it’s not really aimed at me. The good news for me is that I can press the Python button at the top and be instantly transported into a world I know very well:

PythoUIFlow.png

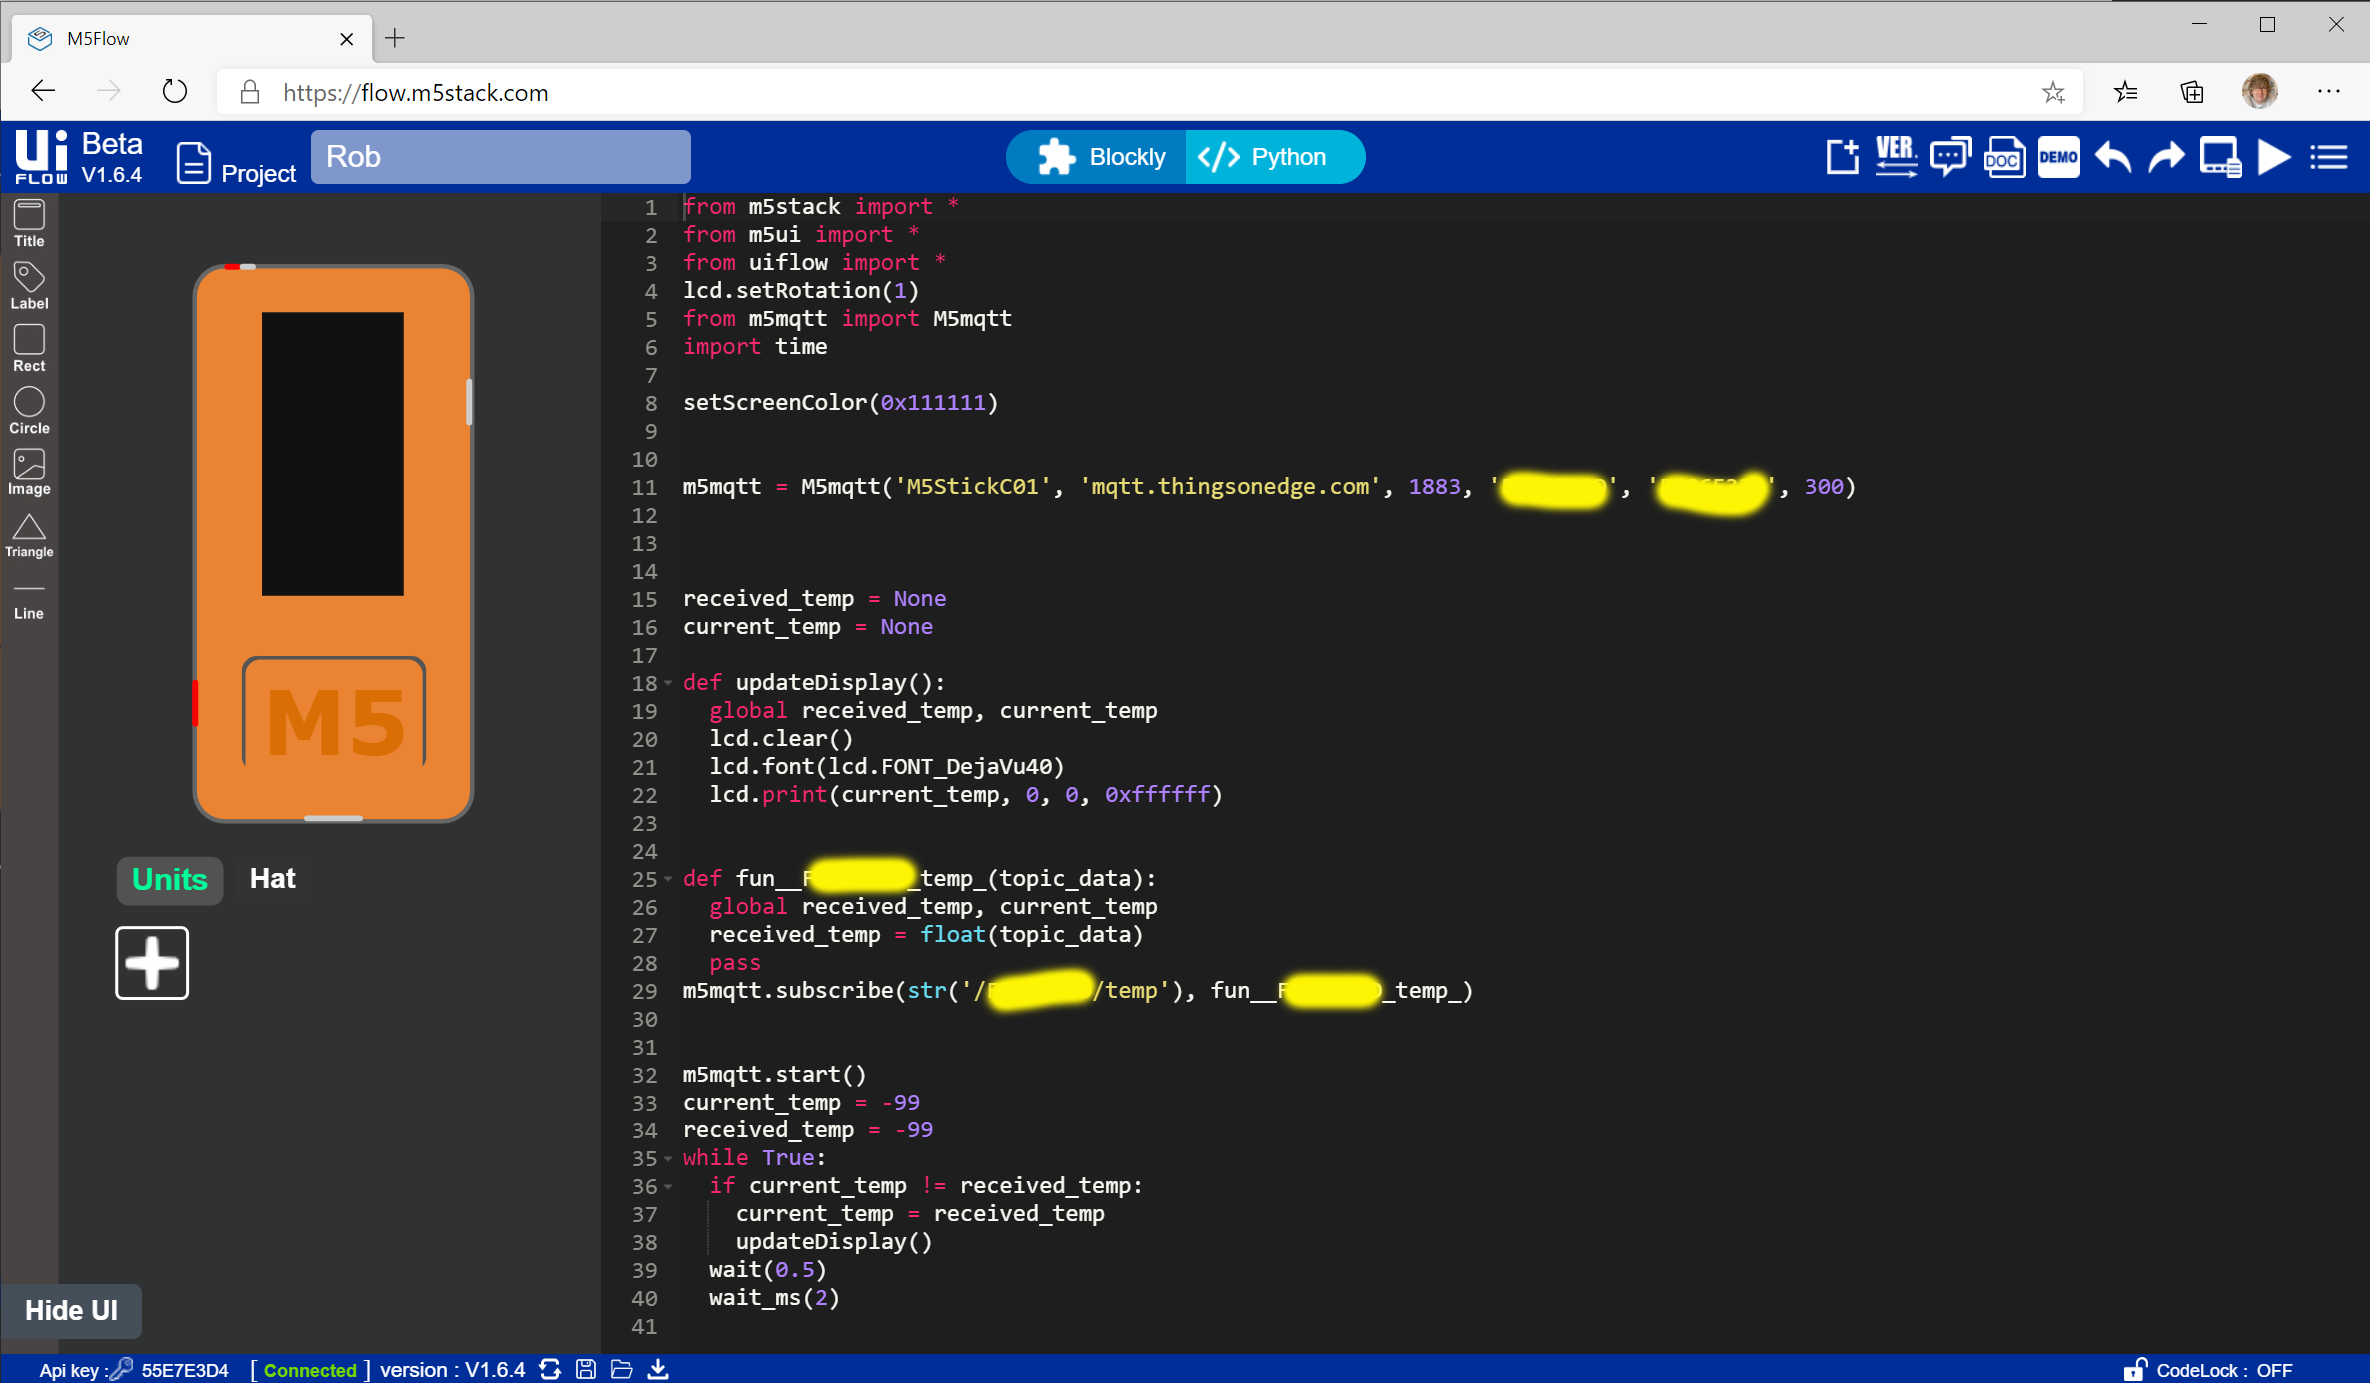
This source is keyed to the Blockly view and if I make changes to the Python code I’ll break all my blocks, but at least it gives me a handle on what is going on. And its a great way to learn to code. When you press the run button in the top right hand corner of the page you get to run the program in the device. If you want to deploy the program so that it runs each time the device is powered on you can use the menu to download it into the file store on the M5Stick. Then you use a tiny menu on the device itself to select the program and run it.

If you are wondering why some of parts of the above images have been covered with yellow blotches this is because these are the unique ID of my Cricket device which is transmitting the temperature values. You use the device ID as both the username and the password for the connection to the Things On Edge MQTT server. I don’t think that there would be a huge problem if someone got hold of the ID of my device (although I guess they could find out the temperature in my house).

And now I’ve got a little client that lets me view the temperatures from my remote sensor. It took hardly any time to put together and it works a treat. If I have a worry about the solution it is that if anything happens to the Things On Edge company my Cricket sensor turns into a tiny paperweight - because the only way to configure the sensor is via the Things On Edge server. It would be wonderful if the whole configuration process could take place on the Cricket itself via the same web interface that it generates when you setup the WiFi connection.

Anyhoo, that’s day 3. On to day 4 when I’m going to make a little box to put the sensor in….

Maketober Day 2: Remote temperature monitoring

The complete system

I’d rather like to be able to monitor the temperature around the house. The heating system tells me the temperature but I’m not sure what this means when I’m sitting in the living room several feet away from the radiator. I’m also keen to test something I got a while back. It’s called a Cricket and it is tiny microcontroller that is specifically designed to do just what I want, which is read the temperature every now and then and send it onto the network. I want to have a battery powered sensor and want the batteries to last forever-ish.

Previously I’d be looking at LoRa (Low Powered Radio) devices to do this but they are a bit complicated to set up. The Cricket claims to give you LoRa style battery life with WiFi connectivity. I should be able to power it from a pair of AA batteries for a good long time. The Cricket achieves this by optimising the time that it takes to connect to the network and send a data packet. It seems to take around four seconds to do this, which is pretty impressive. It has one input for sensing data and another for triggering a transmission. It also has a real time clock which can be used to trigger updates. And there is an onboard temperature sensor which I can use to get my readings.

Once you’ve soldered (badly in my case) the battery pack to the Cricket you then have to attach it to your WiFi. This is done in the “traditional” way of WiFi devices. Hold down a button to trigger Access Point mode, browse to the WiFi hotspot that the device has just created, open up a web page there and enter your WiFi SSID and password. Then you have to configure your device to tell it what data to gather and where to send it. You might think that you’d do this on the device but no, you do it via a browser. Each Cricket has an unique ID on a label on the back. You log into the developer portal, find your device by its name and then use a web interface to configure it.

config page.png

You can configure the real time clock to wake up the sensor in time measured in hours, minutes or seconds. You can also use a digital or analogue input to wake the sensor up and make it send a reading. The reading can be sent as an HTTP Post to a web address or you can use MQTT. Things On Edge provide their own MQTT server or you can use your own. I’m going to use theirs.

The idea is that you enter your settings into the web page, press Save and then press the button on the sensor to make it connect to the server, upload a value and then check for new settings. This took a bit of fiddling for me, but eventually I made a sensor that wakes up every five minutes and sends a temperature reading.

MQTT temp.png

Above you can see the display from the MQTTBox program on the PC showing that temperature readings are being sent up to the server. Next I need a device to get those values and display them. But that’s a job for tomorrow.