HullPixelbot Code takes shape

Building on the work yesterday, I've now made a little code editor that can be used to control the HullPixelbot motor controller. You can load and save programs and send them via a serial port into an Arduino. The programs are stored in EEPROM inside the device, so that they run when the robot starts up. Next step is to distribute the programs over MQTT using the esp8266. Then I'll be a lot closer to my dream of autonomous robots that I can easily reprogram.

The program above starts a movement and then tests a conditional branch behaviour that fires when the motor stops running. You can use this to write code that starts the robot moving and then responds to events.

The nice thing about the programs so far is that they are very frugal. I've got everything running on a single Arduino Pro-Mini and it seems to work OK at the moment.

Potential Dividers for Pixelbots

..a divider with potential

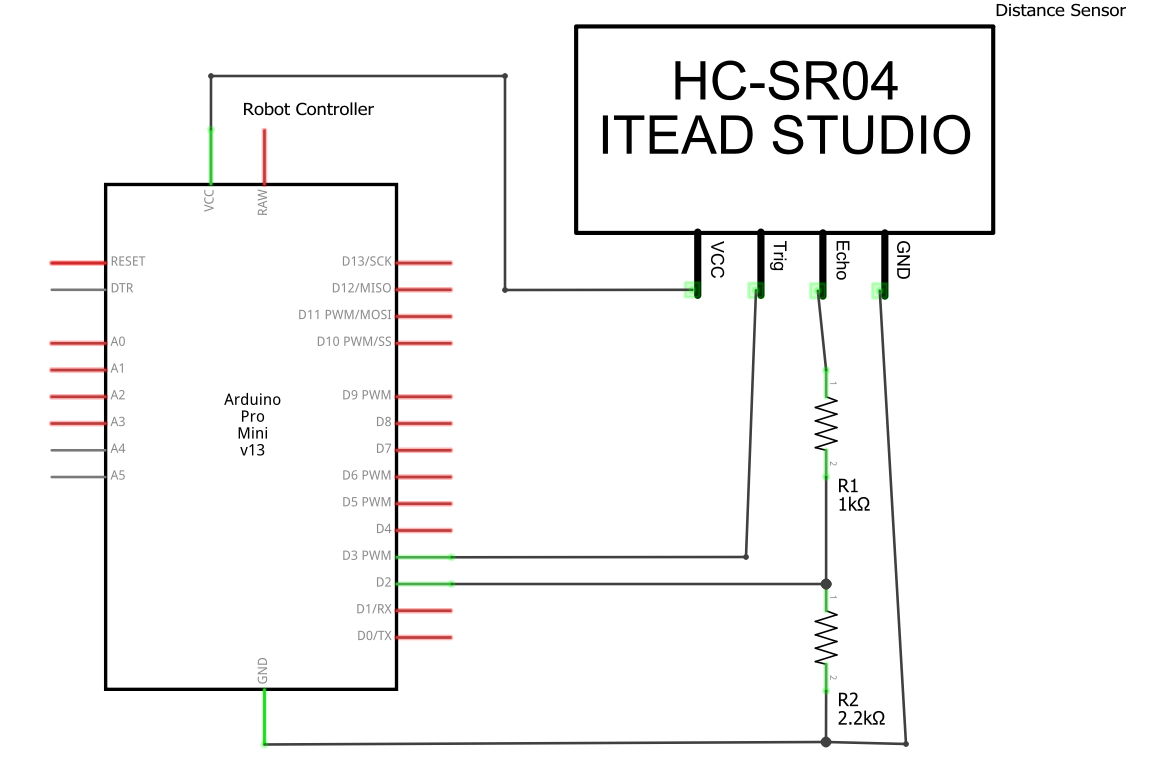
I've been working on the HullPixelbot hardware today. I want to use an HC-SR04 distance sensor so that a robot can detect when it is getting close to something. These devices are not perfect, but they are very cheap (less than a pound from China). Snag is they are 5 volt devices (i.e. they are powered by, and produce signals at, a 5 volt level).

The Arduino Pro-Mini that I'm using to control the motors and sensors is a 3.3 volt device. Directly connecting a distance sensor to it would not end well. It might actually break the Arduino. There are special converter chips thatyou can buy to addressthis, but they are expensive and need to be wired up. Fortunately the only signals you need to worry about are those going into the Arduino, and the only input signal is the echo pulse. So I just have to adjust the level of that signal.

The way that the sensor works is that you give it a signal to say "please measure the distance". The sensor then makes an ultrasonic "squeak" and times how long it takes for the squeak to bounce back. It generates a pulse, called the echo signal that represents this time. The longer the echo pulse, the longer it took for the sound to bounce back, and the further away the target is from the sensor.

The echo signal provided by the distance sensor is either at 0 volts or 5 volts. We want to convert the 5 volt value to 3.3. I've used a potential divider to do this. This uses the principle that the voltages in a circuit are distributed according to the resistances in each element. The higher the resistance of one part of the circuit, the more volts are "dropped" across this part. This probably doesn't seem sensible, but it is how a lot of electronic devices work.

In the old days we used to use lots of low voltage bulbs in our Christmas lights. The mains voltage of 240 volts would be spread over, say 20 bulbs, each designed to work with 12 volts. All the bulbs were connected in a chain, so the voltage dropped across each bulb was 12 volts (a twentieth of 240). Bad news, if one of the bulbs fail the whole chain goes out.

Worse news, if a human being (who has a resistance a lot higher than a 12 volt bulb) puts themselves into the circuit trying to fix this they will find that nearly all the voltage is dropped across them, which is how until recently Christmas was always accompanied by grisly stories of people electrocuted when they were fixing the lights on their tree.

Anyhoo, back to the robot circuit. The total resistance of our two resistors is around 3K. The voltage dropped across the 1K resistor will be around the third of the 5 volt input. These are the volts I don't want. The voltage across the 2K resistor will be around two thirds of 5 volts, which is as near 3.3 volts as makes no difference. And it works, which is nice.

If you think about it, what I've made is a machine that can divide by 3 at close to the speed of light. Any signal going into the potential divider will be divided by 3 on the output because physics. The speed of these two resistors massively outperforms even the most powerful of digital computer, and so-called "analogue" computers like this were much used in the past.

Visual Micro Still Rocks

I bought Visual Micro a while back. Not that I really needed to. The free version is actually plenty powerful enough for day-to-day use. It was just that I thought the product was so good that I really should support it.

For a registration you get a key that works on three machines. I've been through a few machines over the years (as you do) and last week I found that my key didn't work for my desktop. I emailed them, they cleared the key and I'm back in business again. Thanks folks. 

If you are in any way serious about embedded development you should get this tool. The free Arduino SDK is OK for a while, but you'll fairly quickly hit limitations that will grate, and with Visual Micro you get all the lovely intellisense support and general niceness that comes with developing code in Visual Studio.

Visual Micro now works with all the esp devices and pretty much anything Arduino shaped as well. It's got some very interesting debugging support too, but I tend to rely on code instrumentation (print statements) when I'm writing embedded code, so I don't use it very much. Go get it. 

Hull Pixelbot Version 2.0

I've just released a new set of design files for the HullPixelBot. I've made some improvements and also added holders for the pixel lights (always useful in a pixelbot) and the distance sensor. I was quite proud of the design for the distance sensor holder, until I tried to use it. 

I thought I'd been clever by providing mounting slots for the distance sensors so that the wires could come through the slots for the connections on the back. Turns out this was actually stupid. It turned out to be really hard to make the connections with the hole. 

The new design (which you can see above) has separate holes for the two sensor wires, and they are arranged vertically so you can just connect all the bottom wires together to a common ground (or reference voltage) and then take each of the top wires and connect them to their potential divider resistor and reference voltage (or ground). I'll be doing a detailed post about wiring things up a little later. 

Putting the Pixel into HullPixelBot

The idea behind HullPixelBot is that it is a roving pixel robot. From Hull. We've got the robot part working quite nicely now, with motors and wheels and everything. But we've been missing the pixel bit. So today I spent some time crafting the holders for the pixels mounts.

The plan is to have two pixels on a robot.. One on the top, directly between the two wheels. We can use this to "draw with light" and whatnot. The other pixel is mounted on the back of the robot. On the front of the robot we are going to put a light sensor so that a robot can find and follow another robot with a particular coloured pixel on the back.

I'm going to spend the next day or so fiddling with the design and printing test versions to make sure it all fits together. Exciting stuff.


HullPixelBot on WiFi

We had a pretty good turnout tonight at the C4DI hardware group. The focus was on building and powering up HullPixelBots. I'd printed a few sets of parts and some folks had even turned up with all the other bits, so we made some robots from scratch. Important lesson learned, make sure that you link the two pins on the motor driver board If you want the motors to work. 

I even managed to get the WiFi working on the "bot with two brains". The code made the motor move when I browsed a website on the phone. From an access point hosted on the robot. My dream of a networked army of robots doing my bidding is coming closer.

Dual Processor Hull Pixel Bot

I think you should know I'm rather proud of this...

I've just finished building the prototype for the dual processor version of the HullPIxelBot. A single Arduino is a nice enough way to do simple robot control. But I want WiFi. And access points. And web servers. So I've coupled an ESP8266 device (in this case the Node MCU) up to an Arduino Pro-Mini. The Pro-Mini takes care of the low level motor control, producing the signals that will drive the steppers. The ESP8266 device doesn't really have enough pins for the motors, and it has better things to do than drive steppers, so I've linked the two with a serial connection.

Since the Pro-Mini costs around a pound and has a negligible effect on power consumption I reckon it is worth doing. At the moment we have a really simple one byte command protocol, but I can build that up a bit if I need to use the Pro-Mini to do some sensor integration. 

Next step is to work up the web side so that I can make a wireless, web controlled robot. Then we add the coloured pixels to the bot and we are really in business. 

I'll be releasing all the code and the circuit diagrams later. If you want to see the real thing, come along to C4DI tomorrow evening at 6:00 pm. 

Arduino Fun at Platform Expo

We had some great sessions, this is the presenter setup just after a group had left. 

We had some great sessions, this is the presenter setup just after a group had left. 

I did some sessions for Platform Expo today. I was taking about the joy of making things using the Arduino micro controller. Not a lot of people had heard of this amazing device before they arrived, but they sure had afterwards. I showed off a bunch of silly devices including my wedding lights, the Thingomatic, light panel, balancing robots and even did some programming. All in twenty minutes a session. Six times in a row. 

The audiences were all wonderful. At one point I told everyone that an Arduino board can be bought for two pounds fifty, which is less than a McDonald's burger. And someone called out "Does that include the chips?".  Well played sir, well played.

Arduino Bits and Bobs..

Arduino Bits and Bobs..

I've put some resources on my Arduino pages if you fancy getting started with this amazing device. You can find them here


Bluetooth Manager for Windows 10 Universal Apps now on Nuget

BluetoothManager.PNG

I've been playing with nuget

It's awesome. 

It is fantastically easy to package up an assembly and make it available for just anyone to use in their applications. It is beautifully integrated into Visual Studio and I reckon it is actually easier to download a package from the other side of the world and make it part of your solution than it is to add one that you have written yourself on your own machine. 

To practice I've packaged up my Bluetooth Manager library. This is a little wrapper class that makes it really easy to use Bluetooth on Windows 10 applications. I've not tried it on Windows 10 on Raspberry Pi (but I've tried it on lots of other systems and it works fine). You can find out a bit more about it here.  I use it so that I can print message on my little home made Bluetooth printer, but you can use it anywhere you want to talk over a Bluetooth serial connection. 

Oh, and in case you are wondering why it is version 1.0.1 and not version 1.0.0 I found an interesting quirk in nuget. If your library class doesn't have a public constructor the package will fail to work because Visual Studio will complain that the class is "Inaccessible due to its protection level.". That's what happens when you try to use version 1.0.0

Taking a look at the Photon

The Photon is a neat little embedded device a bit like the Electric Imp I played with a while back, but  a bit cheaper to get started with. You write C code in your browser and the program is deployed over WiFi to the device. The hardware is very like the Arduino. The programs can communicate via the cloud using web requests and there are also bindings for If This Then That.

To be honest, I've not done much with it, but number one son has had a play and things it's quite neat. The only concern I have with these systems is that you are a bit dependent on the cloud backend. I've got a collection of cloud enabled devices that are now just paperweights, and I worry that things like the Photon might go the same way. Having said that though, for the price it is a lot of fun. 

Arduino Kits Going Live

So a couple of weeks ago I got the go-ahead to buy some Arduino kits for our Second Year embedded course. We have been using the Arduino robots and they are nice enough, but a bit too closed for my liking. So I went on-line and tracked down a lovely little Sintron kit on ebay. Twenty Five pounds for loads of bits and bobs.

Tomorrow I'm dishing out the hardware along with a bunch of little plastic bags and a page of sticky labels. Job one will be to use the chart above to put all the components in labeled bags so that we can find stuff later. Job two will be to get some lights flashing and buttons being pressed.

Exciting times.  

Robot Recovery

Last Wednesday my balancing robot kind of overbalanced, leapt off the desk and shattered on the floor. You can see the awful damage here. At the time I said that all I'd have to do is design some replacement parts, print them out,  and I'd have him back on his wheels again.

So I have.

Robot Plates.PNG

These are the FreeCad designs for the two plates that were broken. I did some careful measurement, wrote some Python to do the designs (it's a strange way to work, but I like it) and then printed them out and put everything back together. And it all works, which is nice. I think the new pieces are quite a bit stronger than the old ones. And if they break, I can just change one value in the program, run it again and print out some thicker ones..

Hymers School Summer Students Visit

We had some visitors today all the way from China. They are summer school students who are visiting Hymers College in Hull.  I did a talk about developing for the Arduino which was great fun (at least I enjoyed it) even though I managed to break one of my props half way through the session.

Thanks for coming folks, and I hope you enjoyed your visit to the university.

C4DI Hardware Meetup - You Should Come Along - Really

If you live in the Hull area and have any kind of interest in technology there's a very good chance you'd enjoy a C4DI hardware meetup. They are first Thursday of every month and we have a mix of folks who like playing with computers and hardware and stuff. This month we had a Raspberry Pis of various flavours (which sounds wrong but it's right), flashing lights, amazing embedded devices you can get for less than a fiver and some brilliant discussions amongst other things.

Keep an eye on the Hull Meetup site for the next one.

RGB LED Panel Magic

Some time back I got some of these SparkFun LED panels. I hooked one up to an Arduino and got impressive results, although just driving the pixels took pretty much all the power that the Arduino had. I had this plan to use a Parallax Propeller chip or maybe something from Xmos to create a fast moving animated display. But I never got around to it.

Then I found out about the SmartMatrix Shield for the Teensy 3.1 device. This sorts out all the wiring and power supply issues (all you need is something that can spit out 5 volts at a couple of amps). The Teensy is a quite amazing machine. It pops a 72Mhz processor with 64K of RAM and 260K of ROM onto a platform the size of an Arduino Pro. The development tools integrate straight into the Arduino environment and the deployment to the device works wonderfully, far better than a "proper" Arduino.

TodayI set about building my display. Everything fits into an 8 inch picture frame that I got from HobbyCraft.

You can see it all above. The Teensy and the SmartMatrix Shield are at the bottom of the picture. I've also attached an SD card and an IR receiver that allows remote control of the display.  There's a really good set of step-by-step instructions on the AdaFruit site. I designed and printed some corner brackets to position the panel inside the frame, you can get them from Thingiverse here.

The Teensy runs the Aurora software which is completely wonderful. it produces some really lovely displays. I've had to hack it slightly to get it to work with a remote control I happened to have lying around. The display is excellent, and photographs just can't do it justice.

One other nice surprise was that I did all this on my old Surface Pro that is now running Windows 10. It took all these strange programs and usb devices in its stride and just worked. I'm looking forward to adding some more visualisations and searching down some animated gifs to play on the device.

Four Letter Word Generator

Well, here's something completely crackers that you can buy for less than ten pounds from Tindie. It's a Four Letter word associative database all on a single tiny chip. You can ask it for a random word, and then get another word kind of associated with it. There's a blog post here that tells you how it works. 

Of course I ordered one. It arrived today in a big padded envelope, sent all the way from Japan. Next I have to build a bit of hardware to read the words out and display them. I'm thinking it might make an awesome idea generator for Three Thing Game.  The "Three Thing'omatic", I can see it now.....

Happenings in the Department

Muyiwa.jpg

Muyiwa Olu  gave a really good (and Rather Useful) seminar this week about the Python language. It is great to see someone being enthusiastic about a platform they obviously enjoy working with. I reckon that every programmer should have a bit of Python in their lives, because it is just such a fun language, and it was lovely to see some of the features brought to life. A great presentation from one of our second year students. 

You can find the slide deck for the session here

Next week we have Charlotte talking about Computer Science internships and her time at Airbus Industries writing software, including some Python code...

This week we also had our first meeting of the new "Embedded Development Club". Quite a few folk turned up, if just half of them come back next week with some kit to play with then we'll consider that a win. You can find the slide deck for the presentation here

And tonight we have a Hardware Meetup at C4DI. It's all go.