BuildTak Printer Surface

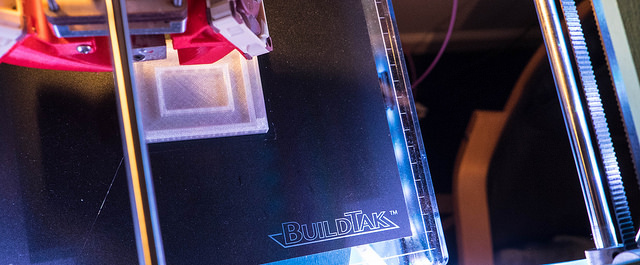
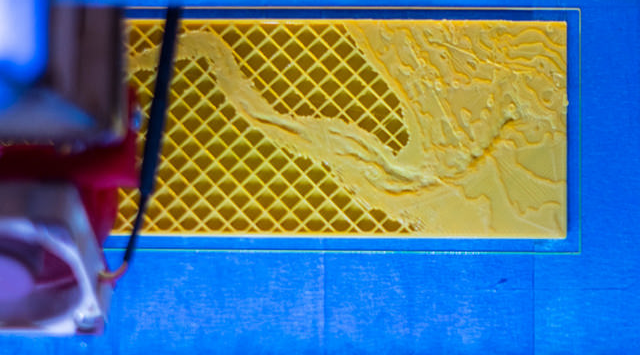
While I was at the 3D printer show a while back I picked up a sheet of BuildTak to put on Una, my Ultimaker printer. Up until now I've used 3M blue masking tape underneath all my prints, and it works quite well, but I've never been able to get a smooth finish because of the gaps between rows of the tape. 

The surface that you print on is actually quite crucial, in that the heated plastic must stick to it well enough to allow the item to be printed but not so well that you can't get the darned thing off the bed afterwards.

BuildTak manages to do this very well. If you're like me, and you've not got a printed bed for your printer, then you might like to have a play. I'm much happier with the quality of the surfaces that I've printed on the BuiltTak bed. They have a slightly rough texture but it is much better than the one provided by tape. The company says that the surface should last for a while, I've done quite a few prints now and it seems to be holding up well. 

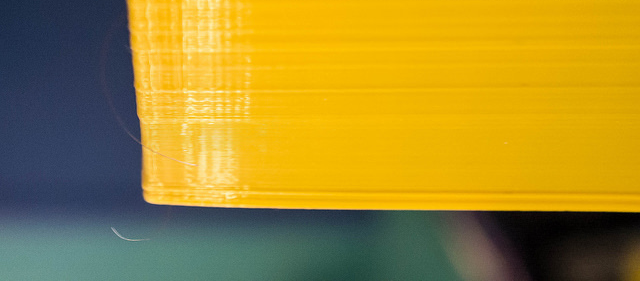
Pro top: if you are printing lots of the same thing, move each one slightly on the print bed so that it spreads the wear on the surface. Also, if you want maximum quality, move the print closer to the back of the printer. This is because when the printer is moving at speed the print bed (which is only supported at one end) will tend to waggle and leave ripples in the printed surfaces. 

3D Printer Show

Today we got up early and headed off to the 3D Printer Show in London Town. This is the third printer show that we’ve been to and I think it is fair to say that we have watched the business grow up a bit. The first one was full of people who were into 3D printing. Last year there were a lot of people who had heard about 3D printing and wanted to find out more. This year there were just a lot of, well, people.

This is the third location and I think in some ways this was a bit of a step down. Last year they had a lovely large venue with a great café which overlooked the exhibition floor. This year they had a place which was optimistically titled the “Food Court” but was actually a room where a few harassed folks were selling coffee, cakes and sandwiches. They were nice enough, but it didn’t feel quite the same.

As for the printers, there were some new brands and some old brands. Most of the printers were what we call “Fused Deposition Manufacture” or FDM. These work in the same way as a cake icing machine, squirting molten material onto a platform one layer at a time to build up a 3D structure. From the look of things this has probably reached the state of the art in terms of how to get from rolls of filament to the finished product. I reckon that Una, my Ultimaker 2 printer which is now over two years old, can still hold her head up high in the company of the newer devices.

However, there are some very interesting things happening in terms of the raw materials that we can put into our printers. There were a lot of companies showing off new designs for printing materials which improve on the ones we presently use. 

This printer can print cakes and chocolate. 

This printer prints seeds and soil, all in one, so you can make things like the display at the top of the post.

I got samples of some of these new filaments, I'm looking forward to having a go with them. 

This is one of the genuinely new printers at the show. The Roland ARM-10 is a departure for the company, which makes a lot of milling machines and CNC tools. It is interesting because it uses a different technology from the filament printers we know and love. It uses Stereo Lithography, where beams of light are shone at liquid resin, causing it to harden and generate hard objects. The prints are still built up layer by layer, like the FDM "cake icing" printers, but the layers are much thinner and the quality of the finished print much higher.

I think that Roland have probably decided that the market for FDM printers is well served at the moment and that in the future there will be a move to the higher quality that this technology can produce. Having said that, these printers cost quite a lot more to feed, with a litre of liquid resin costing over 100 pounds, and the printer itself didn't seem to offer much (if any) of an improvement on the Form Labs printer which is cheaper (and who were also at the show).

Ultimaker were there too, of course, and I had a great chat about where they see the future going. There was also some amazing 3D printed art on show. I've put a bunch more pictures on Flickr, you can find them here

I left the show with loads of ideas for things to try and stuff to play with.

Printing the Humber Estuary

Some time back we got an email from Chris in the Geography Department. He had some data that he wanted to visualise in 3D. Warren and I thought it might be fun to have a go and so Chris sent through a file and I wrote a little Python program that converts it from the DEM format that Geographers like to the STL format that Cura and Una like. Above you can see the results being displayed in FreeCad.

This is the surface being printed. You can see that the bits close to sea level have been filled in and the higher regions are being "shaded" with mostly empty space. The printer will put those bits on later. The groove is the path that the river has cut into the seabed.

This is the finished result. If you look carefully you can spot the Spurn Point at the end of the land. The height has been massively scaled up, along the top you can see some hills, this is about where the Humber Bridge goes. 

Chris wants to use the models to help people visualise what happens when an area is flooded. The next thing to do is try to produce some models with different colours for the areas above and below sea level. 

Home Made Minishift Spacers

I spent a very happy afternoon making up an ArachnidLabs MiniShift that I got a while back. At least I was very happy until I got to the point in the instructions where it said "Now, take one of the spacers and fit it to the circuit board..."

Of course I'd lost mine.

However, the good news is that I happen to have a 3D printer. And so I was able to design and print a set in a rather attractive blue colour and then continue the build. I've not tried firing them up yet. That's for next week.

3D Printed Winterfell

I'm not a fan of Game of Thrones. But I do quite like 3D printing. Our 3D printerns found a really superb 3D model of Winterfell, which is apparently a location in the program. They used the departmental Ultimaker 2 to produce a lovely version of it, so I had a go at getting Una, my home made Ultimaker 1 to print the model. And I'm very pleased with the results, which you can see above.

The great thing about this is that it really doesn't look very 3D printed. It just looks like a little model.  Looking at the picture I need to do a bit of tidying up, but the fundamentals are very solid. 

In terms of comparing an Ultimaker 1 with an Ultimaker 2 the most noticeable difference is that the Ultimaker 2 seems to be better at retraction. This is when the printing filament is pulled back into the print head prior to a move. The printers do it so that they don't leave strings of excess printing material between features on model. Una is a tiny bit more messy than the Ultimaker 2. This is probably due to the slightly larger size of the heated head. 

But overall I'm well pleased with this. 

Microsoft 3D Model Repair Service

One of our "3D Printerns" (students who are spending 8 weeks in the department over summer working on 3D printing) was using this today. It reminded me that I really ought to tell the world about it.  (like my blog is some kind of public service or whatnot.....)

Anyhoo, one of the problems with making 3D models is that sometimes you get bits of data in there that just don't make sense from a 3D point of view. Elements can intersect in odd ways or you might get tiny holes in meshes. These imperfections can cause all kinds of problems when you try to move from a model to a physical artifact.

Normally you need a person to go through and tidy the model it up, but Microsoft have a free, cloud based, service that will just accept your models and tidy them up for you. It's all free, and very useful. You can find it here.

Improving 3D Printer Quality by Adjusting the Temperature

For a while now I've been trying to improve the quality of prints from Una the Ultimaker. I've replaced quite a few bits and bobs here and there and she is now pretty reliable. But I've been having problems with "lumpy layers". Objects with flat sides end up having lots of ridges in them, as if the printer was laying down layers of different thicknesses.

You can see the effect above. The layers at the bottom of the print are nice and smooth, and then they suddenly become thicker and more uneven. This is not a huge problem but, me being me, I've been trying to figure out what causes it, particularly as earlier prints didn't seem to have the same problem. 

Turns out that it is all down to temperature. I used a plugin which is part of the Cura slicer which converts designs into printer instructions. The plugin lets you tweak printer settings at different heights during printing. The layers at the bottom of the print were printed at 210 degrees centigrade, then it switched to 215 and so on upwards in steps of 5 degrees. The effect of the changes is much more significant than I thought it would be. I've noticed that different makes and colours of printing material have quite different temperature profiles. I think I'll have to do a test print like this for each one and then set decide on an optimal temperature.

Oh, and I also managed to include a human hair in the picture so that you can get some idea of scale. It really is astonishing how precisely this technology can be made to work. 

Update: One thought occurred to me after writing this post. The temperatures I'm quoting are as reported by Una, and are probably unique to her (it) as different machines will have different arrangements of print head and temperature sensor. If the temperatures that I mention don't work for you the try different ones, the important point here is that it is worth calibrating your machine for each different material. 

Home to a Bluetooth Printer

We spent the night in Whitby at the Dolphin Hotel. We had a lovely large room which overlooks the bridge right in the centre of the town. I took the photo from the room first thing in the morning, just before we headed down for a really nice (and huge) breakfast. If you are looking for somewhere to stay, I strongly recommend the place.

Then we headed home and I found some time to finish off the hardware for the Bluetooth printer I've been working on.  Note how it is a Bluetooth device, and I've put it in a bright yellow enclosure. And why not....

When I designed the box it seemed like a good idea to put the switch in the bottom. Of course it is actually a bit silly, as whenever you put the box down you turn it on or off. Fortunately I have some bit stick-on feet that help with this, but I'm going to have to refine the design anyway as I don't seem to have left much room to allow the actual construction of the device.....

This is the guts of the printer, just a bunch of batteries and a trusty Bluetooth adapter. I'll post full details of construction and the software later this week. 

C4DI Hardware Meetup - With Nerf Guns

Lots of Industry

Lots of Industry

Tonight was our second hardware meetup at C4DI. I knew that things were going to go well when I arrived to find everyone had already set up and was building stuff and making it do things without us needing to do anything. Peter was in charge of the exercise tonight (you can find his lab here) and he had made really good use of the flex sensor in the SparkFun Redboard Kit to create a shooting game that you can play with Nerf guns. Which he had thoughtfully provided too....

Everyone had great fun building up the circuit, getting the software working and playing with the result. The lab was great because it shows how you can create a fully formed solution (a shooting game where you have a few seconds to hit the target three times) based on this technology. 

No Cows were harmed in the making of this game

No Cows were harmed in the making of this game

Peter had even provided a bunch of 3D printed parts that support the flex sensor target, and some cows (taken from milk cartons) to use as targets. 

Making 3D Pictures with Cura

Just found out that the lovely Cura software that I use to slice 3D models for the my lovely Ultimaker printer will also import images and then create 3D landscapes from them. It will assign the height of points on the surface to the brightness (or darkness) of the image. You can use it to make rather nice renderings of text. I've actually printed out the above and will be giving to one lucky person who registers for our Careers and Internships event next week.  I'm also going to print out some 3D Business Cards. 

The event is on April 2nd and there will be free food, drink, business cards and mugs and other merchandise. Just for turning up and maybe getting an internship or a career. 

You can register here.

An Ultimaker 2 in the Department

I've had my Ultimaker printer for nearly two years now. It was around now in 2012 that I ordered it, and the kit took around 6 weeks to arrive as they were very popular.

I've had a lot of fun with Una the Ultimaker. I've replaced her drive mechanism, print head, pulleys and print bed supports and added end caps and a bunch of other things. And I've printed one or two items as well. I like Una very much and most of the time she rewards me with good looking output.

Mr. Burns seems to approve

Mr. Burns seems to approve

This week our departmental 3D printer arrived. They asked me what to get and of course I said we should get an Ultimaker. But I suggested we get an Ultimaker 2 as this is pre-built and looks to have moved the field on a bit. It took around 6 weeks to arrive as they are very popular, so some things haven't changed I suppose.

I set the new printer up in my office and had it working within half an hour or so of opening the box. It is fundamentally the same as Una, but is much more of an appliance.  It has lost a lot of the "home spun charm" of the original, but replaced this with a slickness that would make it much more viable as a printer that you get because you want to print stuff, rather than tinker with the printer itself.

Some design changes took me by surprise. You now set things like print temperature on the printer rather than in the slicing program. This actually makes a lot of sense, in that you will need to customise your printing for different kinds of fibre and you don't want to re-slice the model every time. The integration with Cura, the program that converts your designs ready for printing, is impressive and once I'd fed the fibre into the machine (the only tricky part of the setup) I was turning out prints that were at least as good as ones from Una. The only real problem for me was that the heated bed was set to a temperature which was much higher than it should be for the PLA plastic I was printing. I turned the temperature down to 60 degrees and things got a lot better. 

I do miss the sense of control that I have with Una. The print display on the Ultimaker 2 just tells you how much time is left on the print, rather than the other useful metrics that I get. However I'd be much happier leaving the new one to print on its own, something that I'm not keen to do with my printer. 

One major improvement with the Ultimaker 2 is the fan arrangement around the print head, which blows cooling air from both sides onto the object being printed, so that there is a better chance of the next print layer being put down onto solid plastic.

I really liked this, so I had a look around to see if I could find something similar for Una. I found this design and so tonight I spent a happy couple of hours installing some new fan ducts along with a pair of very posh fans that are completely silent in operation. I reckon this has made quite a difference to the printed output, the definition on both sides of my owl test piece is now much better than before. Previously the right hand side of the owl face was a bit of a mess because it faces away from the fan. Now things are a lot more symmetrical. 

The next step is to change the fan arrangement on Una to make her a bit quieter. The Ultimaker 2 is very quiet in operation and I want to get rid of the rattling fan that was supplied as part of my kit, and seems to be rattling even more now.

If you want to get a printer that represents state of the art in FDM (Fused Deposition Modelling) printing then I reckon you'll do well with the Ultimaker 2. It produced some of the best prints I've ever seen right out of the box and is a very well presented package. 

Printing Vases with Ultimaker

Some time back I found the "Spiralize" options in the Expert settings for Cura, the slicing program that I use when I'm printing with Una the Ultimaker. This lets you take a solid object and generates a print that just wraps a single layer print round the outside of the object.

It is called "Spiralize" because the print ends up being one long spiral, with the head laying down successive layers as it goes round and round in circles. The print that you get is very thin, rather like a lampshade, but if you use translucent materials (like the  nice transparent fibre from Faberdashery) the results are rather good.